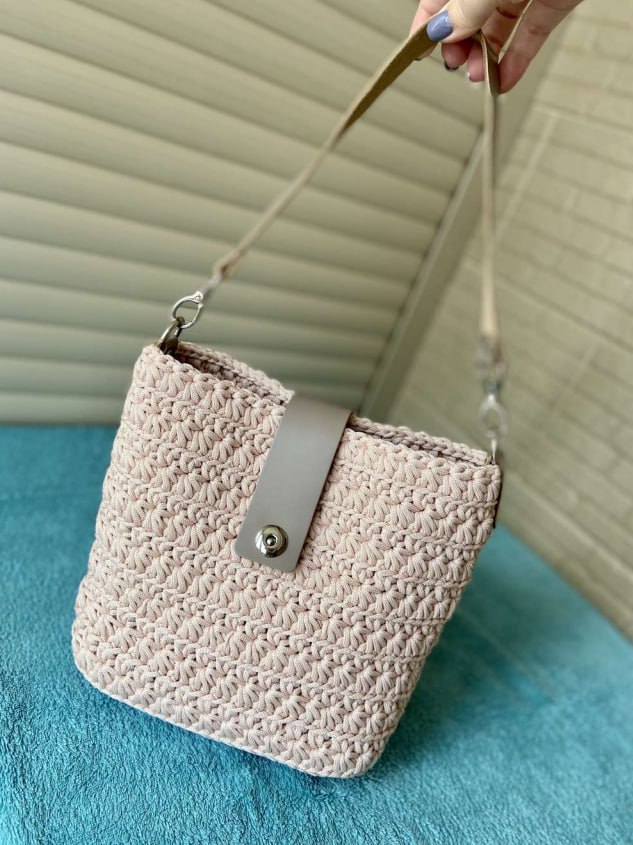
Craft Your Own Designer-Style Snowflake Tote: A Professional Crochet Guide
How to Crochet a Snowflake Tote Bag: Step-by-Step Tutorial
Create a stunning, structured accessory with this intermediate-level crochet project. This “Snowflake” tote bag combines the durability of polyester cord with elegant leather accents for a professional, high-end look. Follow our detailed guide to craft your own.
Materials Needed
- Yarn: Approximately 200 meters of 3mm polyester cord.
- Crochet Hooks:
- 3.5 mm (for the bottom edging)
- 4.0 mm (for the main body)
- Hardware Kit:
- Leather bottom base (20 x 10 cm)
- Leather strap and strap holders
- Leather pocket/flap and snap button
- Tools:
- Sewing needle (for leather)
- Pins
- Waxed thread (or heavy-duty thread)
- Phillips head screwdriver
- Iron or steamer
Crochet Abbreviations (US Terms)
- Ch: Chain
- Sc: Single Crochet
- Hdc: Half Double Crochet
- Sl st: Slip Stitch
Step-by-Step Instructions
Step 1: Edging the Leather Bottom
Start by preparing the foundation of your bag using the 3.5 mm crochet hook and the 20×10 cm leather base.
- Begin at the designated starting hole of the leather base.
- Leave a tail of approximately 15 cm for securing later.
- Work Single Crochets (Sc) around the entire perimeter of the leather base according to the placement holes.
- You should have a total of 78 Sc around the base.
Step 2: Building the First Row
Switch to the 4.0 mm crochet hook for the rest of the bag body.
- Work in Single Crochets (Sc). Insert the hook under the back loop and the connecting bridge of the previous stitch.
- To provide structure and shape, create 4 double increases (two stitches in one) at each of the four corners.
- The total stitch count for this row should be 82 Sc.
- Tip: Weave in the starting tail for the first 6-8 stitches, then trim and carefully singe the end to prevent unraveling.
Step 3: The Snowflake Pattern
The main body of the bag is worked in the round, with every row ending in a slip stitch.
- The “Snowflake” design is a two-row repeat.
- Continue working the pattern until the bag reaches a height of 20 cm (this typically takes about 7.5 repeats).
- Important: Ensure there are exactly 41 snowflakes in every row to maintain the pattern’s symmetry.
- If you prefer a taller or shorter bag, simply adjust the number of repeats.
Step 4: Finishing the Body
- Once you reach your desired height, join the final row.
- Perform a finishing edge on the wrong side of the fabric. This creates a cleaner look and makes the upper rim of the bag firmer and more durable.
- Secure the cord ends firmly.
Step 5: Shaping and Blocking (VTO)
To give the bag its professional structure, you must perform a “wet blocking” or steaming process.
- Roll up a small terry cloth towel and place it inside the bag to help it hold its shape.
- Gently pull and smooth the crochet fabric.
- Using a steamer or an iron on a medium setting (synthetic fabric setting), steam the bag through a pressing cloth. Do not press the iron directly onto the fabric; hold it slightly above.
- Avoid steaming the leather parts.
- While the fabric is still warm and damp, make final adjustments to the width and length.
- Let the bag sit and cool completely to “set” the shape.
Installing the Leather Hardware
Positioning
- Use markers to identify the side positions for the strap holders. Ensure the fabric is not skewed.
- Mark the center of the front and back panels to help align the pocket and the closure flap.
Hardware Attachment
- Strap Holders: Install the strap holders first using a Phillips head screwdriver. This makes it easier to align the remaining pieces.
- The Pocket: Position the leather pocket on the side where the connecting seam is located. Leave a gap of one pattern repeat from the edge. Pin it in place and sew it using waxed thread or heavy-duty thread.
- The Closure Flap: Sew the strap/flap to the bag. Ensure the top seam is approximately 2 cm from the top edge so the flap lies flat without pulling the fabric.
- The Snap Button: Once the flap is secure, position the receiving part of the snap button on the front. Ensure the bag closes completely and the flap doesn’t bunch the fabric before sewing it in place.
Final Touches
- Optional Lining: If you wish to add a fabric lining, do so now. Align the lining height with the lower screw of the strap holder.
- Final Steam: Repeat the blocking process by placing a towel inside and lightly steaming one last time. Let it cool for several hours.
Your Snowflake Tote Bag is now complete and ready to use!