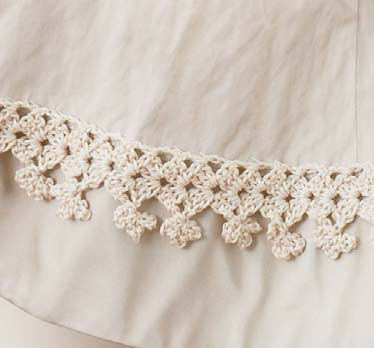
Beautiful Crochet Skirt Edging Pattern: How to Add a Lace Border to Your Skirt
Have you ever looked at a favorite simple skirt and felt it was just missing a little something extra? One of the fastest and most rewarding ways to elevate your wardrobe is by adding a handmade crochet trim. Whether you are looking to give an old skirt a bohemian flair or want to add a touch of elegance to a new purchase, a delicate lace edging is the perfect solution.
In this tutorial, we will walk you through a lovely, airy lace border that creates a scalloped effect. This pattern is designed to be worked as a long strip that is later sewn onto the garment, making it much easier for beginners to manage than crocheting directly into the fabric. By the end of this project, you will have a professional-looking trim that adds texture and charm to any outfit.
Materials & Abbreviations
Before you pick up your hook, gather all your supplies. Because this is a delicate edging, using a thinner yarn will ensure the lace remains light and doesn’t weigh down the fabric of your skirt.
Supplies Needed
- Yarn: Lace weight yarn. One 50g ball (approximately 1.75 oz) will yield roughly 72 inches of edging. Choose a color that matches your skirt for a seamless look or a contrasting color for a bold statement.
- Crochet Hook: 3.5 mm (US size E/4) crochet hook. If your tension is naturally tight, you may want to go up a half-size to keep the lace supple.
- Notions: A sewing needle, matching thread, and straight pins for positioning.
- The Garment: A purchased or handmade skirt ready for embellishment.
Stitch Glossary (US Terms)
This pattern uses standard US crochet terminology. If you are new to the craft, here are the abbreviations we will be using:
- Ch: Chain
- Dc: Double Crochet
- Sl st: Slip Stitch
- Sp: Space
- Rep: Repeat
- RS: Right Side (the “pretty” side of the work)
- WS: Wrong Side (the back of the work)
Tension Guide
To achieve the correct size for this trim, your tension should be approximately 26 single crochet stitches and 28 rows over a 4-inch square. If your work is too loose or too tight, adjust your hook size accordingly.
Step-by-Step Instructions
This edging is worked in rows, creating a repeating pattern of shells and loops. We will start by creating a foundation and then establish a two-row repeat that you will follow until the strip is long enough to wrap around your skirt.
The Foundation and First Row
Start by creating your starting chain. This sets the width of your lace trim.
Starting Chain: Chain 4.
Row 1 (Wrong Side): Work (2 dc, ch 2, 3 dc) all into the 4th chain from your hook. This creates your first small shell. Turn your work.
Establishing the Pattern (Row 2)
Row 2 is where we begin to build the height and the decorative loops of the edging.
Row 2: Chain 6. Slip stitch in the 4th chain from the hook. Now, we create the decorative picot-style loops: (Chain 3, slip stitch in the same space as the last slip stitch) and repeat this a second time. Chain 2. Now, work the shell: (3 dc, ch 2, 3 dc) into the next ch-2 space from the previous row. Turn your work.
Completing the Repeat (Row 3)
Row 3 serves to stabilize the work and prepare the foundation for the next set of loops.
Row 3: Slip stitch in each of the first 3 double crochets and then slip stitch into the ch-2 space. Chain 3 (this counts as your first double crochet). In that same ch-2 space, work (2 dc, ch 2, 3 dc). Turn your work.
Growing Your Lace Strip
Now that you have completed the first three rows, you have established the pattern. To finish the trim, simply repeat Row 2 and Row 3.
Continue repeating these two rows until the edging measures the required length to fit comfortably around the lower edge of your skirt. Make sure to end your work on a Right Side (RS) row to ensure the pattern looks consistent. Once you have reached the desired length, fasten off your yarn.
Finishing the Project
Once your lace strip is complete, it is time to attach it to your garment. This is the most important part for ensuring the skirt hangs correctly and the lace doesn’t pucker.
Positioning: Lay your skirt flat on a table. For a classic look, position the top edge of the crochet trim 4 inches above the bottom hem of the skirt. This creates a beautiful layered effect where the lace floats just above the edge of the fabric.
Pinning: Use your straight pins to secure the lace around the entire circumference of the skirt. Ensure the lace is not stretched too tight or sagging too much. Pin every few inches to keep the trim steady.
Sewing: Using a sewing needle and matching thread, use a small whipstitch or a running stitch to sew the top edge of the crochet trim to the skirt. Be careful to keep your stitches small and hidden within the crochet work for a professional finish.
Tips for a Professional Result
Adding crochet to clothing can be intimidating, but a few simple tricks can make your project look store-bought:
Choose the Right Yarn
Since this is a lace pattern, avoid using thick or “bulky” yarns. A heavy yarn will cause the skirt to sag or pull. Stick to cotton or a cotton-blend lace weight yarn for the best drape and durability.
Manage Your Tension
The “shell” stitches (the groups of double crochets) can sometimes become too tight, which makes the lace look stiff. Try to keep your hook movements relaxed. If the shell isn’t fitting easily into the chain space, move up to a slightly larger hook.
Measuring Your Skirt
Don’t just guess the length of the lace strip! Use a measuring tape to find the exact circumference of the skirt at the point where you intend to sew the trim. I recommend adding an extra inch to your total length to account for the join where the two ends of the lace meet; this prevents the trim from pulling the fabric of the skirt.
Blocking Your Lace
For an extra-crisp look, “block” your crochet strip before sewing it onto the skirt. Pin the strip to a foam board and lightly steam it with an iron (without touching the iron directly to the yarn if it is acrylic). This opens up the lace stitches and makes the scalloped edges perfectly uniform.