Adorable Amigurumi Snail Crochet Pattern: A Step-by-Step Tutorial
Looking for a sweet and simple project to brighten up your crochet nook? This adorable amigurumi snail is the perfect companion for beginners and experienced makers alike. With its bright colors and whimsical shape, this little snail makes a fantastic gift, a cute desk buddy, or a wonderful way to use up some scrap yarn from your stash. In this tutorial, we will walk you through the process of creating this charming creature from scratch, using easy-to-follow instructions and standard US crochet terms.
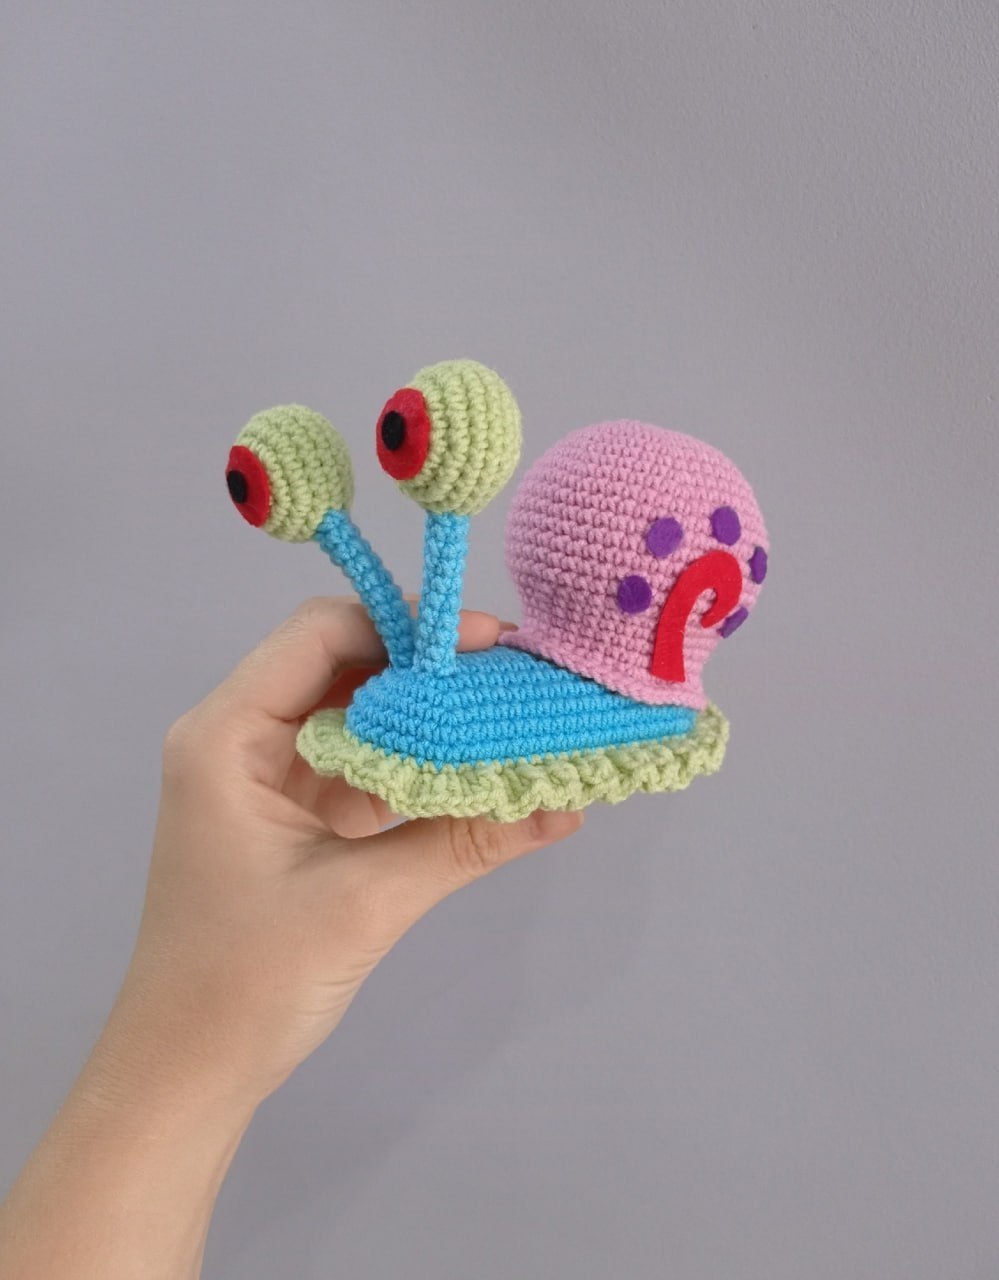
The beauty of this pattern is its modular design. You will create the shell, the body, and the eyes separately, and then assemble them at the end to bring your snail to life. Whether you want a classic garden snail or a colorful fantasy creature, you can easily customize the yarn colors to suit your style. Let’s grab our hooks and get started!
Materials & Abbreviations
Before we dive into the stitches, make sure you have all your supplies ready. To achieve the look shown in the tutorial, we recommend using a medium-weight (worsted) acrylic or cotton yarn for a sturdy finish.
Supplies Needed:
- Yarn: Medium weight (Size 4) yarn in Pink, Light Blue, and Pale Green.
- Crochet Hook: 3.25mm or 3.5mm (D or E) hook to keep stitches tight so stuffing doesn’t show through.
- Stuffing: Polyester fiberfill or a similar stuffing material.
- Notions: Yarn needle, scissors, and stitch markers.
- Details: Small scraps of red and purple felt (or embroidery thread) for the shell decorations and black safety eyes or embroidery thread for the pupils.
Abbreviations (US Terms):
- ch: chain
- sc: single crochet
- inc: increase (2 sc in the same stitch)
- dec: decrease (sc 2 stitches together)
- dc: double crochet
- MR: magic ring
- FLO: front loop only
- st(s): stitch(es)
- rnd: round
Step-by-Step Instructions
The Pink Shell
The shell is worked in an oval shape to give the snail a realistic, rounded look. We will start with a foundation chain and work around both sides of it.
- Rnd 1: Ch 6. Starting in the 2nd ch from hook: inc, 3 sc, 3 sc in the last ch. Now working along the other side of the chain: 4 sc. (12 sts)
- Rnd 2: inc x2, 3 sc, inc x3, 3 sc, inc. (18 sts)
- Rnd 3: (1 sc, inc) x2, 4 sc, (inc, 1 sc) x2, inc, 4 sc, inc. (24 sts)
- Rnd 4: (2 sc, inc) x2, 5 sc, (inc, 2 sc) x2, inc, 5 sc, inc. (30 sts)
- Rnd 5: (3 sc, inc) x2, 6 sc, (inc, 3 sc) x2, inc, 6 sc, inc. (36 sts)
- Rnd 6: sc in each st around. (36 sts)
- Rnd 7: (4 sc, inc) x2, 7 sc, (inc, 4 sc) x2, inc, 7 sc, inc. (42 sts)
- Rnd 8: (5 sc, inc) x2, 8 sc, (inc, 5 sc) x2, inc, 8 sc, inc. (48 sts)
- Rnd 9-15: sc in each st around for 7 rounds. (48 sts)
- Rnd 16: (5 sc, dec) x2, 8 sc, (dec, 5 sc) x2, dec, 8 sc, dec. (42 sts)
- Rnd 17: (4 sc, dec) x2, 7 sc, (dec, 4 sc) x2, dec, 7 sc, dec. (36 sts)
- Rnd 18-20: sc in each st around. (36 sts)
- Rnd 21: (5 sc, inc) x6. (42 sts)
- Rnd 22: (6 sc, inc) x6. (48 sts)
Fasten off, leaving a long tail for sewing the shell to the body.
The Body: Upper Part
The body is worked in two halves—an upper part in light blue and a lower part in green—which are later joined together.
Using Light Blue Yarn:
- Rnd 1: Ch 19. Starting in the 2nd ch from hook: inc, 16 sc, 3 sc in the last ch. Working along the other side of the chain: 17 sc. (38 sts)
- Rnd 2: inc x2, 16 sc, inc x3, 16 sc, inc. (44 sts)
- Rnd 3: (1 sc, inc) x2, 17 sc, (inc, 1 sc) x2, inc, 17 sc, inc. (50 sts)
- Rnd 4: (2 sc, inc) x2, 18 sc, (inc, 2 sc) x2, inc, 18 sc, inc. (56 sts)
- Rnd 5: (3 sc, inc) x2, 19 sc, (inc, 3 sc) x2, inc, 19 sc, inc. (62 sts)
- Rnd 6-7: sc in each st around. (62 sts)
- Rnd 8: Switch to Pale Green yarn. sc in each st around. (62 sts)
- Rnd 9: Working in the FLO (front loop only), work 2 dc in every stitch around to create a ruffled edge. (124 sts)
Fasten off.
The Body: Lower Part
The lower part is a mirror of the upper part but is worked entirely in Pale Green yarn and is shorter.
- Rnd 1-5: Repeat the instructions for the Upper Part (Rnd 1 through Rnd 5), using Pale Green yarn for all rounds.
Fasten off, leaving a tail for sewing.
The Eyes
You will need to make two of these. Use Pale Green yarn.
- Rnd 1: 6 sc in a MR. (6 sts)
- Rnd 2: inc x6. (12 sts)
- Rnd 3: (1 sc, inc) x6. (18 sts)
- Rnd 4: (2 sc, inc) x6. (24 sts)
- Rnd 5-7: sc in each st around. (24 sts)
- Rnd 8: (2 sc, dec) x6. (18 sts)
- Rnd 9: (1 sc, dec) x6. (12 sts)
- Rnd 10: dec x6. (6 sts)
Fasten off and weave in the ends securely.
The Eye Stalks
Make two stalks using Light Blue yarn.
- Rnd 1: Ch 7, join into a circle with a slip stitch to form a ring.
- Rnd 2-11: sc in each st around (7 sc per round).
Fasten off, leaving a long tail for sewing.
Finishing & Assembly
Now comes the fun part—putting your snail together! Follow these steps for a clean, professional look:
1. Assemble the Body
Place the upper (blue) body part and lower (green) body part right sides together. Using a yarn needle and matching yarn, sew the two pieces together. As you sew, lightly stuff the body with fiberfill. Do not overstuff, or the body may lose its flat, snail-like shape.
2. Attach the Shell
Place the pink shell on the back of the body. Position it so it sits centrally. Sew the bottom edge of the shell to the blue portion of the body. Stuff the shell firmly before closing the seam completely.
3. Add the Eyes and Stalks
Sew the eye stalks to the front of the body, ensuring they are evenly spaced. Then, sew the green eyes to the top of each stalk. For the pupils, you can use safety eyes or embroider small black circles using black yarn or thread.
4. Final Decorations
To give your snail some personality, add decorations to the shell. Cut a small red spiral and several purple dots from felt and glue them onto the pink shell. Alternatively, you can embroider these details directly onto the crochet fabric.
Tips for Success
- Maintain Tension: Since amigurumi requires a dense fabric to keep the stuffing inside, keep your tension consistent. If you see gaps, try dropping down a hook size.
- Use Stitch Markers: Because these pieces are worked in continuous spirals, it is very easy to lose track of where your round ends. Place a marker in the first stitch of every round.
- Stuffing Strategy: When stuffing the body, use small clumps of fiberfill and push them into the corners with your finger to avoid lumps.
- Invisible Decrease: To make your decreases less noticeable, use the “invisible decrease” method (working into the front loops of the next two stitches) for the eyes.