How to Crochet a Winter Teddy Bear in a Cozy Sweater: Free Amigurumi Pattern
Introduction
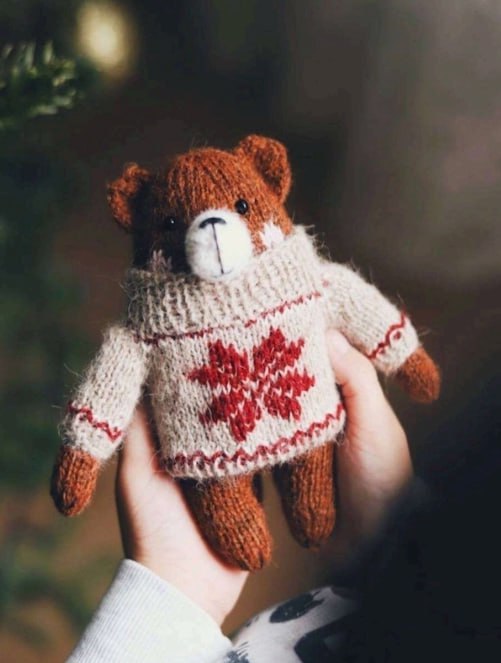
There is nothing quite as charming as a handmade plush teddy bear bundled up for cold weather! This free winter teddy bear crochet pattern guides you step-by-step through creating an adorable, classic stuffed bear complete with a cozy turtleneck sweater featuring a festive snowflake detail. Standing approximately 7.5 inches tall, this finished amigurumi bear makes a wonderful holiday gift, nursery accent, or cozy addition to your seasonal home decor.
Whether you are an intermediate amigurumi maker or an ambitious beginner, this tutorial uses straightforward US crochet stitches and clear assembly instructions to ensure your project turns out beautifully. Grab your hook, pick your favorite winter yarn colors, and let’s get crocheting!
Materials & Abbreviations
Supplies Needed
- Yarn: Light Worsted Weight (Category 3) or Sport Weight Yarn
- Main Bear Color (Medium Brown): approx. 110 yards
- Sweater Color (Cream / Off-White): approx. 65 yards
- Sweater Accent Color (Dark Red or Forest Green): approx. 15 yards
- Muzzle Color (White): approx. 10 yards
- Crochet Hook: US Size C-2 (2.75 mm) or D-3 (3.25 mm) hook
- Safety Eyes: One pair of 6 mm black safety eyes
- Stuffing: Polyester fiberfill stuffing
- Notions: Tapestry/yarn needle, black embroidery floss, stitch markers, straight pins, and scissors
Finished Size
When made with recommended yarn and hook size, your completed teddy bear will measure approximately 7.5 inches (19 cm) tall from head to toe.
Crochet Abbreviations (US Terms)
- ch: chain
- sc: single crochet
- inc: increase (work 2 single crochets in the same stitch)
- dec: decrease (single crochet 2 stitches together)
- st(s): stitch(es)
- rnd(s): round(s)
- BLO: back loop only
- FLO: front loop only
- sl st: slip stitch
- [ ]: repeat instructions within brackets the specified number of times
- ( ): total stitch count at the end of the round
Step-by-Step Instructions
Head and Torso (Worked Top-Down)
Using Brown Yarn, work in continuous spiral rounds. Use a stitch marker to mark the beginning of each round.
Rnd 1: Start with a magic ring, work 6 sc into the ring. (6 sts)
Rnd 2: Work 2 sc in each st around. (12 sts)
Rnd 3: [1 sc, inc] 6 times. (18 sts)
Rnd 4: [2 sc, inc] 6 times. (24 sts)
Rnd 5: [3 sc, inc] 6 times. (30 sts)
Rnd 6: [4 sc, inc] 6 times. (36 sts)
Rnd 7: [5 sc, inc] 6 times. (42 sts)
Rnds 8–16: Sc in each st around. (42 sts)
Eye Placement Note: Insert the 6 mm safety eyes between Rounds 12 and 13, leaving approximately 8 stitches visible between them.
Rnds 17–45: Sc in each st around. (42 sts)
Begin stuffing the head firmly with fiberfill stuffing, continuing to add stuffing into the torso as you work down.
Legs (Worked Bottom Split)
We will now divide the bottom 42 stitches of the body to form two separate legs. Count 18 stitches for the first leg, leaving 3 stitches open at the front center and 3 stitches open at the back center between the legs.
First Leg:
Rnd 1: Join brown yarn at the inner side of the leg opening. Sc in each of the 18 leg stitches around. (18 sts)
Rnds 2–8: Sc in each st around. (18 sts)
Rnd 9: [4 sc, dec] 3 times. (15 sts)
Rnd 10: [3 sc, dec] 3 times. (12 sts)
Rnd 11: [1 sc, dec] 4 times. (8 sts)
Stuff the leg firmly with fiberfill.
Rnd 12: Dec 4 times around. (4 sts)
Fasten off, weave the yarn tail through the front loops of the remaining 4 stitches, pull tight to close, and weave in the end.
Second Leg:
Join brown yarn on the opposite side across the remaining 18 leg stitches. Repeat Rounds 1 through 12 as worked for the first leg.
Before closing the second leg completely, stuff the body torso and both legs securely. Use a small yarn tail to sew closed the small 3-stitch gap between the legs at the front and back center.
Muzzle
Using White Yarn, work in continuous rounds:
Rnd 1: Make a magic ring, work 6 sc into ring. (6 sts)
Rnd 2: Work 2 sc in each st around. (12 sts)
Rnd 3: [1 sc, inc] 6 times. (18 sts)
Rnds 4–6: Sc in each st around. (18 sts)
Fasten off, leaving a 10-inch yarn tail for sewing.
Ears (Make 2)
Using Brown Yarn, work in continuous rounds:
Rnd 1: Make a magic ring, work 6 sc into ring. (6 sts)
Rnd 2: Work 2 sc in each st around. (12 sts)
Rnd 3: [1 sc, inc] 6 times. (18 sts)
Rnds 4–5: Sc in each st around. (18 sts)
Fasten off, leaving a long tail for sewing. Do not stuff the ears. Press them flat.
Arms (Make 2)
Using Brown Yarn, work in continuous rounds:
Rnd 1: Make a magic ring, work 6 sc into ring. (6 sts)
Rnd 2: Work 2 sc in each st around. (12 sts)
Rnds 3–20: Sc in each st around. (12 sts)
Stuff only the lower half of the arm lightly. Leave the upper half unstuffed so the arms lie naturally flat against the body. Press the top opening flat and sc 6 stitches across the top edge to seal. Fasten off with a long tail.
Cozy Snowflake Sweater
The sweater is crocheted separately in Cream yarn with ribbed collar and armhole openings.
Ribbed Turtleneck Collar:
Using Cream Yarn, chain 10.
Row 1: Sc in 2nd ch from hook and in each ch across, turn. (9 sc)
Rows 2–36: Working in BLO, ch 1, sc in each st across, turn. (9 sc)
Fold the narrow ends together and slip stitch the short sides to form a ribbed circular collar tube. Do not fasten off.
Sweater Body:
Turn the collar sideways to work along the long edge of the ribbed collar ring.
Rnd 1: Ch 1, work 36 sc evenly around the edge of the ribbed collar, sl st to join. (36 sts)
Rnd 2: [5 sc, inc] 6 times. (42 sts)
Rnd 3: [6 sc, inc] 6 times. (48 sts)
Rnd 4: [7 sc, inc] 6 times. (54 sts)
Rnd 5 (Armhole Creation): Sc 8, ch 6, skip 11 sts (first armhole), sc 16, ch 6, skip 11 sts (second armhole), sc 8. (44 sts total)
Rnds 6–16: Sc in each st around. (44 sts)
Attach Accent Red Yarn for bottom sweater hem:
Rnd 17: In BLO, [1 sc, sl st] in each st around. Fasten off and weave in ends.
Sweater Sleeves (Make 2):
Attach Cream yarn at the underarm of one armhole opening.
Rnd 1: Work 11 sc around skipped stitches and 3 sc along underarm chain. (14 sts)
Rnds 2–10: Sc in each st around. (14 sts)
Attach Accent Red Yarn:
Rnd 11: In BLO, [1 sc, sl st] in each st around to form cuff trim. Fasten off.
Finishing
Assembling the Face
Position the white muzzle centered on the lower face between Rounds 12 and 18, directly below the safety eyes. Pin in place. Sew around the perimeter with the long yarn tail, placing a small amount of fiberfill stuffing underneath before sealing.
Using black embroidery floss and a tapestry needle, stitch a small triangular nose at the top center of the muzzle, followed by a vertical straight line down to form a classic bear mouth.
Attaching Ears and Arms
Pinch the ears slightly at the base and pin them onto the top sides of the head between Rounds 4 and 9. Stitch securely using the long yarn tails.
Slip the crocheted sweater onto the bear body through the turtleneck opening. Position the arms at the sides of the bear body just under the armholes of the sweater (around Round 22 of the body) and sew firmly through both sweater and body.
Embroidering the Snowflake Detail
Using Red Yarn and a tapestry needle, embroider a bold 8-pointed star or classic fair-isle snowflake pattern onto the chest of the cream sweater using straight embroidery stitches.
Tips for Success
- Maintain Tight Gauge: Amigurumi requires a tight stitch gauge so that polyester fiberfill stuffing does not peek through the stitches. If you notice gaps, decrease your hook size by 0.5 mm.
- Stuffing Technique: Add fiberfill in small clumps rather than one large ball. Shape the head and body gently with your hands as you stuff to maintain a smooth silhouette.
- Yarn Customization: Experiment with traditional holiday color combinations like forest green and burgundy red, or try pastel grey and ice blue for a gentle winter nursery look.
- Child Safety Note: If making this bear for infants or young children under 3 years old, replace plastic safety eyes with embroidered French knots for maximum safety.