Adorable Crochet Baby Deer Pattern: Step-by-Step Amigurumi Tutorial
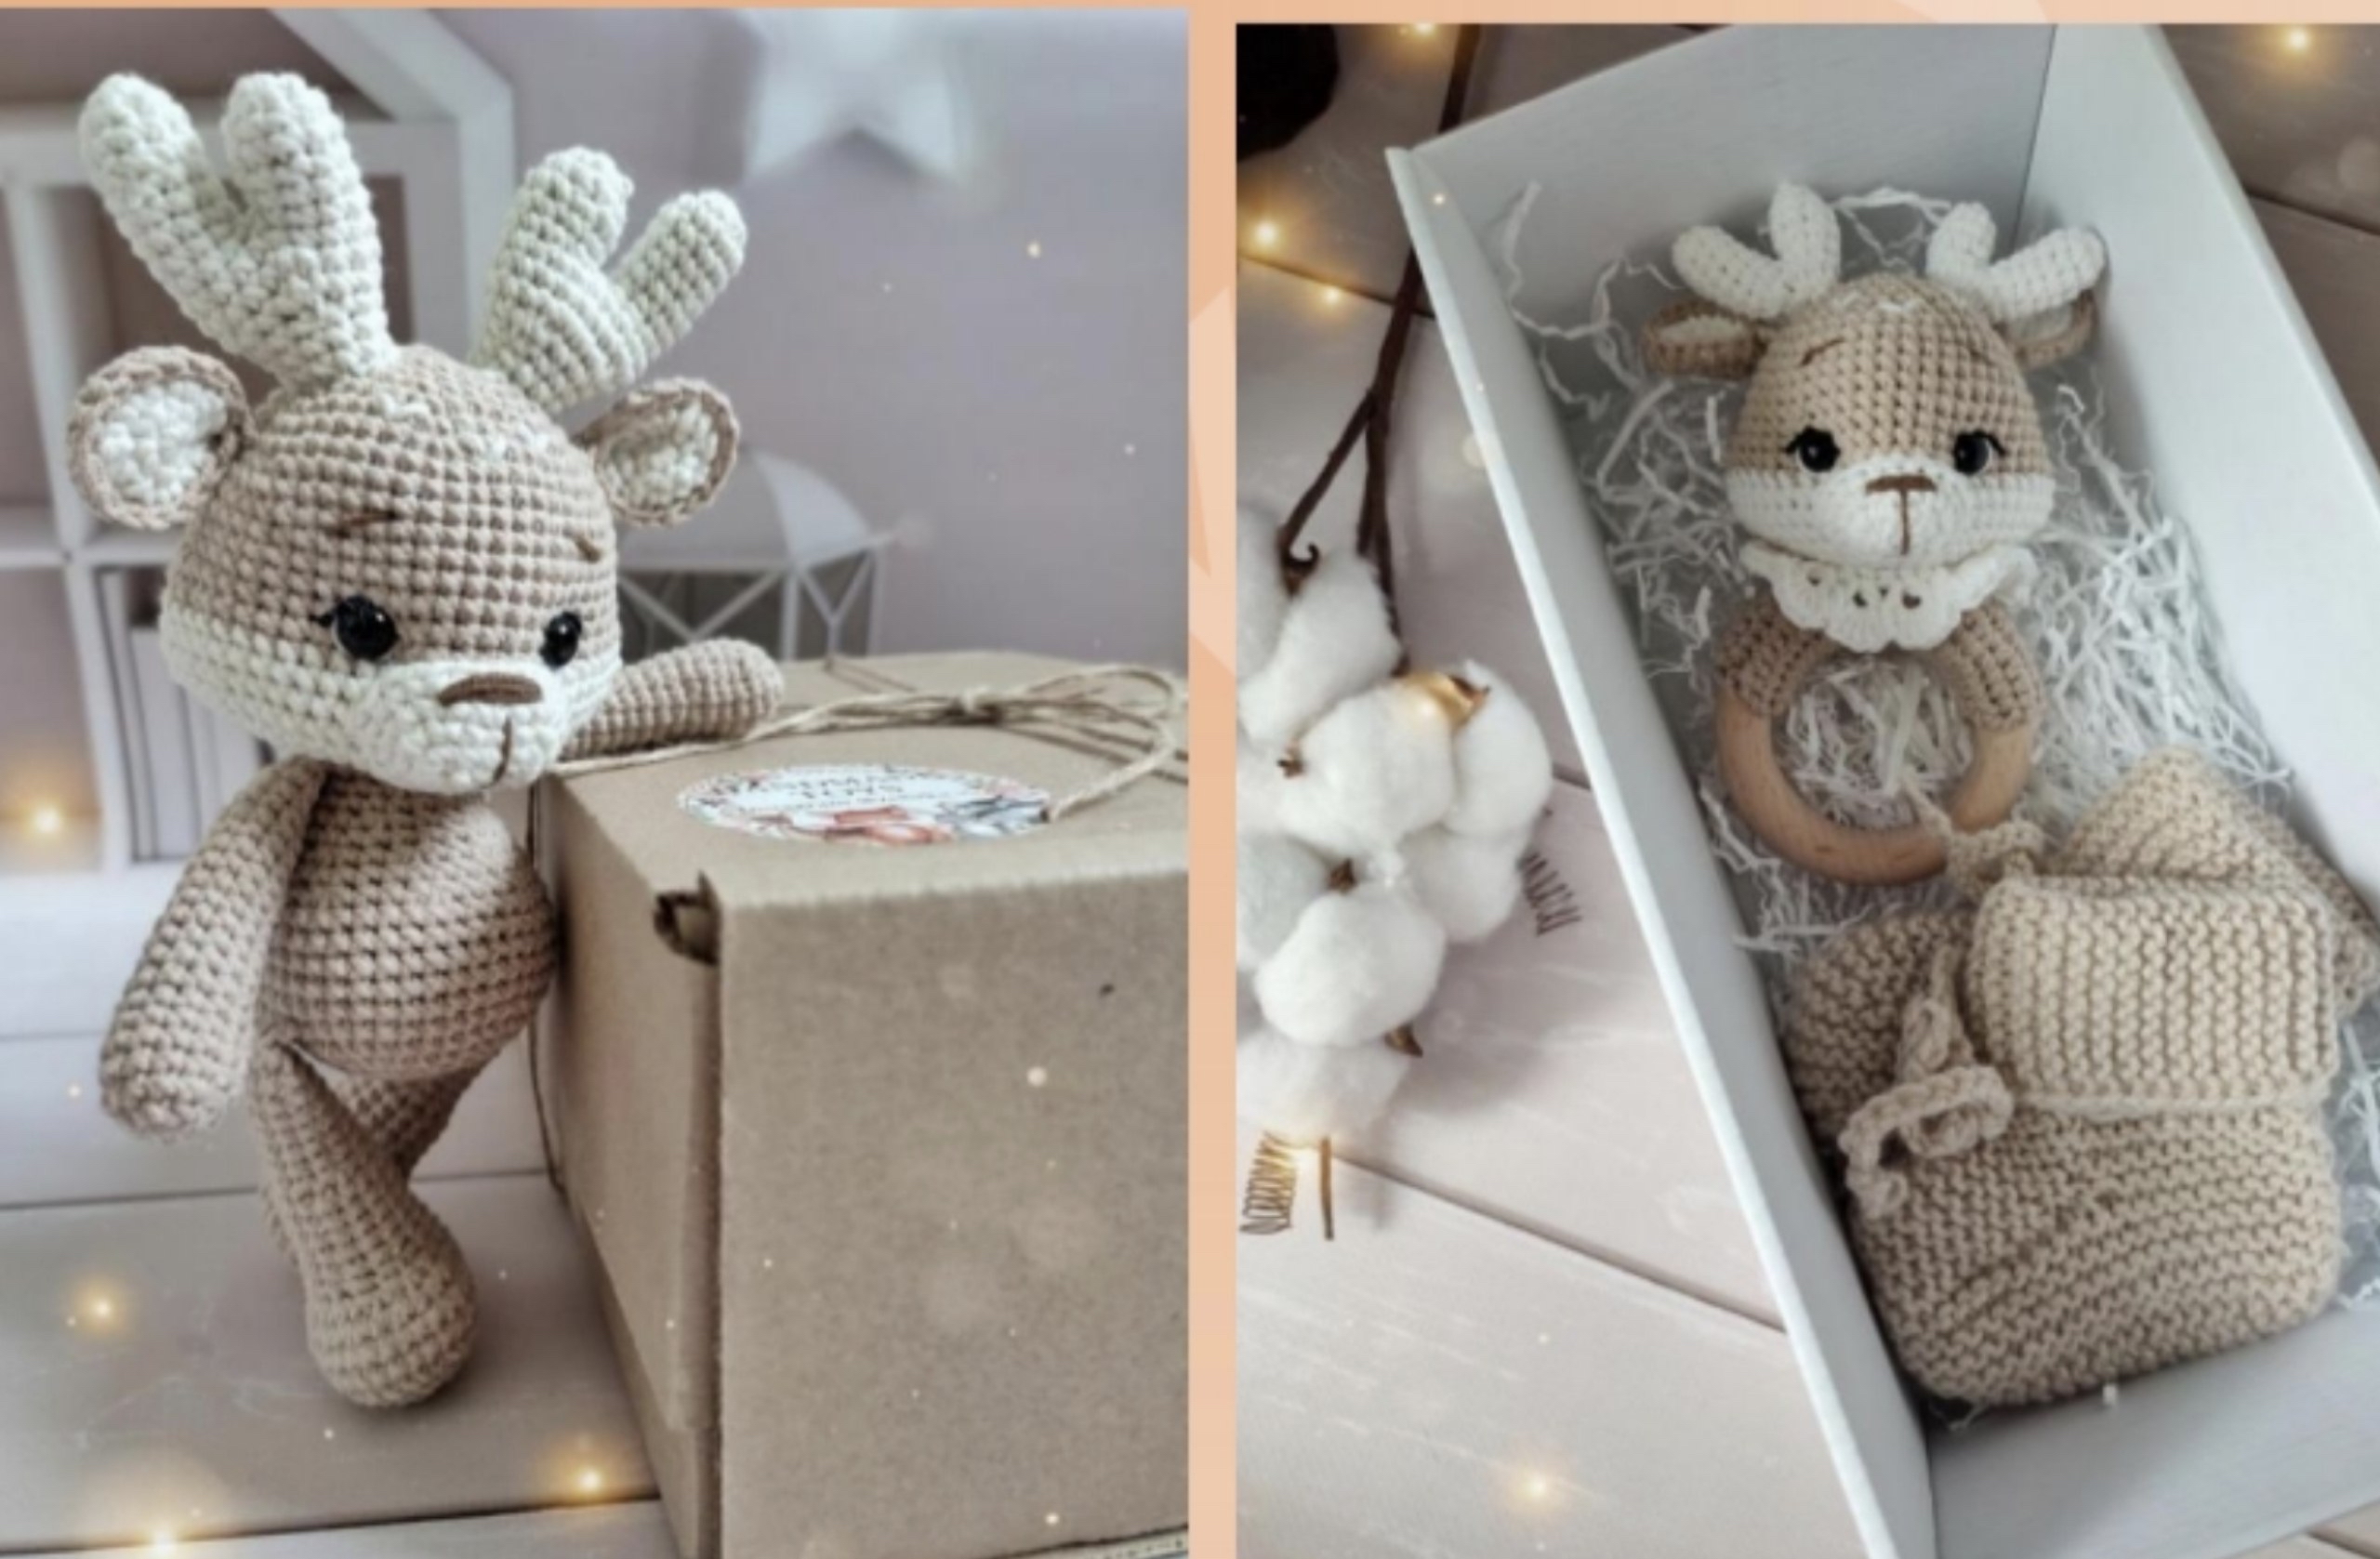
Looking for a sweet, cuddly project for a baby shower or a nursery addition? This adorable crochet baby deer is the perfect project for amigurumi lovers. With its soft features and gentle expression, this little fawn makes a wonderful handmade gift. Whether you are an experienced crocheter or a beginner looking to practice your skills, this tutorial will guide you through every stitch.
The finished deer stands approximately 8 inches tall, making it the perfect size for little hands to hold. We will walk you through creating the full plushie, and as a bonus, we’ve included instructions for a baby rattle version at the end!
Materials & Abbreviations
To get started, gather the following materials. We recommend using a cotton-blend yarn for a clean, defined stitch and a soft feel.
Materials Needed
- Yarn: Cotton blend (like YarnArt Jeans).
- Main Color: Light Brown/Taupe
- Accent Color: Cream/Beige
- Small amounts of Black, White, and Dark Brown for facial details.
- Crochet Hook: 2.0mm
- Eyes: 10mm safety eyes (8mm for the rattle version)
- Stuffing: High-quality polyester fiberfill
- Tools: Yarn needle, scissors, and a stitch marker (or a piece of contrasting thread)
- For Rattle: A wooden teething ring (approx. 2 to 2.75 inches in diameter) and a plastic rattle insert.
US Crochet Abbreviations
- MR: Magic Ring
- ch: Chain
- sc: Single crochet
- inc: Increase (two sc in one stitch)
- dec: Decrease (sc two together)
- hdc: Half double crochet
- dc: Double crochet
- sl st: Slip stitch
- st: Stitch
Step-by-Step Instructions
Note: All parts are worked in continuous rounds. Use a stitch marker to keep track of the start of each round. Stuff pieces firmly as you go, but not so tight that the stuffing shows through.
The Head
Start with the Main Color.
- Round 1: 6 sc in MR (6)
- Round 2: inc in each st around (12)
- Round 3: (1 sc, inc) * 6 (18)
- Round 4: (2 sc, inc) * 6 (24)
- Round 5: (3 sc, inc) * 6 (30)
- Round 6: (4 sc, inc) * 6 (36)
- Round 7: (5 sc, inc) * 6 (42)
- Round 8: (6 sc, inc) * 6 (48)
- Round 9: (15 sc, inc) * 3 (51)
- Round 10: sc in each st around (51)
- Round 11: (16 sc, inc) * 3 (54)
- Rounds 12-15: sc in each st around (54) – 4 rounds total
- Round 16: 12 sc, 3 inc, 24 sc, 3 inc, 12 sc (60)
- Round 17: sc in each st around. Change to Accent Color on the last stitch (60)
- Rounds 18-21: sc in each st around (60) – 4 rounds total
- Round 22: 13 sc, 3 dec, 24 sc, 3 dec, 11 sc (54)
- Round 23: 12 sc, 3 dec, 20 sc, 3 dec, 10 sc (48)
- Round 24: (4 sc, dec) * 8 (40)
Eye Placement: Insert 10mm safety eyes between rounds 16 and 17, approximately 8 stitches apart from the edge of the eye.
- Round 25: (3 sc, dec) * 8 (32)
- Round 26: (2 sc, dec) * 8 (24)
- Round 27: (2 sc, dec) * 6 (18). sl st to join. Fasten off.
The Muzzle
Use the Accent Color.
- Round 1: Ch 6. Starting in 2nd ch from hook: 4 sc, 3 sc in last ch, 3 sc along opposite side of chain, inc (12)
- Round 2: inc, 3 sc, 3 inc, 3 sc, 2 inc (18)
- Round 3: 1 sc, inc, 3 sc, (1 sc, inc) * 3, 3 sc, (1 sc, inc) * 2 (24)
- Round 4: sc in each st around (24). sl st to join. Leave a long tail for sewing.
The Antlers
Use the Accent Color. You will need two large antlers and two small antlers.
Large Antlers (Make 2):
- Round 1: 5 sc in MR (5)
- Round 2: inc in each st around (10)
- Rounds 3-8: sc in each st around (10). Fasten off and weave in ends.
Small Antlers (Make 2):
- Round 1: 5 sc in MR (5)
- Round 2: inc in each st around (10) – Wait, based on the pattern logic, this should likely be a smaller increase or different count, but follow the original logic: 5 inc to reach 10 or 8. Let’s use 8 sc as per instructions. (8)
- Rounds 3-6: sc in each st around (8). Do not fasten off.
Joining Antlers: Join the small antler to the large one.
- Round 4 (Join): 10 sc around the large antler, 10 sc around the small antler (20)
- Rounds 5-6: sc in each st around (20)
- Round 7: (2 sc, dec) * 5 (15)
- Round 8: (3 sc, dec) * 3 (12)
- Rounds 9-10: sc in each st around (12). Leave a long tail for sewing.
The Ears
You will need two ears, each consisting of a beige part and a main color part.
Beige Part (Accent Color):
- Round 1: 6 sc in MR (6)
- Round 2: inc in each st around (12)
- Round 3: (1 sc, inc) * 2, 1 sc, [1 sc and 1 hdc in same stitch], 1 dc in next st, [1 hdc and 1 sc in same stitch], inc in next st, (1 sc, inc) * 2 (19). Fasten off.
Main Color Part: Join the main color yarn to the beige part using a slip stitch. Crochet around the edge of the beige circle. Once complete, fold the ear in half and sc across the bottom to create a flat shape. Fasten off.
The Legs
Use the Main Color. Make 2.
- Round 1: Ch 5. In 2nd ch from hook: inc, 2 sc, 3 sc in last ch, 3 sc along opposite side (10)
- Round 2: 2 inc, 2 sc, 3 inc, 2 sc, inc (16)
- Round 3: (1 sc, inc) * 2, 2 sc, (inc, 1 sc) * 3, 3 sc, inc (22)
- Round 4: (1 sc, inc) * 2, 6 sc, (inc, 1 sc) * 3, 5 sc, inc (28)
- Rounds 5-6: sc in each st around (28)
- Round 7: 12 sc, (dec, 1 sc) * 4, 4 sc (24)
- Round 8: 10 sc, 6 dec, 2 sc (18)
- Round 9: 10 sc, 1 dec, 1 sc, dec, 3 sc (16)
- Rounds 10-14: sc in each st around (16)
- Round 15: (2 sc, dec) * 4 (12). Ch 3 for offset, place marker.
- Rounds 16-21: sc in each st around (12)
- Round 22: (1 sc, dec) * 4 (8). sc across both sides of the final 4 stitches. Fasten off.
The Arms
Use the Main Color. Make 2.
- Round 1: 6 sc in MR (6)
- Round 2: inc in each st around (12)
- Round 3: (5 sc, inc) * 2 (14)
- Rounds 4-5: sc in each st around (14)
- Round 6: 5 sc, dec, 7 sc (13)
- Rounds 7-8: sc in each st around (13)
- Round 9: 6 sc, dec, 5 sc (12)
- Rounds 10-11: sc in each st around (12)
- Round 12: 6 sc, dec, 4 sc (11)
- Rounds 13-14: sc in each st around (11)
- Round 15: 6 sc, dec, 3 sc (10)
- Rounds 16-17: sc in each st around (10)
- Round 18: 6 sc, dec, 2 sc (9)
- Rounds 19-20: sc in each st around (9)
- Round 21: (1 sc, dec) * 3. sl st to join. sc across both sides of the final 3 stitches. Fasten off.
The Body
Use the Main Color.
- Round 1: 6 sc in MR (6)
- Round 2: inc in each st around (12)
- Round 3: (1 sc, inc) * 6 (18)
- Round 4: (2 sc, inc) * 6 (24)
- Round 5: (3 sc, inc) * 6 (30)
- Round 6: (4 sc, inc) * 6 (36)
- Round 7: (5 sc, inc) * 6 (42)
- Round 8 (Joining Legs): 8 sc, 4 sc joined with leg, 18 sc, 4 sc joined with leg, 8 sc (42)
- Rounds 9-13: sc in each st around (42)
- Round 14: 8 sc, (dec, 3 sc) * 5, dec, 7 sc (36)
- Round 15: sc in each st around (36)
- Round 16: 8 sc, (dec, 2 sc) * 5, dec, 6 sc (30)
- Round 17: sc in each st around (30)
- Round 18: (3 sc, dec) * 6 (24)
- Round 19: sc in each st around (24)
- Round 20: (2 sc, dec) * 6 (18)
- Round 21 (Joining Arms): 3 sc, 3 sc joined with arm, 6 sc, 3 sc joined with arm, 3 sc (18). Adjust placement so arms align with legs.
- Round 22: sc in each st around (18). sl st to join. Fasten off.
The Tail
Option 1 (Small Ball): 6 sc in MR, inc around (12), 12 sc, (2 sc, dec) * 3 (9). Fasten off.
Option 2 (Flat Tail): Ch 8. Work around the chain: 2 dc, 2 hdc, 2 sc, 2 sc on the return side, 2 hdc, 2 dc. Join the two halves together with 12 sc. Fasten off.
Finishing & Assembly
Facial Features & Details
- Muzzle: Sew the muzzle to the center of the head. Use a yarn needle and main color to “sculpt” the head by pulling the yarn from the back of the head to the muzzle to create a more defined face.
- Antlers & Ears: Sew antlers between rounds 3 and 6. Sew ears approximately two rounds below the antlers.
- Embroidery:
- Use brown yarn to embroider a small nose.
- Use black yarn for the eyebrows and eyelashes.
- Use white yarn to add a small highlight/white part to the eyes.
- Use the accent color (beige) to embroider a small “V” shape on the forehead for a cute deer spotting.
- Final Assembly: Sew the head securely to the body. Sew on the tail to the back.
Tips for Success
- Tension: Keep your tension consistent. If your stitches are too loose, the stuffing may peek through.
- Sculpting: Don’t skip the “sculpting” step (pulling thread through the head). This is what transforms a simple ball into a professional-looking character.
- Safety: If making this for a very young baby, consider embroidering the eyes with black yarn instead of using plastic safety eyes.
Bonus: Baby Rattle Variation
To create the rattle version, follow the head pattern but use a smaller scale (starting with 5 sc in MR and following the modified counts on page 11 of the guide). Instead of a body, crochet a small rectangle of sc (approx. 25 ch by 5-6 rows). Sew this rectangle around the wooden teething ring, then attach your finished rattle head to the top of the ring cover!