Free Amigurumi Dragon Crochet Pattern: Crochet a Cute Baby Dragon!
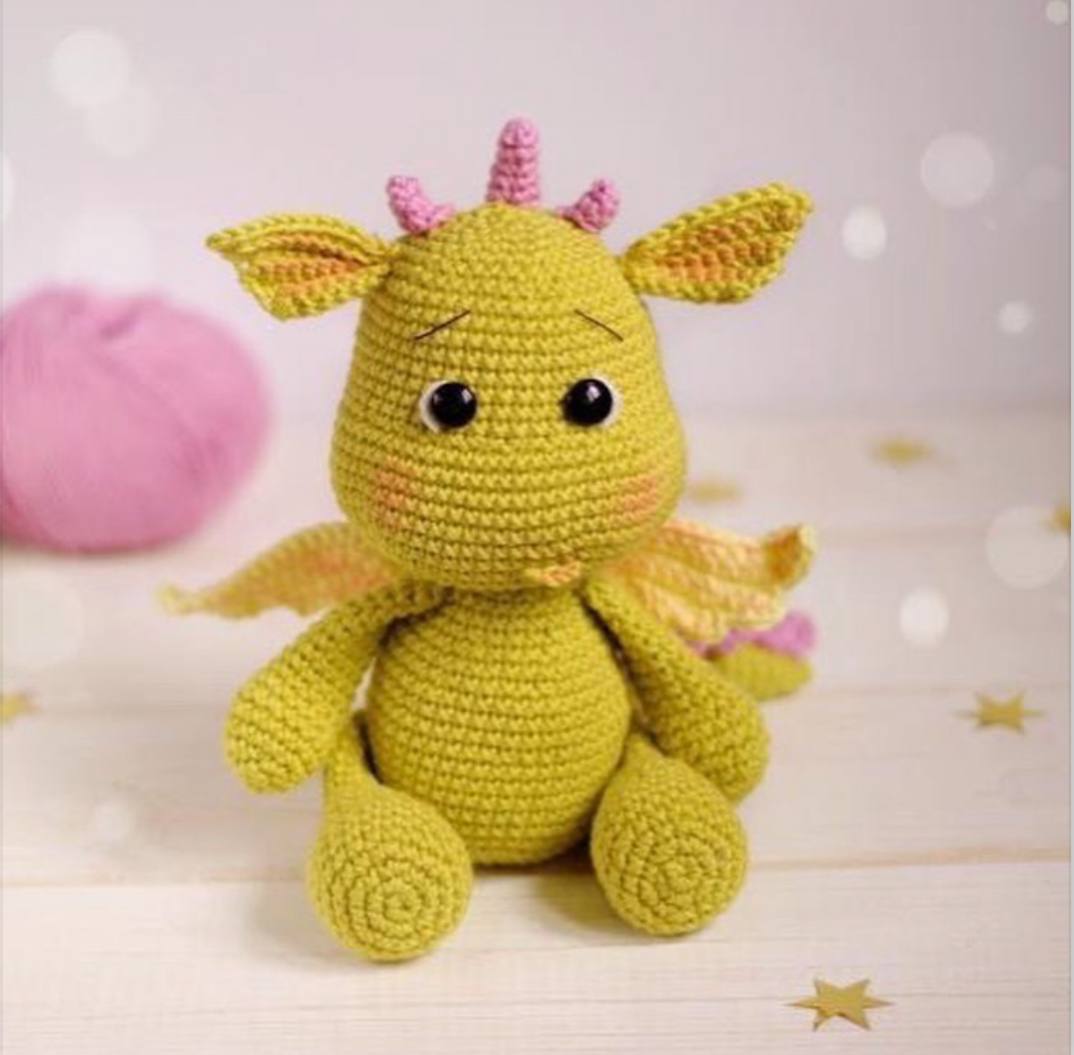
Are you looking to add a touch of magic to your crochet collection? This adorable, beginner-friendly free amigurumi dragon crochet pattern is the perfect project! With its chubby cheeks, sweet little wings, and playful spines, this baby dragon is guaranteed to melt hearts. Whether you are making a whimsical gift for a little one or a cute companion for your desk, this step-by-step tutorial will guide you through the entire process with ease.
This dragon measures approximately 6 inches (15-16 cm) tall when sitting, and about 8 inches (21 cm) in total length from head to toe. Grab your yarn, heat up some tea, and let’s start crocheting!
Materials & Abbreviations
Materials Needed
- Yarn: Sport weight (Category 2) or DK weight (Category 3) cotton/acrylic blend yarn.
- Main Color (Lime Green): ~110 yards
- Contrast Color 1 (Light Yellow): ~35 yards
- Contrast Color 2 (Light Pink): ~20 yards
- Crochet Hook: Size US B-1 / C-2 (2.0 mm) crochet hook (or size needed to obtain tight, gap-free stitches)
- Safety Eyes: 10 mm to 15 mm black safety eyes
- Stuffing: Premium polyester fiberfill
- Tools: Yarn needle, embroidery needle, stitch markers, and scissors
- Optional: Black embroidery thread (for eyebrows), white embroidery thread (for eye whites), and pink blush or dry pastels for the cheeks
Crochet Abbreviations (US Terms)
- MR: Magic Ring
- ch: Chain
- sc: Single crochet
- inc: Increase (2 single crochet stitches in the same stitch)
- dec: Decrease (invisible single crochet decrease recommended)
- sl st: Slip stitch
- FLO: Front loops only
- BLO: Back loops only
- st(s): Stitch(es)
- Row/Rnd: Row/Round
Step-by-Step Instructions
The Head
The head is worked from the bottom up, starting with a foundation chain to create an oval shape.
Using Main Color (Lime Green) yarn:
Ch 10. Start in the second chain from your hook:
- Rnd 1: 3 sc in the first chain, 7 sc, 3 sc in the last chain. Turn to work along the opposite side of the chain: 7 sc (20 sts)
- Rnd 2: [3 inc, 7 sc] repeat 2 times (26 sts)
- Rnd 3: [(1 sc, inc) * 3, 7 sc] repeat 2 times (32 sts)
- Rnd 4: [(2 sc, inc) * 3, 7 sc] repeat 2 times (38 sts)
- Rnd 5: [(3 sc, inc) * 3, 7 sc] repeat 2 times (44 sts)
- Rnd 6: [(4 sc, inc) * 3, 7 sc] repeat 2 times (50 sts)
- Rnd 7: [(5 sc, inc) * 3, 7 sc] repeat 2 times (56 sts)
- Rnd 8: [(6 sc, inc) * 3, 7 sc] repeat 2 times (62 sts)
- Rnds 9-13: sc in each st around (62 sts for 5 rounds)
- Rnd 14: 12 sc, (dec, 1 sc) * 12, 14 sc (50 sts)
- Rnds 15-22: sc in each st around (50 sts for 8 rounds)
- Rnd 23: 10 sc, dec, 23 sc, dec, 13 sc (48 sts)
- Rnd 24: 5 sc, dec, (6 sc, dec) * 5, 1 sc (42 sts)
- Rnd 25: 4 sc, dec, (5 sc, dec) * 5, 1 sc (36 sts)
- Rnd 26: 3 sc, dec, (4 sc, dec) * 5, 1 sc (30 sts)
- Rnd 27: 2 sc, dec, (3 sc, dec) * 5, 1 sc (24 sts)
Adding the Safety Eyes & Stuffing: Insert your safety eyes between Rounds 16 and 17. The distance between the eyes should be 7 to 9 stitches. Stuff the head firmly with fiberfill, shaping it into a rounded teardrop shape as you go.
- Rnd 28: (1 sc, dec), (2 sc, dec) * 5, 1 sc (18 sts)
- Rnd 29: dec, (1 sc, dec) * 5, 1 sc (12 sts)
Finish stuffing the head completely, ensuring it is firm but doesn’t stretch the stitches.
- Rnd 30: 6 dec (6 sts)
- Rnd 31: Fasten off, weave the tail through the front loops of the remaining 6 stitches, pull tight to close, and hide the thread inside the head.
The Legs (Make 2)
Start with Contrast Color 1 (Light Yellow) yarn:
- Rnd 1: 6 sc in a MR (6 sts)
- Rnd 2: 6 inc (12 sts)
- Rnd 3: (1 sc, inc) * 6 (18 sts)
- Rnd 4: (2 sc, inc) * 6 (24 sts)
- Rnd 5: (3 sc, inc) * 6 (30 sts)
- Rnd 6: Switch to Main Color (Lime Green). Working in BLO: sc in each st around (30 sts)
- Rnds 7-8: sc in each st around (30 sts for 2 rounds)
- Rnd 9: 4 sc, (1 sc, dec) * 7, 5 sc (23 sts)
- Rnd 10: sc in each st around (23 sts)
- Rnd 11: 4 sc, 7 dec, 5 sc (16 sts)
Stuff the lower foot section firmly. Important note: Only stuff the leg firmly up to Round 12. From Rounds 12 to 21, add only a very light amount of stuffing so that the leg remains flexible and bends easily when your dragon sits!
- Rnds 12-20: sc in each st around (16 sts for 9 rounds)
- Rnd 21: (1 sc, dec) * 5, 1 sc (11 sts)
- Rnd 22: 5 dec, 1 sc (6 sts)
- Rnd 23: Fasten off, close the opening with a yarn needle, and weave in your ends.
The Arms (Make 2)
Using Main Color (Lime Green) yarn:
- Rnd 1: 6 sc in a MR (6 sts)
- Rnd 2: 6 inc (12 sts)
- Rnd 3: (1 sc, inc) * 6 (18 sts)
- Rnds 4-6: sc in each st around (18 sts for 3 rounds)
- Rnd 7: 5 sc, 4 dec, 5 sc (14 sts)
- Rnd 8: 5 sc, 2 dec, 5 sc (12 sts)
- Rnd 9: (2 sc, dec) * 3 (9 sts)
- Rnds 10-17: sc in each st around (9 sts for 8 rounds)
Stuff the lower arm section lightly up to Round 10. Leave the upper arm unstuffed. Fold the top opening flat and crochet 5 sc through both layers to close. Fasten off and hide the yarn tail.
The Body
Using Main Color (Lime Green) yarn:
- Rnd 1: 6 sc in a MR (6 sts)
- Rnd 2: 6 inc (12 sts)
- Rnd 3: (1 sc, inc) * 6 (18 sts)
- Rnd 4: (2 sc, inc) * 6 (24 sts)
- Rnd 5: (3 sc, inc) * 6 (30 sts)
- Rnd 6: (4 sc, inc) * 6 (36 sts)
- Rnd 7: (5 sc, inc) * 6 (42 sts)
- Rnd 8: (6 sc, inc) * 6 (48 sts)
- Rnds 9-14: sc in each st around (48 sts for 6 rounds)
- Rnd 15: (6 sc, dec) * 6 (42 sts)
- Rnds 16-17: sc in each st around (42 sts for 2 rounds)
- Rnd 18: (5 sc, dec) * 6 (36 sts)
- Rnds 19-20: sc in each st around (36 sts for 2 rounds)
Begin stuffing the body firmly with fiberfill.
- Rnd 21: (4 sc, dec) * 6 (30 sts)
- Rnd 22: (3 sc, dec) * 6 (24 sts)
- Rnd 23: sc in each st around (24 sts)
Now, we will attach the arms directly to the body in the next round. Position your body so that the start of the round aligns symmetrically at the back-center.
- Rnd 24: 3 sc, join the left arm by crocheting through both the arm and the body for 5 sc, 8 sc, join the right arm by crocheting through both the arm and the body for 5 sc, 3 sc (24 sts)
- Rnd 25: 5 sc, dec, (3 sc, dec) * 3, 2 sc (20 sts)
- Rnd 26: 4 sl st (to align the symmetry of the neck opening). Fasten off, leaving a long yarn tail for sewing the head to the body. Stuff the remaining neck area firmly.
The Tail
Using Main Color (Lime Green) yarn:
- Rnd 1: 4 sc in a MR (4 sts)
- Rnd 2: (inc, 1 sc) * 2 (6 sts)
- Rnd 3: (inc, 2 sc) * 2 (8 sts)
- Rnd 4: sc in each st around (8 sts)
- Rnd 5: (inc, 3 sc) * 2 (10 sts)
- Rnd 6: sc in each st around (10 sts)
- Rnd 7: (inc, 4 sc) * 2 (12 sts)
- Rnd 8: sc in each st around (12 sts)
- Rnd 9: (inc, 5 sc) * 2 (14 sts)
- Rnd 10: sc in each st around (14 sts)
- Rnd 11: (inc, 6 sc) * 2 (16 sts)
- Rnd 12: sc in each st around (16 sts)
- Rnd 13: (inc, 7 sc) * 2 (18 sts)
- Rnd 14: sc in each st around (18 sts)
- Rnd 15: (inc, 8 sc) * 2 (20 sts)
- Rnd 16: sc in each st around (20 sts)
- Rnd 17: (inc, 9 sc) * 2 (22 sts)
- Rnd 18: (inc, 10 sc) * 2 (24 sts)
- Rnd 19: 3 inc, 16 sc. (Do not crochet to the very end of the round; this softens the stitch height transition). Make a few slip stitches to finish.
Leave a long tail for sewing. Stuff the tail moderately with fiberfill.
The Ears (Make 2)
The ears are worked in flat rows using the Main Color (Lime Green) yarn.
Ch 8. Starting in the second chain from your hook:
- Row 1: 7 sc, ch 1, turn (7 sts)
- Row 2: Working in FLO: 6 sc, inc, ch 1, turn (8 sts)
- Row 3: Working in FLO: inc, 7 sc, ch 1, turn (9 sts)
- Row 4: Working in FLO: 8 sc, inc, ch 1, turn (10 sts)
- Row 5: Working in FLO: inc, 9 sc, ch 1, turn (11 sts)
- Row 6: Working in FLO: 10 sc, inc (12 sts)
Fasten off, leaving a long thread. Thread your yarn needle and run it through the foundation chain stitches of Row 1. Pull the yarn tight to cinch the bottom of the ear together. Secure with a knot, leaving the remaining tail to sew the ears to the head.
Horns & Spines
Small Horns (Make 2)
Using Contrast Color 2 (Light Pink) yarn:
- Rnd 1: 3 sc in a MR (3 sts)
- Rnd 2: inc, 2 sc (4 sts)
- Rnd 3: sc in each st around (4 sts)
- Rnd 4: 2 inc, 2 sc (6 sts)
Fasten off, leaving a tail for sewing. Do not stuff.
Main Horn (Make 1)
Using Contrast Color 2 (Light Pink) yarn:
- Rnd 1: 4 sc in a MR (4 sts)
- Rnd 2: inc, 3 sc (5 sts)
- Rnd 3: inc, 4 sc (6 sts)
- Rnd 4: sc in each st around (6 sts)
- Rnd 5: inc, 2 sc, 2 inc (8 sts)
- Rnd 6: 7 sc, inc (9 sts)
Fasten off, leaving a tail for sewing. Stuff lightly.
Spines (Make 5)
Using Contrast Color 2 (Light Pink) yarn:
- Rnd 1: 6 sc in a MR (6 sts)
- Rnd 2: sc in each st around (6 sts)
- Rnd 3: (2 sc, inc) * 2 (8 sts)
- Rnd 4: (3 sc, inc) * 2 (10 sts)
- Rnd 5: (4 sc, inc) * 2 (12 sts)
Stuff lightly and leave a long tail for sewing.
Small Spines (Make 2)
Using Contrast Color 2 (Light Pink) yarn:
- Rnd 1: 6 sc in a MR (6 sts)
- Rnd 2: sc in each st around (6 sts)
- Rnd 3: (2 sc, inc) * 2 (8 sts)
- Rnd 4: (3 sc, inc) * 2 (10 sts)
Stuff lightly and leave a tail for sewing.
The Wings (Make 2)
The wings are worked in rows using the Contrast Color 1 (Light Yellow) yarn. We will chain 1 and turn at the end of every row unless specified.
Ch 6. Start in the second chain from your hook:
- Row 1: 4 sc, 1 sl st, ch 1, turn
- Row 2: 2 sc, inc, 1 sc, ch 3, ch 1 (turning chain), turn
- Row 3: 4 sc (working across the 3 chain stitches and the first sc), inc, 2 sc, 1 sl st, ch 1, turn
- Row 4: 2 sc, inc, 5 sc, ch 3, ch 1, turn
- Row 5: 8 sc, inc, 2 sc, sl st, ch 1, turn
- Row 6: 2 sc, inc, 9 sc, ch 3, ch 1, turn
- Row 7: 12 sc, inc, 2 sc, sl st
Edging: Single crochet evenly along the top and outer edges of the wing (from Row 2 to Row 7). Once complete, connect the first stitch of Row 7 to the first stitch of Row 1 with a slip stitch. This pulls the base together to create a sturdy, slightly curved wing structure.
Finishing & Assembly
1. Sew the Head to the Body
Sew the neck opening of the body securely to the bottom of the head using the yarn tail left on the body. Ensure the head is facing forward, aligned perfectly with the arms.
2. Attach the Legs
To keep your dragon sitting upright, attach the legs to the lower sides of the body using a thread-jointing technique. Pass a long needle with matching yarn through one leg, all the way through the lower body, through the second leg, and back. Repeat this 2-3 times to secure. This jointed attachment allows your dragon’s legs to move!
3. Assemble the Tail, Horns, and Spines
- Tail: Center the tail at the lower back of the body and sew it firmly in place.
- Ears: Sew the cinched base of the ears to the sides of the head between Rounds 22 and 23.
- Horns: Sew the large pink horn directly on top of the head in the center. Sew the two small pink horns on either side of the main horn, keeping them about 4 rounds down from the crown.
- Spines: Sew the remaining spines in a neat line running down the center of the head, back, and tail. Use the smaller spines at the very top of the head (behind the horns) and at the tip of the tail, placing the larger spines in the middle along the back.
- Wings: Sew the wings to the back of the body, just below the neck.
4. Facial Details & Embroidery
- Eyebrows: Embroider small, upward-curved eyebrows using black thread between Rounds 20 and 21 (about 3 stitches wide). This gives the dragon a sweet, curious expression.
- Eyes: Add a highlight by embroidering a tiny white line around the outer edges of each safety eye using white yarn.
- Nostrils: Count 10 rounds down from the top center of the face. Embroider two tiny, horizontal stitches to create adorable nostrils.
- Mouth: Chain 3 with Contrast Color 1 (Light Yellow) and sew this tiny chain between Rounds 5 and 6, slightly to the right of the center for a cute smirk.
- Cheeks: Dip a dry brush into pink blush or dry pastel and gently shade the areas just below the eyes to give your dragon rosy cheeks!
Tips for Amigurumi Success
- Keep Your Tension Tight: Amigurumi requires tight, even tension so that your fiberfill stuffing doesn’t show through the stitches. If you notice gaps, try sizing down your crochet hook.
- Use Invisible Decreases: When working decreases, insert your hook into the front loops only of the next two stitches, then complete your single crochet. This makes your decreases virtually invisible!
- Custom Details: Have fun with colors! You can make a classic red fire dragon, a pastel purple fairy dragon, or even add embroidery details to the bottom of the feet to create cute paw pads.