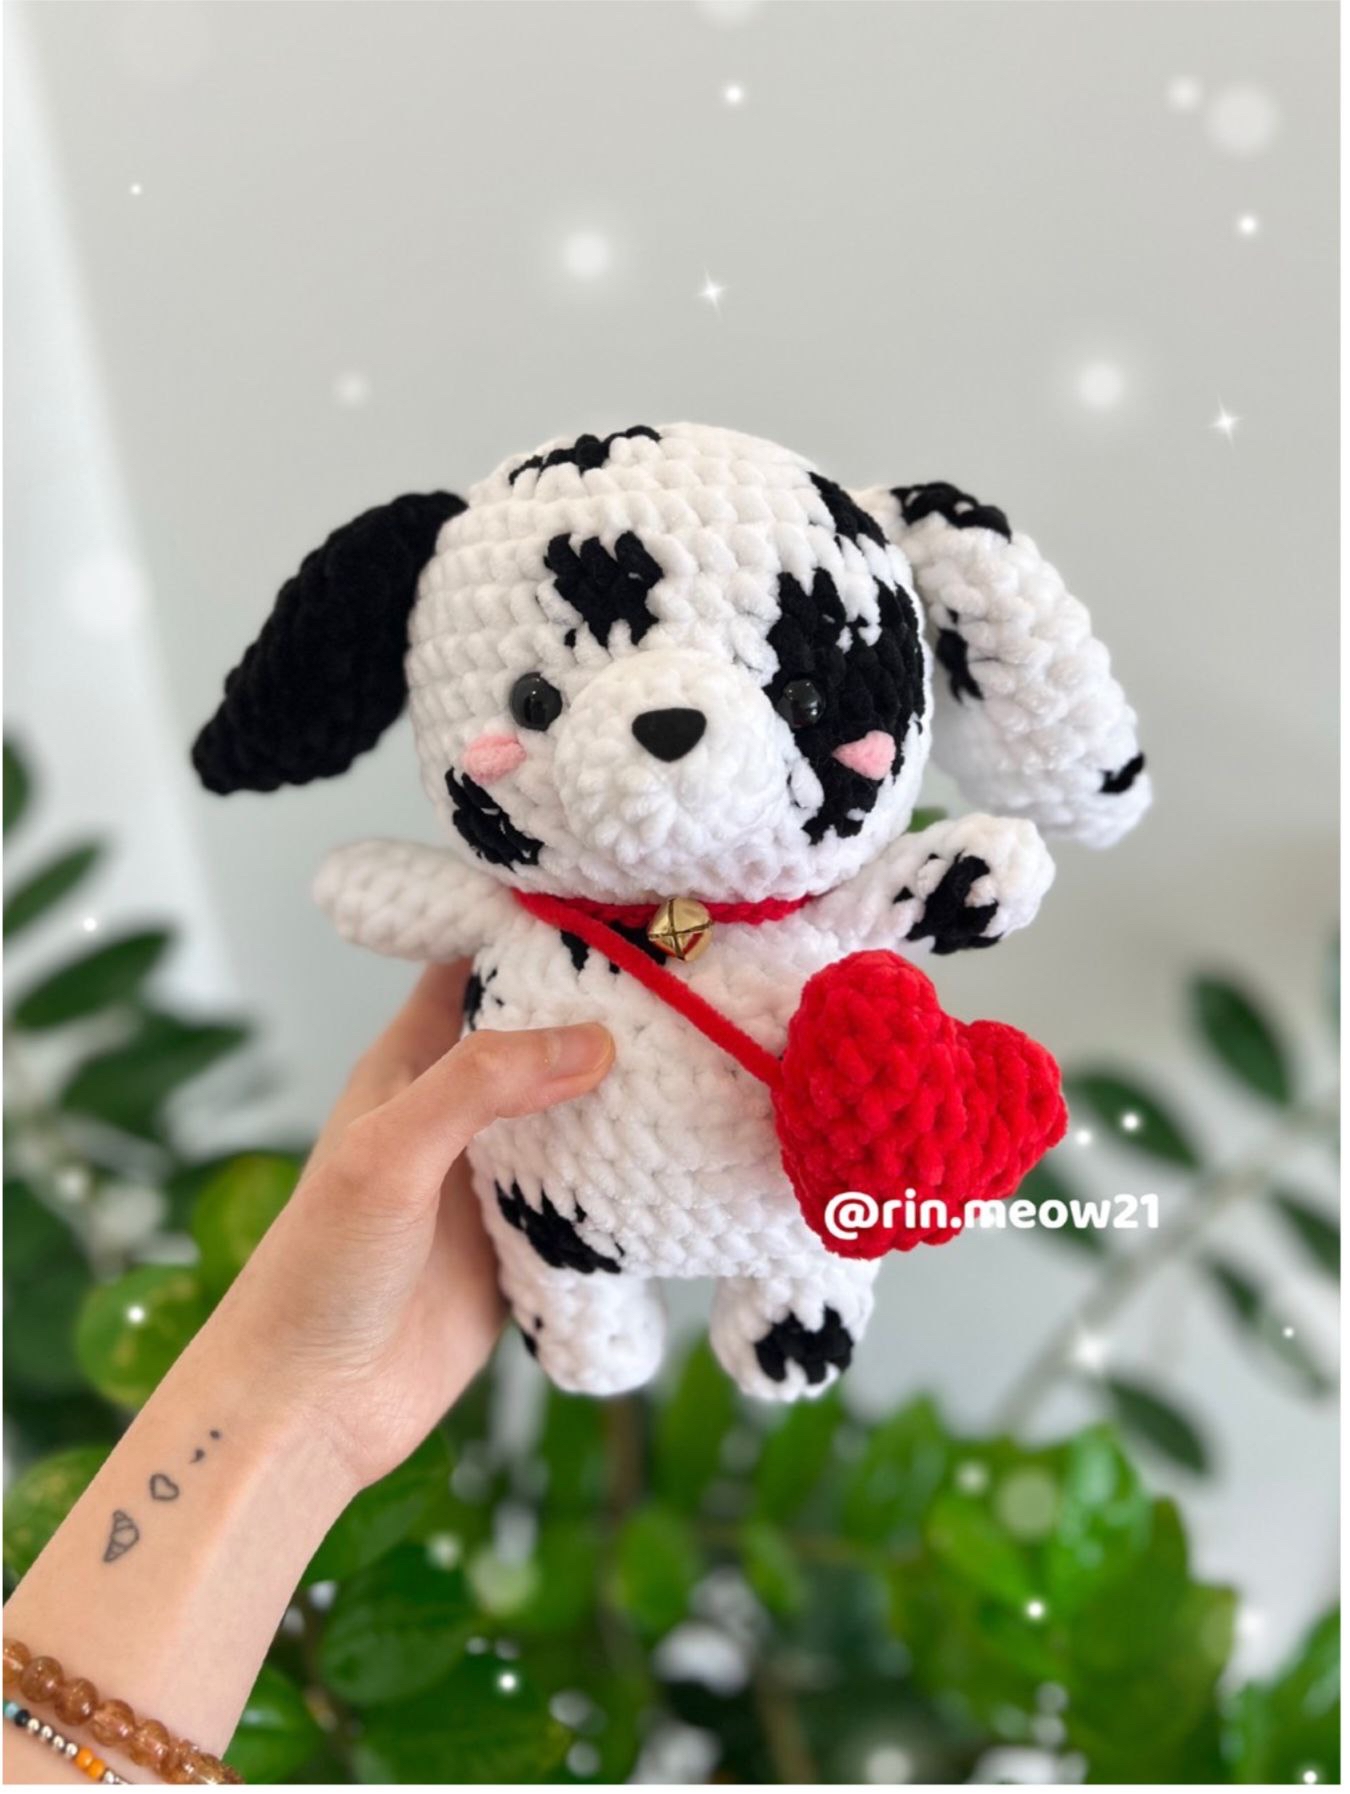
Adorable Crochet Dalmatian Dog Pattern: A Step-by-Step Amigurumi Tutorial
There is nothing quite as charming as a spotted puppy! If you are looking for your next crochet project, this adorable Dalmatian amigurumi is the perfect choice. This little pup is designed to be extra soft and huggable, making it an ideal companion for nursery decor, a gift for a dog lover, or a sweet addition to your own crochet collection.
In this tutorial, we will be working with plush, velvet-style yarn to create a high-texture, “squishy” effect that makes the Dalmatian look incredibly professional and cuddly. Whether you are a beginner looking to practice color changes or an experienced amigurumi artist wanting to make something cute, this pattern is designed to be accessible and fun. Grab your hook, find a cozy spot, and let’s bring this spotted friend to life!
Materials & Abbreviations
To ensure your Dalmatian turns out exactly like the photos, I recommend using a chunky, chenille-style yarn. This gives the puppy that premium, velvety feel.
Materials Needed
- Yarn: Velvet or chenille-style yarn in White, Black, and Red. (Using a brand like Himalaya Dolphin Baby works beautifully, but any similar plush yarn will do). You will need less than one skein of each color.
- Crochet Hook: 4 mm (approx. G/6). If you use thicker yarn, you can scale up the hook size; if thinner, scale down.
- Safety Eyes: 12 mm eyes.
- Safety Nose: A small black safety nose suitable for amigurumi.
- Stuffing: High-quality polyester fiberfill.
- Notions: Stitch markers, scissors, and a yarn needle for sewing.
- Optional: Pink embroidery thread or yarn for the rosy cheeks.
Abbreviations (US Terms)
Please ensure you are using US crochet terminology for this pattern:
- MR: Magic Ring (or 2 ch in a ring)
- sc: Single crochet
- inc: Increase (2 sc in one stitch)
- dec: Decrease (invisible decrease recommended for amigurumi)
- ch: Chain
- sl st: Slip stitch
- hdc: Half double crochet
- dc: Double crochet
- tr: Treble crochet
- BLO: Back loop only
- FLO: Front loop only
- Color Change: When a color change is noted, finish the last stitch of the previous color in the next stitch of the new color to ensure a clean transition.
Step-by-Step Instructions
The Head
Worked in White with Black color changes for the spots.
Round 1: 8 sc in MR (8)
Round 2: 8 inc (16)
Round 3: (1 sc, 1 inc) x 3, [Change to Black] 1 sc, 1 inc, [Change to White] (1 sc, 1 inc) x 4 (24)
Round 4: (3 sc, 1 inc) x 2, [Black] 3 sc, [White] 1 inc, (3 sc, 1 inc) x 3 (30)
Round 5: 2 sc, 1 inc, (4 sc, 1 inc) x 3, 1 sc, [Black] 2 sc, [White] 1 sc, 1 inc, 4 sc, 1 inc, 2 sc (36)
Round 6: (5 sc, 1 inc) x 3, 5 sc, [Black] 1 inc, 1 sc, [White] 4 sc, 1 inc, 5 sc, 1 inc (42)
Round 7: 18 sc, [Black] 3 sc, [White] 21 sc (42)
Round 8: 19 sc, [Black] 2 sc, [White] 3 sc, [Black] 2 sc, [White] 1 sc, [Black] 2 sc, [White] 13 sc (42)
Rounds 9-10: 24 sc, [Black] 6 sc, [White] 12 sc (42)
Round 11: 25 sc, [Black] 4 sc, [White] 13 sc (42)
Round 12: 15 sc, [Black] 2 sc, [White] 9 sc, [Black] 2 sc, [White] 14 sc (42)
Round 13: (5 sc, 1 dec) x 2, 1 sc, [Black] 3 sc, [White] 1 sc, 1 dec, (5 sc, 1 dec) x 3 (36)
Round 14: 2 sc, 1 dec, (4 sc, 1 dec) x 5, 2 sc (30)
Round 15: (3 sc, 1 dec) x 6 (24)
Round 16: (2 sc, 1 dec) x 6 (18)
Fasten off and leave a long tail for sewing.
Assembly Note: Before closing the head, insert your 12mm safety eyes between rounds 10 and 11, leaving approximately 6 stitches between them. Stuff the head firmly with fiberfill. Use a needle and pink yarn to embroider small pink cheeks near the eyes.
The Muzzle
Worked in White.
Round 1: 8 sc in MR (8)
Round 2: 8 inc (16)
Round 3: 16 sc (16)
Stuff the muzzle lightly. Fasten off, leaving a long tail. Attach the safety nose between rounds 1 and 2 of the muzzle. When sewing the muzzle to the head, attach it between rounds 10 and 13 of the head.
The Legs (Make 2)
Leg 1 (White/Black):
Round 1: 5 sc in MR (5)
Round 2: 5 inc (10)
Round 3: 5 sc, [Black] 3 sc, [White] 2 sc (10)
Round 4: 6 sc, [Black] 2 sc, [White] 2 sc (10)
Fasten off and leave a long tail.
Leg 2 (White/Black):
Round 1: 5 sc in MR (5)
Round 2: 5 inc (10)
Round 3: 3 sc, [Black] 2 sc, [White] 5 sc (10)
Round 4: 4 sc, [Black] 3 sc, [White] 3 sc (10)
Fasten off and leave a long tail.
The Body
Worked in White with Black accents.
Round 1: Connect the legs. 10 sc (on Leg 1) + 3 sc (along the ch connecting the legs) + 10 sc (on Leg 2) + 3 sc (along the ch connecting the legs) (26)
Round 2: (3 sc, 1 inc) x 6, 2 sc (32)
Round 3: 16 sc, [Black] 3 sc, [White] 13 sc (32)
Round 4: 4 sc, [Black] 2 sc, [White] 11 sc, [Black] 3 sc, [White] 12 sc (32)
Rounds 5-8: 32 sc (32)
Round 9: 9 sc, [Black] 2 sc, [White] 21 sc (32)
Round 10: 8 sc, [Black] 4 sc, [White] 10 sc, [Black] 1 sc, [White] 9 sc (32)
Round 11: 14 sc, 1 dec, 5 sc, [Black] 3 sc, [White] 6 sc, 1 dec (30)
Round 12: 30 sc (30)
Round 13: (3 sc, 1 dec) x 3, [Black] 3 sc, [White] 1 dec, (3 sc, 1 dec) x 2 (24)
Round 14: (2 sc, 1 dec) x 3, [Black] 2 sc, 1 dec, [White] (2 sc, 1 dec) x 2 (18)
Fasten off, leaving a long tail to sew the body to the head. Stuff the body very firmly.
The Arms (Make 2)
Arm 1 (White):
Round 1: 4 sc in MR (4)
Round 2: 4 inc (8)
Round 3: 2 sc, [Black] 3 sc, [White] 3 sc (8)
Round 4: 3 sc, [Black] 2 sc, [White] 3 sc (8)
Rounds 5-7: 8 sc (8)
Stuff lightly. Fasten off, leaving a long tail. Sew between rounds 15 and 16 of the body.
Arm 2 (Black/White):
Follow the same steps as Arm 1, but use Black yarn for the majority of the arm to create a dark-colored limb.
The Ears (Make 2)
Ear 1 (Black):
Round 1: 5 sc in MR (5)
Round 2: 5 inc (10)
Round 3: (1 sc, 1 inc) x 5 (15)
Round 4: (2 sc, 1 inc) x 5 (20)
Rounds 5-9: 20 sc (20)
Round 10: (3 sc, 1 dec) x 4 (16)
Round 11: (6 sc, 1 dec) x 2 (14)
Round 12: (5 sc, 1 dec) x 2 (12)
Do not stuff. Fasten off, leaving a long tail. Sew between rounds 5 and 6 of the head.
Ear 2 (White/Black):
Round 1: 5 sc in MR (5)
Round 2: 5 inc (10)
Round 3: 1 sc, 1 inc, [Black] 1 sc, 1 inc, [White] (1 sc, 1 inc) x 3 (15)
Round 4: (2 sc, 1 inc) x 4, [Black] 2 sc, 1 inc (20)
Round 5: [White] 17 sc, [Black] 3 sc (20)
Round 6: [White] 20 sc (20)
Round 7: 10 sc, [Black] 2 sc, [White] 8 sc (20)
Round 8: 10 sc, [Black] 3 sc, [White] 7 sc (20)
Round 9: 20 sc (20)
Round 10: 3 sc, 1 dec, [Black] 3 sc, [White] 1 dec, (3 sc, 1 dec) x 2 (16)
Round 11: 5 sc, [Black] 1 sc, 1 dec, [White] 6 sc, 1 dec (14)
Round 12: (5 sc, 1 dec) x 2 (12)
Do not stuff. Fasten off, leaving a long tail. Sew between rounds 5 and 6 of the head.
The Tail
Worked in Black and White.
Round 1: 6 sc in MR (6)
Rounds 2-3: 6 sc (6)
Rounds 4-6: [White] 6 sc (6)
Round 7: 3 sc, [Black] 2 sc, [White] 1 sc (6)
Rounds 8-10: 6 sc (6)
Fasten off, leaving a long tail. Sew to the back of the body between rounds 8 and 9.
The Heart Bag
Worked in Red. You will make two identical halves and join them.
First Half:
Round 1: 6 sc in MR (6)
Round 2: (1 sc, 1 inc) x 3 (9)
Fasten off. Repeat for the second half.
Joining the halves:
Connect the two halves and work in the round:
Round 3: (9 sc + 9 sc) (18)
Round 4: 18 sc (18)
Round 5: (4 sc, 1 dec) x 3 (15)
Round 6: (3 sc, 1 dec) x 3 (12)
Round 7: (2 sc, 1 dec) x 3 (9)
Round 8: (1 sc, 1 dec) x 3 (6)
Fasten off and hide the ends. Use a long piece of red yarn to create a strap and sew the heart to the puppy.
Finishing
Once all the pieces are crocheted, it is time for assembly! Use your yarn needle to sew the head to the body, the arms to the sides, and the ears to the top of the head. Ensure the limbs are positioned in a way that allows the puppy to sit or stand upright. Finally, attach the heart bag using the red strap. Your Dalmatian is now ready for cuddles!
Tips
- Tension is Key: When working with velvet yarn, it is easy to lose your stitches. Use stitch markers religiously to keep track of your rounds.
- Invisible Decreases: Always use the invisible decrease method (inserting the hook into the front loops only of the next two stitches) to avoid gaps in your amigurumi.
- Stuffing: Don’t be afraid to stuff firmly! This prevents the “lumpiness” often seen in crochet toys and helps the shape hold up over time.
- Color Transitions: When changing colors, pull the new color through the last loop of the previous stitch to make the boundary between black and white spots look seamless.