Adorable Crochet Easter Bunny Pattern: A Step-by-Step Amigurumi Tutorial
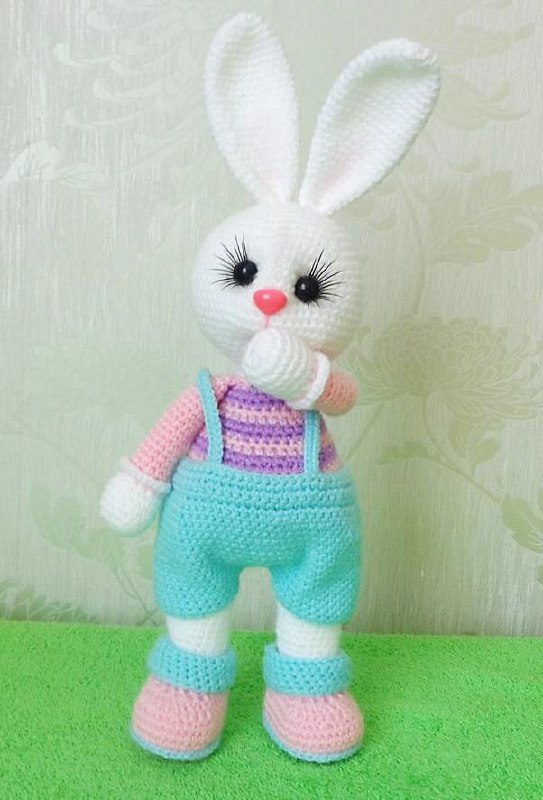
Looking for the perfect spring project? This sweet, stylish amigurumi bunny is a wonderful addition to any crochet collection. With its colorful striped outfit, cute little boots, and long floppy ears, this bunny is designed to bring a smile to anyone’s face. Whether you are making this as a gift for a loved one or a festive decoration for your home, this detailed guide will walk you through every stitch.
This pattern is written for beginners and intermediate crocheters. We will be working primarily in continuous rounds, which is standard for amigurumi, to create a seamless, professional look. Let’s grab our hooks and yarn and get started!
Materials & Abbreviations
To create your bunny, you will need the following supplies. While the original was made with a baby-specific yarn, any medium-weight (worsted or DK) yarn will work beautifully. Just keep in mind that changing yarn weights will change the final size of your bunny.
Materials Needed
- Yarn: Medium weight yarn in White, Pink, Light Pink, Dark Pink, and Turquoise.
- Crochet Hook: A size appropriate for your yarn (typically 2.5mm to 3.5mm for amigurumi).
- Safety Eyes: 10mm black safety eyes or black buttons.
- Stuffing: Polyester fiberfill.
- Accessories: False eyelashes, a small pink plastic nose (or pink embroidery floss), and 2 small buttons for the overalls.
- Tools: Yarn needle, stitch markers, and scissors.
Abbreviations (US Terms)
- MR: Magic Ring
- ch: Chain
- sc: Single crochet
- inc: Increase (2 sc in one stitch)
- dec: Decrease (sc 2 together)
- dc: Double crochet
- dc-dec: Double crochet decrease
- sl st: Slip stitch
- BLO: Back loop only
- FLO: Front loop only
- st(s): Stitch(es)
Step-by-Step Instructions
The Shoes and Legs
We start by creating the boots and legs. You will make two of these in total. Start with Pink yarn.
The Boot:
- Round 1: Ch 7. In the 2nd ch from hook, inc; 4 sc; 4 sc in the last ch. Working along the other side of the chain: 4 sc, inc (16 sts).
- Round 2: sc, inc, 4 sc, 4 inc, 4 sc, inc, sc (22 sts).
- Round 3: 2 sc, inc, 4 sc, (sc, inc) x 4, 4 sc, inc, 2 sc (28 sts).
- Round 4: 3 sc, inc, 4 sc, (2 sc, inc) x 4, 4 sc, inc, 3 sc (34 sts).
- Round 5: 2 inc, 15 sc, 2 inc, 15 sc (38 sts).
- Round 6: 38 sc in BLO.
- Rounds 7-8: 38 sc.
- Round 9: 12 sc, (dc, dc-dec) x 6, 8 sc (32 sts).
- Round 10: 12 sc, dc-dec, 8 sc (26 sts).
Change yarn to White.
- Round 11: (2 sc, dec) x 6, 2 sc in BLO (20 sts).
- Round 12: (2 sc, dec), 14 sc, dec (18 sts).
- Rounds 13-16: 18 sc.
- Round 17: (5 sc, inc) x 3 (21 sts).
- Rounds 18-30: 21 sc. Fasten off and weave in ends.
The Cuffs (Turquoise):
Attach Turquoise yarn to the back of the heel where the pink and white yarn meet. Work in rounds.
- Round 1: ch 1, 26 sc, sl st to join.
- Rounds 2-5: ch 1, 26 sc, sl st to join.
- Round 6: ch 1, 26 sc worked in FLO, sl st to join.
- Rounds 7-10: ch 1, 26 sc, sl st to join. Fasten off and fold the top edge down.
Repeat for the second leg. Once both legs are complete, join them together by attaching the yarn to Round 6 of the legs and working a round of slip stitches to connect them.
The Paws
Make two paws. Start with White yarn.
- Round 1: 6 sc in MR (6 sts).
- Round 2: 6 inc (12 sts).
- Round 3: (sc, inc) x 6 (18 sts).
- Rounds 4-7: 18 sc.
- Round 8: (4 sc, dec) x 3 (15 sts).
Change to Pink yarn.
- Round 9: (3 sc, dec) x 3 (12 sts).
- Round 10: 12 sc in BLO.
- Rounds 11-26: 12 sc.
- Fold the piece in half and sc across 5 sts to close the end. Attach yarn to Round 10 and work a round of 12 inc (24 sts) to create a base. Fasten off, leaving a long tail for sewing.
The Body
Continue from the legs using White yarn.
- Round 31: Starting from the marker, work 3 sc, ch 3, join to the first leg. Work around: 21 sc, 3 sc in the ch-3 loop (back), 21 sc.
- Round 32: 3 sc in the ch-3 loop (front), 45 sc (48 sts).
- Round 33: (7 sc, inc) x 6 (54 sts).
- Rounds 34-38: 54 sc.
Change to Pink. Now, the start of your round is at the middle of the back.
- Rounds 39-40: 54 sc.
Change to Light Pink.
- Rounds 41-42: 54 sc.
Change to Dark Pink.
- Round 43: 18 sc, (sc, dec) x 6, 18 sc (48 sts).
- Rounds 44-48: 48 sc.
Change to Light Pink.
- Round 45: 48 sc.
- Round 46: 17 sc, (sc, dec) x 6, 13 sc (42 sts).
Change to Dark Pink.
- Rounds 47-48: 42 sc.
Change to Light Pink.
- Round 49: (5 sc, dec) x 6 (36 sts).
- Round 50: 36 sc.
Change to Dark Pink.
- Round 51: 36 sc.
- Round 52: (4 sc, dec) x 6 (30 sts).
Change to Light Pink.
- Rounds 53-54: 30 sc.
Change to Dark Pink.
- Round 55: (3 sc, dec) x 6 (24 sts).
- Round 56: 24 sc.
Change to White.
- Round 57: 24 sc in BLO.
- Round 58: 24 sc. Fasten off, leaving a tail for sewing.
The Head
Use White yarn.
- Round 1: 6 sc in MR (6 sts).
- Round 2: 6 inc (12 sts).
- Round 3: (sc, inc) x 6 (18 sts).
- Round 4: (2 sc, inc) x 6 (24 sts).
- Round 5: (3 sc, inc) x 6 (30 sts).
- Round 6: (4 sc, inc) x 6 (36 sts).
- Round 7: (5 sc, inc) x 6 (42 sts).
- Round 8: (6 sc, inc) x 6 (48 sts).
- Round 9: (7 sc, inc) x 6 (54 sts).
- Round 10: (8 sc, inc) x 6 (60 sts).
- Rounds 11-20: 60 sc.
- Round 21: (8 sc, dec) x 6 (54 sts).
- Round 22: (7 sc, dec) x 6 (48 sts).
- Round 23: (6 sc, dec) x 6 (42 sts).
- Round 24: (5 sc, dec) x 6 (36 sts).
- Round 25: (4 sc, dec) x 6 (30 sts).
- Round 26: (3 sc, dec) x 6 (24 sts).
- Round 27: (2 sc, dec) x 6 (18 sts).
- Round 28: (sc, dec) x 6 (12 sts).
- Round 29: 6 dec. Fasten off and hide the tail.
The Ears
Make two ears with White yarn.
- Round 1: 6 sc in MR.
- Round 2: 6 inc (12 sts).
- Round 3: 12 sc.
- Round 4: (sc, inc) x 6 (18 sts).
- Round 5: 18 sc.
- Round 6: (2 sc, inc) x 6 (24 sts).
- Rounds 7-16: 24 sc.
- Round 17: (6 sc, dec) x 3 (21 sts).
- Rounds 18-19: 21 sc.
- Round 20: (5 sc, dec) x 3 (18 sts).
- Rounds 21-22: 18 sc.
- Round 23: (4 sc, dec) x 3 (15 sts).
- Rounds 24-26: 15 sc.
Fold the ear in half and sc across 6 sts to close the bottom. Leave a tail for sewing.
The Overalls
Use Turquoise yarn. Work every stitch in the back loop only (BLO).
- Row 1: ch 61, sc in 2nd ch from hook and across (60 sts).
- Rows 2-4: ch 1, turn, 60 sc.
- Row 5: (9 sc, inc) x 6 (66 sts).
- Row 6: Join in a round with a sl st and work 66 sc.
- Row 7: (21 sc, inc) x 3 (69 sts).
- Rows 8-17: 69 sc. Fasten off.
Sew the center of the piece to create the crotch, leaving roughly 27-30 sts for each leg. Finish the leg holes with 2 rounds of sc. Create the straps by chaining the desired length and working sc back down the chain. Sew the straps to the waist and attach buttons for a cute finish.
Finishing
Now comes the magic part—bringing your bunny to life!
Face Sculpting
To give your bunny a professional expression, we will use a yarn needle and a long piece of white yarn to “sculpt” the face. Pull the yarn from the back of the head to the front to create indentations.
- Eye Sockets: Mark two points for the eyes (about 7-8 sts apart). Pull the yarn from one eye point, across to the other, and tighten to create a small dip for the eye. Repeat this to deepen the socket.
- The Mouth: Create a similar pull from the center of the face toward the nose area to lift the muzzle upward, giving the bunny a sweet smile.
Final Assembly
- Sew the head to the body securely.
- Attach the ears to the top of the head.
- Sew the paws to the sides of the body.
- Glue or sew on the pink nose.
- Insert the safety eyes into the sculpted sockets and add the false eyelashes for a glamorous look.
- Dress your bunny in the turquoise overalls!
Tips for Success
- Stuffing: Stuff the boots and legs firmly, but be careful not to overstuff the nose area, as this can distort the shape.
- Stitch Markers: Since we are working in continuous rounds, always use a stitch marker at the start of each round to avoid losing your place.
- Tension: Keep your tension consistent. If you notice the stuffing peeking through, try using a smaller crochet hook.
- Customization: Feel free to change the colors of the stripes or the overalls to match your favorite color palette!