Cute Crochet Capybara with Chicken Hat Free Pattern
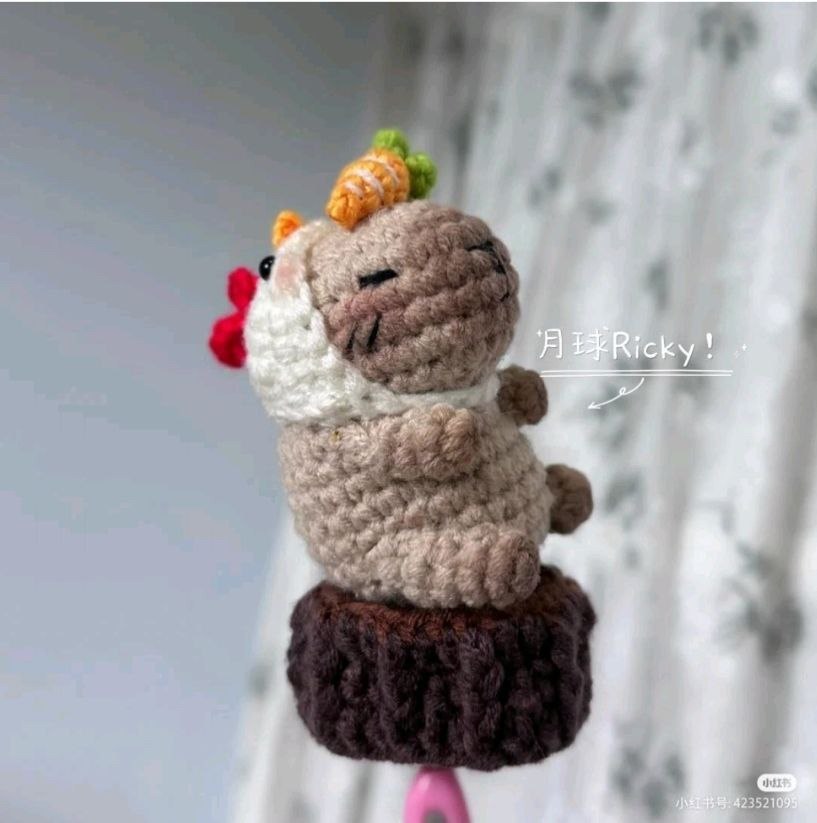
Who doesn’t love a capybara? These “giant rodents” have taken the internet by storm with their chill vibes and friendly nature. If you are looking for your next adorable amigurumi project, this crochet capybara is the perfect choice. To make it even more whimsical, this little friend comes with a tiny chicken hat and sits atop its own little wooden stump pedestal!
This pattern is designed to be beginner-friendly, using basic stitches and simple shaping. Whether you’re looking for a unique gift or a new desk companion, this little capybara is sure to bring a smile to anyone’s face. Grab your hook and some yarn, and let’s get started!
Materials & Abbreviations
To create your capybara, you will need the following materials. We recommend using a medium-weight (worsted) yarn for a sturdy, plush result.
Materials Needed:
- Yarn: Medium weight (Size 4) yarn in the following colors:
- Brown (for the capybara body)
- White or Cream (for the chicken hat)
- Orange (for the beak)
- Red (for the chicken comb)
- Dark Brown (for the stump pedestal)
- Crochet Hook: 3.25mm or 3.5mm (D or E) hook.
- Stuffing: Polyester fiberfill or similar stuffing.
- Eyes: 6mm or 8mm safety eyes.
- Other Tools: Yarn needle, scissors, and stitch markers.
Abbreviations (US Terms):
- ch: Chain
- sc: Single crochet
- inc: Increase (2 sc in the same stitch)
- dec: Decrease (sc 2 together)
- hdc: Half double crochet
- dc: Double crochet
- tr: Treble crochet
- sl st: Slip stitch
- MR: Magic Ring
- st: Stitch
Step-by-Step Instructions
The Body
The body is worked in a continuous spiral. Do not join rounds unless specified.
- Round 1: Ch 5. Starting in the 2nd ch from the hook: 3 sc, 3 sc in the last chain, 2 sc, inc. (10 sts)
- Round 2: Inc, 2 sc, 3 inc, 2 sc, 2 inc. (17 sts)
- Round 3: Inc, 3 sc, (inc, 1 sc) repeat 3 times, 2 sc, (inc, 1 sc) repeat 2 times. (23 sts)
- Round 4: Inc, 4 sc, (inc, 2 sc) repeat 3 times, 2 sc, (inc, 2 sc) repeat 2 times. (28 sts)
- Rounds 5-7: Sc in each st around. (28 sts)
- Round 8: Sc, inc, 7 sc, dec, (sc, dec) repeat 2 times, 8 sc, inc, sc, inc. (28 sts)
- Round 9: 9 sc, 3 dec, 13 sc. (22 sts)
- Round 10: 9 sc, decrease 3 stitches together into one, 13 sc. (20 sts)
- Round 11: 8 sc, 3 inc, 12 sc. (23 sts)
- Rounds 12-14: Sc in each st around. (26 sts)
- Round 15: 2 sc, dec, 17 sc, dec, sc, dec. (21 sts)
- Round 16: Sc, dec, 15 sc, dec, sc, dec. (18 sts)
- Round 17: (Sc, dec) repeat 3 times, 2 sc, (sc, dec) repeat 3 times. (12 sts)
- Round 18: 7 dec (or dec until closed).
Fasten off and weave in the ends. Stuff the body firmly with fiberfill.
The Chicken Hat
The hat starts in rounds and then switches to rows to create the chicken shape.
- Round 1: 6 sc in MR.
- Round 2: 6 inc. (12 sts)
- Round 3: (Sc, inc) repeat 6 times. (18 sts)
Switch to turning rows:
- Row 4: 15 dc. Ch 1, turn.
- Row 5: 2 tr, 2 dc, 2 hdc, 3 inc, 2 hdc, 2 dc, 2 tr. Ch 1, turn.
- Row 6: Inc tr, tr, 2 dc, 2 hdc, 6 sc, 2 hdc, 2 dc, tr, inc tr.
- Row 7: Ch 10, then slip stitch to the opposite end of the piece to secure the shape.
Hat Accessories (Beak and Comb)
The Beak:
- Ch 2, work 2 sc in each chain. Fasten off.
The Comb:
- Join red yarn to the top of the hat. Work (5 ch, sl st) repeat 2 times. Fasten off.
The Legs (Make 2)
- Round 1: 6 sc in MR.
- Rounds 2-3: Sc in each st around. (6 sts)
Switch to turning rows:
- Row 4: 4 sc. Ch 1, turn.
- Row 5: 2 dec. Ch 1, turn.
- Row 6: Dec. Fasten off.
The Arms (Make 2)
- Round 1: 5 sc in MR.
- Round 2: Sc in each st around. (5 sts)
Switch to turning rows:
- Row 3: 3 sc. Ch 1, turn.
- Row 4: Sc, dec. Ch 1, turn.
- Row 5: Dec. Fasten off.
The Pedestal Stump
- Round 1: 6 sc in MR.
- Round 2: 6 inc. (12 sts)
- Round 3: (Sc, inc) repeat 6 times. (18 sts)
- Round 4: (2 sc, inc) repeat 6 times. (24 sts)
- Round 5: (3 sc, inc) repeat 6 times. (30 sts)
- Round 6: Sl st to join, work 30 dc around.
- Rounds 7-9: (2 regular dc, 1 popcorn stitch) repeat 10 times.
- Round 10: Sl st to join, (3 sc, dec) repeat 6 times. (24 sts)
- Round 11: (2 sc, dec) repeat 6 times. (18 sts)
- Round 12: Stuff the stump. (Sc, dec) repeat 6 times. (12 sts)
- Round 13: 6 dec.
Fasten off and weave in ends.
Finishing
Now comes the fun part: putting your capybara together!
- Eyes: Place the safety eyes on the face, approximately between rounds 6 and 8 of the body, spaced apart to give that sleepy capybara look.
- Assembly: Sew the arms to the sides of the body and the legs to the bottom.
- The Hat: Sew the beak to the front of the chicken hat, then place the hat on the capybara’s head and sew it securely in place.
- The Pedestal: Sew the bottom of the capybara’s body to the top of the stump. Ensure it is centered so your capybara stays balanced.
Tips for Success
- Tension: Keep your stitches tight, especially when working the body, to prevent the stuffing from showing through.
- Popcorn Stitches: If you are new to the popcorn stitch used in the stump, remember that it involves working several double crochets into one stitch and then joining them together to create a “bobble” effect. This gives the stump its realistic, bark-like texture.
- Customization: Feel free to change the hat! You could make a frog hat, a bee hat, or even a tiny crown to give your capybara more personality.
- Stitch Markers: Since amigurumi is worked in spirals, always use a stitch marker in the first stitch of each round so you don’t lose your place.