Crochet Amigurumi Duck Pattern: A Step-by-Step Tutorial for Mark the Duckling
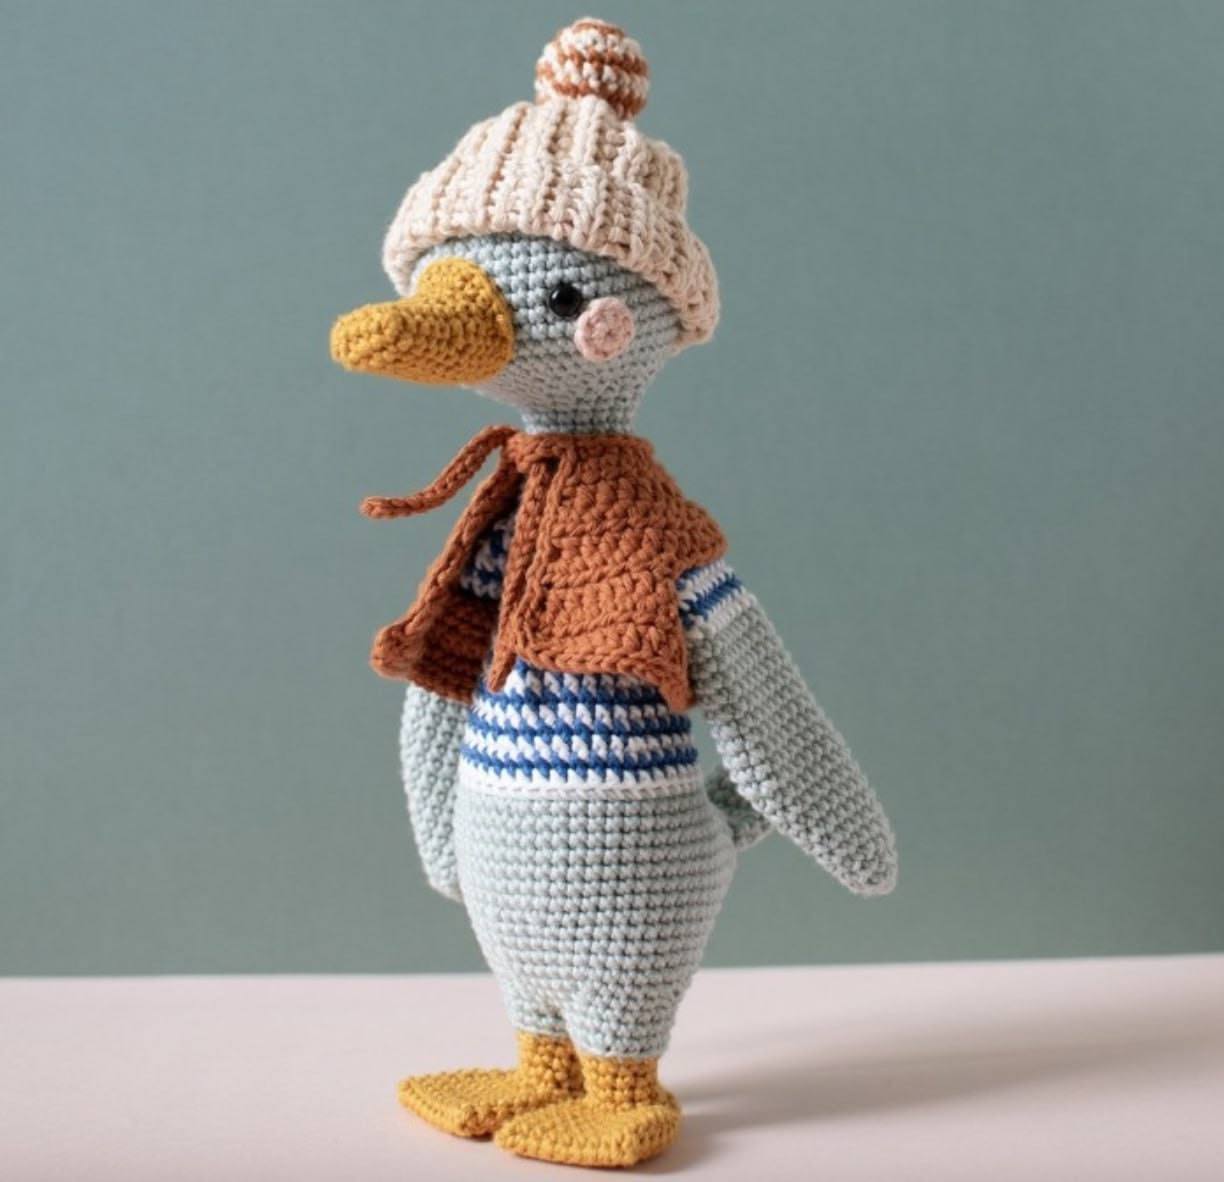
Are you looking for your next adorable crochet project? Meet Mark, the most charming little duckling you’ll ever make! This amigurumi duck is the perfect blend of cozy and cute, featuring a tiny striped body, a warm little cape, and a snug knit-style hat. Whether you are looking to create a unique nursery decoration, a sweet baby shower gift, or just a new desk buddy, this duckling pattern is a delightful challenge for intermediate crocheters.
In this tutorial, I will walk you through the entire process of creating Mark from scratch. We will work through his tiny accessories, his striped body, and even his little legs. Grab your favorite cotton yarn and a cup of tea, and let’s get stitching!
Materials & Abbreviations
To ensure your duckling turns out looking just like the photos, I recommend using a smooth cotton yarn. This provides great stitch definition, which is essential for amigurumi.
Materials Needed:
- Yarn: Medium weight (worsted) cotton yarn. You will need several colors: a main body color (e.g., light blue or grey), a bright color for stripes (e.g., navy and white), a tan/yellow for the beak and feet, a nude/beige for the cheeks, a brown for the cape, and a nude shade for the hat and pom-pom.
- Hook: A crochet hook appropriate for your yarn weight (typically 3.0mm to 3.5mm for amigurumi to keep stitches tight).
- Stuffing: High-quality polyester fiberfill.
- Eyes: 6mm to 8mm safety eyes.
- Notions: Tapestry needle, stitch markers, scissors, and a crochet hook for sewing.
US Crochet Abbreviations:
- MR: Magic Ring
- ch: Chain
- sc: Single crochet
- hdc: Half double crochet
- sl st: Slip stitch
- inc: Increase (2 sc in one stitch)
- dec: Decrease (sc 2 together)
- BLO: Back loop only
- FLO: Front loop only
Note: This pattern is worked in a continuous spiral. Please use a stitch marker to keep track of the beginning of each round.
Step-by-Step Instructions
The Cheeks (Make 2)
Using a soft peach/nude color:
- Round 1: 8 sc in a magic ring [8].
Fasten off, leaving a long tail for sewing. Do not stuff.
The Beak
Using a bright yellow or orange color:
Start by making 6 ch. You will work stitches on both sides of the chain.
- Round 1: From the 2nd ch from the hook: 4 sc, then 3 sc in the last ch. Now, working on the opposite side of the chain: 3 sc, 1 inc [12].
- Rounds 2–5: 12 sc [12].
- Round 6: (5 sc, inc) x2 [14].
- Rounds 7–9: 14 sc [14].
- Round 10: 2 sc, 3 inc, 9 sc [17].
- Round 11: 3 sc, 3 inc, 11 sc [20].
Fasten off, leaving a long tail. Stuff lightly before sewing.
Head and Body
Starting with your main body color (e.g., light grey or blue):
- Round 1: 6 sc in a magic ring [6].
- Round 2: 6 inc [12].
- Round 3: (1 sc, inc) x6 [18].
- Round 4: (2 sc, inc) x6 [24].
- Round 5: (3 sc, inc) x6 [30].
- Round 6: (4 sc, inc) x6 [36].
- Round 7: (5 sc, inc) x6 [42].
- Rounds 8–9: 42 sc [42].
- Round 10: (6 sc, inc) x6 [48].
- Rounds 11–16: 48 sc [48].
- Round 17: 18 sc, 6 dec, 18 sc [42].
- Round 18: (5 sc, dec) x6, 2 sc [36].
Assembly Note: Insert safety eyes between rounds 12 and 13, approximately 3 stitches away from where the beak will be. Sew the beak between rounds 9 and 16, centered on the face. The beak should be opposite the start of the round.
Continuing the Body:
- Round 19: (1 sc, dec) x12 [24].
- Round 20: (2 sc, dec) x6 [18].
- Rounds 21–26: 18 sc [18].
The Striped Pattern: Now, begin changing colors every single round to create stripes. Alternate between your two chosen stripe colors (e.g., navy and white).
- Round 27: (5 sc, inc) x3 [21].
- Rounds 28–29: 21 sc [21].
- Round 30: (6 sc, inc) x3 [24].
- Rounds 31–32: 24 sc [24].
- Round 33: (7 sc, inc) x3 [27].
- Rounds 34–35: 27 sc [27].
- Round 36: (8 sc, inc) x3 [30].
- Rounds 37–38: 30 sc [30].
- Round 39: (5 sc, inc) x5 [35].
- Rounds 40–42: 35 sc [35].
- Round 43: (6 sc, inc) x5 [40].
- Rounds 44–45: 40 sc [40].
Switch back to your main body color for the following rounds:
- Round 46: Working in BLO (Back Loop Only): 40 sc [40].
Forming the Legs
Find the center of the duck’s back. If you are not there yet, continue crocheting until you reach the center. From the center point:
- Ch 5.
- Work into the chain: 4 sc, 1 sc in the next stitch (the base of the chain), 15 sc along the body, (inc, 2 sc) x2, 1 inc, 18 sc, 3 sc along the other side of the chain, 1 inc. [53 total].
- Round 48: inc, 51 sc, inc [55].
- Round 49: inc, 54 sc [56].
- Rounds 50–51: 56 sc [56].
- Round 52: 2 sc, dec, 48 sc, dec, 2 sc [54].
- Round 53: 2 sc, dec, 46 sc, dec, 2 sc [52].
- Round 54: (5 sc, dec) x6, 2 sc [46].
- Round 55: (4 sc, dec) x6, 2 sc [40].
- Round 56: (3 sc, dec) x6, 2 sc [34].
- Round 57: (2 sc, dec) x6, 2 sc [28].
- Round 58: (1 sc, dec) x6, 2 sc [22].
- Round 59: 6 dec, 10 sc [16].
Dividing for Legs: Divide the remaining stitches into two equal parts (approximately 15 stitches per leg). Create a 3-ch bridge between the legs to connect them. Place your marker at the start of the left leg.
Leg 1
Using your yellow/tan color:
- Round 1: 15 sc on the leg + 3 sc across the bridge = 18 sc.
- Rounds 2–3: 18 sc.
- Round 4: 18 sc.
- Round 5: (1 sc, dec) x6 [12].
- Round 6: 12 sc.
- Round 7: 6 dec [6].
Fasten off, stuff, and close the opening. Hide your yarn tail.
Leg 2
Join your yarn to the other side of the 3-ch bridge. Work in FLO (Front Loop Only) to avoid twisting.
Repeat the exact same steps used for Leg 1.
The Wings (Make 2)
Using your stripe colors (alternating every round):
- Round 1: (Starting with 10 ch) 5 sc, 2 inc, 5 sc [14].
- Round 2: 14 sc.
- Round 3: 6 sc, 2 inc, 6 sc [16].
- Round 4: 16 sc.
- Round 5: 7 sc, 2 inc, 7 sc [18].
- Round 6: 18 sc.
- Round 7: 8 sc, 2 inc, 8 sc [20].
- Rounds 8–20: 20 sc.
Decrease to close the wing shape:
- Round 21: (8 sc, dec) x2 [18].
- Round 22: 18 sc.
- Round 23: (7 sc, dec) x2 [16].
- Round 24: 16 sc.
- Round 25: (6 sc, dec) x2 [14].
- Round 26: 14 sc.
- Round 27: (5 sc, dec) x2 [12].
Fasten off, leaving a long tail. Do not stuff the wings. Sew them to the sides of the body between rounds 29 and 30.
The Tail
Using the main body color:
- Round 1: 6 sc in a magic ring [6].
- Round 2: 6 inc [12].
- Rounds 3–8: 12 sc [12].
Fasten off, leaving a long tail. Do not stuff. Sew the tail to the back of the duck, centered between rounds 49 and 50.
The Cozy Cape
Using a brown color:
Ch 21. Work in rows (turning at the end of each row):
- Round 1: From 2nd ch: 20 sc, 2 ch, turn [20].
- Round 2: (4 hdc, 1 inc) x4, 2 ch, turn [24].
- Round 3: (5 hdc, 1 inc) x4, 2 ch, turn [28].
- Round 4: (6 hdc, 1 inc) x4, 2 ch, turn [32].
- Round 5: (7 hdc, 1 inc) x4, 2 ch, turn [36].
- Round 6: 6 hdc, 10 ch (skip 9 sts), 2 hdc, 1 inc, 2 hdc, 10 ch (skip 9 sts), 6 hdc, 1 inc, 2 ch, turn [40].
- Round 7: (9 hdc, 1 inc) x4, 2 ch, turn [44].
- Round 8: (10 hdc, 1 inc) x4, 2 ch, turn [48].
- Round 9: (11 hdc, 1 inc) x4, 2 ch, turn [52].
Edging: Do not turn. Work along the edge: approx 13 sl st, ch 21 (tie), 20 sl st along the chain, 20 sl st along the neckline, ch 21 (second tie), 20 sl st along the other side of the chain, and approx 13 sl st along the final edge. Work in BLO for the last row of the cape if desired for a cleaner edge. Fasten off and hide ends.
The Hat and Pom-Pom
The Hat: Using a nude/beige color:
Ch 22. Work in rows of hdc:
- Round 1: From 2nd ch: 21 hdc, 1 ch, turn [21].
- Rounds 2–34: 21 hdc (work in BLO for a textured look), 1 ch, turn [21].
Fasten off, leaving a long tail. Sew the two short ends together to form a tube. Use the remaining yarn tail to weave through the edge and pull tight to close the top. Turn the hat right-side out.
The Pom-Pom: Using nude and a secondary color:
- Round 1: 6 sc in MR [6].
- Round 2: 6 inc [12].
- Round 3: (1 sc, inc) x6 [18].
- Rounds 4–6: 18 sc [18].
- Round 7: (1 sc, dec) x6 [12].
- Round 8: 6 dec [6].
Stuff lightly, fasten off, and sew to the top of the hat.
Finishing
Now comes the magic! Assembly is key to giving Mark his personality:
- Sew the beak to the face.
- Insert safety eyes between rounds 12 and 13, about 3 stitches away from the beak.
- Sew the cheeks directly under the eyes.
- Sew the wings to the sides of the body.
- Sew the tail to the center of the back.
- Place the hat on his head and secure with a few stitches.
- Drape the cape around his neck and tie it loosely.
Tips for Success
- Tension is everything: Amigurumi should be worked with slightly tighter tension than a standard scarf to ensure the stuffing doesn’t peek through the stitches.
- Use a marker: Since amigurumi is worked in a continuous spiral, it is incredibly easy to lose your place. Always use a stitch marker.
- Be patient: If your stitches aren’t looking perfect on the first try, don’t worry! Crochet is a skill that improves with every project.
- Sizing: Depending on your yarn and hook, your duckling should be approximately 6 to 7 inches tall.