Adorable Crochet Seal Pattern: A Step-by-Step Amigurumi Tutorial
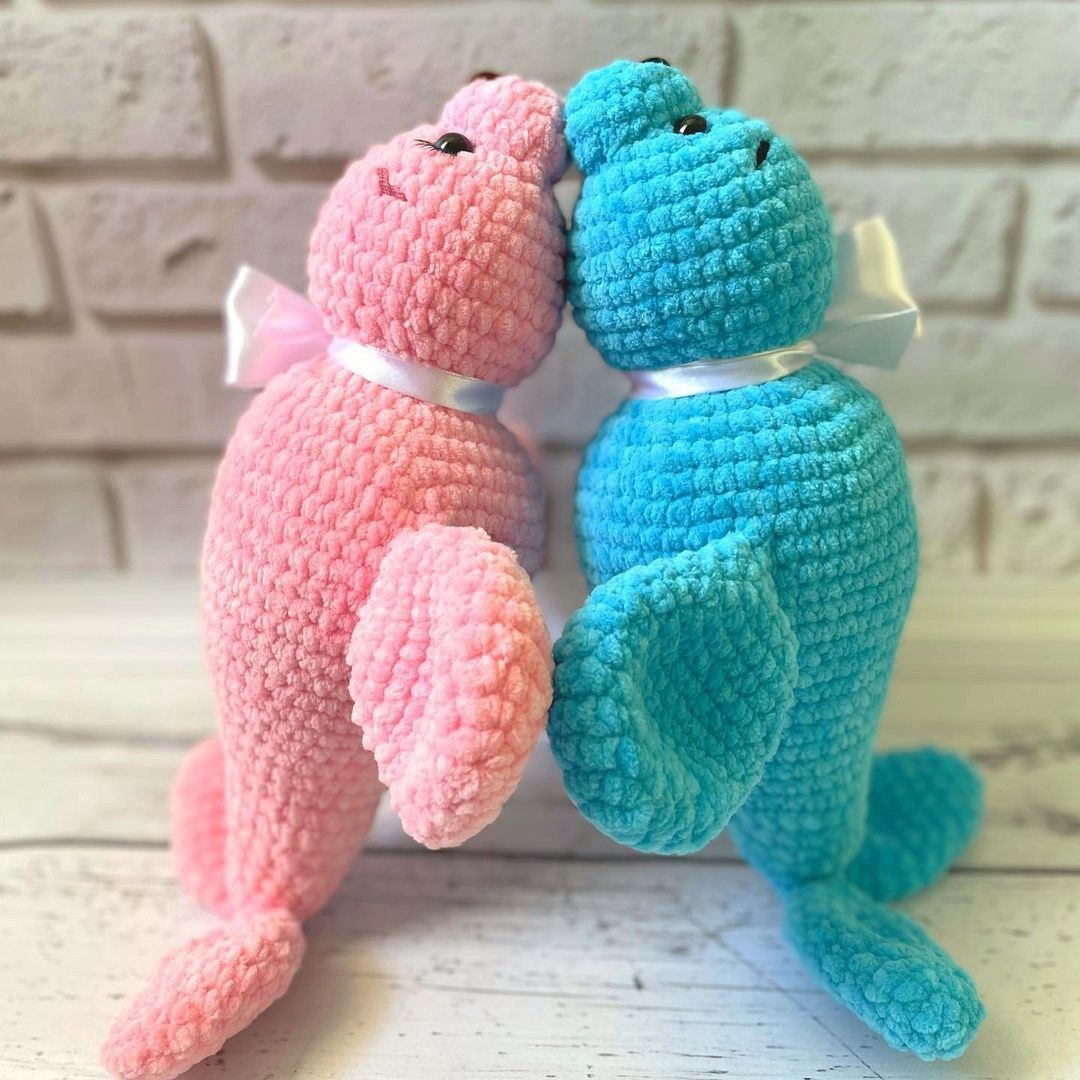
There is nothing quite as heartwarming as a handmade plushie, especially when it is as soft and squishy as a little seal! If you are looking for your next crochet project, this adorable crochet seal pattern is the perfect choice. Whether you are making a nursery decoration, a gift for a loved one, or a new friend for your own collection, these velvet-textured seals are guaranteed to bring a smile to anyone’s face.
This pattern uses chunky, chenille-style yarn to create a high-end, boutique look that feels incredibly cuddly. The design features a sweet, slightly tilted head and large, expressive eyes that give the seal a soulful, lovable personality. While the project looks impressive, the construction is straightforward, making it a fantastic project for intermediate beginners or anyone looking to practice amigurumi shaping.
Introduction
Welcome to your new favorite crochet project! This seal amigurumi is designed to be worked in a continuous spiral, which is a standard technique in amigurumi to avoid visible seams. Because we are using plush, velvet-style yarn, the finished seal will measure approximately 12 inches long, making it a substantial and huggable size.
This tutorial is written with clarity in mind. We will walk through every piece—from the tiny snout to the wide flippers—ensuring you have a smooth crafting experience. Grab your favorite cozy yarn, find a comfortable spot, and let’s dive into the wonderful world of marine life crochet!
Materials & Abbreviations
Before we pick up our hooks, let’s make sure you have everything you need. Using the right materials is key to achieving that professional, velvety finish seen in the photos.
Required Materials
- Yarn: 1 skein of bulky chenille or velvet yarn (such as Himalaya Dolphin Baby or a similar brand). You can choose any color you like—classic blue, soft pink, or even a sea-foam green!
- Crochet Hook: 4.0 mm (G/6) hook.
- Stuffing: High-quality polyester fiberfill for toy stuffing.
- Safety Eyes: Large safety eyes (size varies, but usually around 10-12mm).
- Safety Nose: A small safety nose or a black button.
- Sculpting Thread: A piece of strong, thick thread in a color matching your yarn to shape the snout.
- Extras: A stitch marker (highly recommended), a yarn needle, and an optional satin ribbon for a cute neck accessory.
Abbreviations (US Terms)
- MR: Magic Ring
- sc: Single crochet
- inc: Increase (2 sc in one stitch)
- dec: Decrease (sc 2 stitches together)
- sl st: Slip stitch
- ( ) : The number in parentheses indicates the total stitch count at the end of the round.
Step-by-Step Instructions
Note: For all parts, work in continuous rounds. Do not join rounds with a slip stitch unless specifically instructed.
Making the Head
The head is worked first and should be stuffed as you go to ensure a firm, rounded shape.
- Round 1: 6 sc in a MR (6)
- Round 2: 6 inc (12)
- Round 3: (1 sc, inc) x 6 (18)
- Round 4: (2 sc, inc) x 6 (24)
- Round 5: (3 sc, inc) x 6 (30)
- Round 6: (4 sc, inc) x 6 (36)
- Rounds 7-11: 36 sc (36)
Eye Placement: Before continuing, insert your safety eyes between rounds 4 and 5. Make sure they are spaced approximately 7 stitches apart. This placement ensures the face looks natural and sweet.
- Round 12: (4 sc, dec) x 6 (30)
- Round 13: (3 sc, dec) x 6 (24)
- Round 14: 24 sc (24)
- Round 15: 6 sc, 6 dec, 6 sc (18). Note: This specific sequence creates a slight indentation that gives the head its adorable tilted appearance.
Do not cut the yarn! We will continue directly from the head into the body.
Creating the Body
The body is quite large and provides the weight for the seal. Stuff it firmly as you work.
- Round 16: inc in every stitch around (36)
- Round 17: (5 sc, inc) x 6 (42)
- Round 18: (6 sc, inc) x 6 (48)
- Round 19: (7 sc, inc) x 6 (54)
- Rounds 20-24: 54 sc (54)
- Round 25: (7 sc, dec) x 6 (48)
- Rounds 26-27: 48 sc (48)
- Round 28: (6 sc, dec) x 6 (42)
- Round 29: 42 sc (42)
- Round 30: (5 sc, dec) x 6 (36)
- Round 31: 36 sc (36)
- Round 32: (4 sc, dec) x 6 (30)
- Rounds 33-34: 30 sc (30)
- Round 35: (3 sc, dec) x 6 (24)
- Rounds 36-37: 24 sc (24)
- Round 38: (2 sc, dec) x 6 (18)
- Rounds 39-40: 18 sc (18)
- Round 41: (1 sc, dec) x 6 (12)
- Rounds 42-43: 12 sc (12)
Fold the body in half and sew the two sides together horizontally using a single crochet stitch. Stuff the body very well.
Crafting the Flippers
Upper Flippers (Make 2)
Note: These pieces are not stuffed.
- Round 1: 6 sc in a MR (6)
- Round 2: 6 inc (12)
- Round 3: (1 sc, inc) x 6 (18)
- Round 4: (2 sc, inc) x 6 (24)
- Rounds 5-9: 24 sc (24)
- Round 10: (3 sc, dec) x 4. At the end of the round, you will have 4 stitches left; simply work 4 sc in those stitches (20)
- Round 11: 20 sc (20)
- Round 12: (3 sc, dec) x 4 (16)
- Round 13: (2 sc, dec) x 4 (12)
- Round 14: 12 sc (12)
Fold the flipper in half and join the edges together by working 6 sc through both layers.
Lower Flippers / Tail (Make 2)
Note: These pieces are not stuffed.
- Round 1: 4 sc in a MR (4)
- Round 2: 4 inc (8)
- Round 3: (1 sc, inc) x 4 (12)
- Round 4: 12 sc (12)
- Round 5: (2 sc, inc) x 4 (16)
- Round 6: (3 sc, inc) x 4 (20)
- Round 7: 20 sc (20)
- Round 8: (3 sc, dec) x 4 (16)
- Round 9: (2 sc, dec) x 4 (12)
- Round 10: (1 sc, dec) x 4 (8)
Do not join the edges. Leave a long tail of yarn for sewing the tail to the body.
The Cute Snout
- Round 1: 6 sc in a MR (6)
- Round 2: 6 inc (12)
- Round 3: (1 sc, inc) x 6 (18)
- Round 4: (2 sc, inc) x 6 (24)
- Round 5: 24 sc and 1 sl st (24)
Leave a long tail for sewing. Insert your safety nose between rounds 3 and 4.
Finishing
Now it is time for the magic! Assembly is where your seal truly comes to life.
Assembly Guide
- The Snout: Sew the snout directly underneath the eyes. Add a tiny amount of stuffing inside the snout before sewing it shut to give it a bit of volume. Once sewn, use your strong sculpting thread to pull the thread through the snout to create a cute, pointed shape.
- The Flippers: Sew the upper flippers to the sides of the body. For the best look, count 6 rounds down from the neck area before attaching them.
- The Tail: To attach the tail, insert the tip of the body into one of the tail pieces and sew it in place with the remaining yarn tail. Repeat this process on the other side to secure the tail to the body.
- Final Touches: If you like, tie a small satin ribbon around the neck to add a touch of charm!
Tips
To ensure your amigurumi turns out perfectly, keep these professional tips in mind:
- Tension is Key: When working with velvet yarn, it is very easy to lose stitches in the “fluff.” Use stitch markers religiously so you always know where your round begins.
- Stuffing Strategy: Don’t just shove stuffing in! Work in small clumps to avoid lumps, especially in the head and the snout area.
- Safety First: If you are making this for a small child, consider embroidering the eyes and nose with black yarn instead of using plastic safety parts to avoid any choking hazards.
- Lighting: Since velvet yarn has a lot of sheen, try to crochet in a well-lit area so you can clearly see your stitch definition.