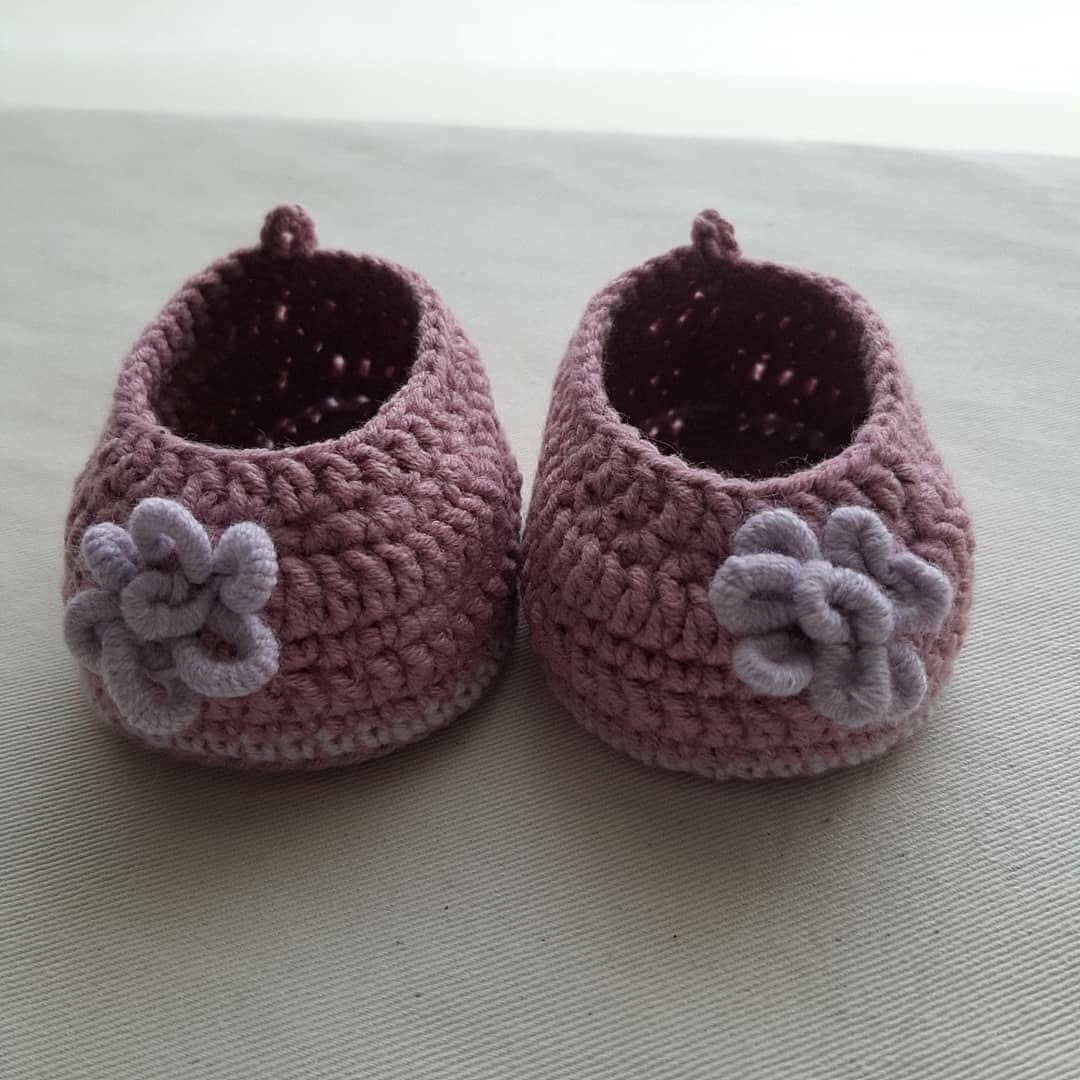
Adorable Crochet Baby Booties with Flower Detail: A Step-by-Step Pattern
There is nothing quite as precious as a pair of tiny, handmade baby booties. Whether you are preparing for a new arrival in the family, looking for the perfect baby shower gift, or simply want to add some handmade charm to your nursery, these crochet booties are the ultimate project. They are sweet, stylish, and feature a delicate flower accent that adds a touch of elegance to the soft, cozy design.
In this tutorial, we will walk through the entire process of creating these darling booties. This pattern is designed to be beginner-friendly, focusing on foundational stitches like single crochet and double crochet. By the end of this guide, you will have a finished pair of booties that look professional and feel incredibly soft against a baby’s delicate skin.
Materials & Abbreviations
Before we pick up our hooks, let’s make sure you have everything you need. To achieve the look seen in the photos, I recommend using a soft cotton or cotton-blend yarn, which provides great stitch definition and stays comfortable for little feet.
What You Will Need
- Yarn: Approximately 75–100 yards of DK weight or light worsted weight yarn (a cotton/acrylic blend like YarnArt Jeans works beautifully). You will need your main color for the booties and a contrasting color for the decorative flower.
- Crochet Hook: A 2.0 mm (US size B) crochet hook.
- Tapestry Needle: For weaving in ends and assembly.
- Scissors: To cut your yarn.
- Stitch Markers: Highly recommended to keep track of your rounds.
Abbreviations (US Terms)
This pattern uses standard US crochet terminology. If you are used to UK terms, please be sure to double-check your stitch heights!
- ch: chain
- sc: single crochet
- dc: double crochet
- sl st: slip stitch
- inc: increase (two stitches worked into the same stitch)
- dec: decrease (two stitches worked together to create one)
- BLO: back loop only
- st(s): stitch(es)
Step-by-Step Instructions
You will need to make two identical booties. To ensure they are perfectly symmetrical, I recommend making one, then making the second. If you find you are running low on yarn, check your tension to ensure you aren’t pulling too tightly!
The Sole (The Foundation)
We begin by creating an oval base that will form the bottom of the foot. This shape provides the necessary structure for the bootie to sit flat on a surface.
Row 1: Start with a foundation chain of 7 ch. In the second chain from your hook, work an increase (inc). Continue with 4 sc in the next stitch. In the very last chain, work 3 sc (this turns the corner). Now, working along the opposite side of your foundation chain, work 5 sc. (Total: 14 stitches)
Row 2: 2 inc, 4 sc, 3 inc, 4 sc, 1 inc. (Total: 20 stitches)
Row 3: 3 inc, 7 sc, 3 inc (using dc to add height), 7 sc. (Total: 26 stitches)
Row 4: (sc inc) x3, 7 sc, work an increase using dc, then two increases using dc, then one more increase using dc, and finish with 7 sc. (Total: 33 stitches). Note: Using double crochets during the increase phase helps shape the width of the foot more smoothly.
Row 5: 15 sc, (inc using dc) x6, 6 sc. (Total: 39 stitches)
Row 6: (inc 2 sc) x3, inc 6 sc, (inc 2 sc) x6, 5 sc. (Total: 49 stitches)
Fasten off your yarn and secure it with a tapestry needle. Your sole should now look like a small, sturdy oval. Note that the final row ends on the side of the oval.
The Upper Part (Building the Bootie)
Now we will transition from the sole to the body of the bootie. We will begin working from the middle of the heel area to build the sides upward.
Row 7: Join your yarn at the 7th stitch from the end of your sole (this marks the center of the heel). Change colors if desired. Ch 1, then work 48 sc through the Back Loops Only (BLO). Fasten off and secure. Using the BLO helps create a clean ridge where the sole meets the upper.
Row 8: Join yarn at the start of the previous row. Ch 1, work 48 sc, then finish with a sl st to join. (Total: 49 stitches)
Row 9: Ch 2, work 48 dc, then finish with a sl st to join. (Total: 49 stitches)
Row 10: Ch 1, work 48 sc, then finish with a sl st to join. (Total: 49 stitches)
Row 11: Ch 2, work 48 dc, then finish with a sl st to join. (Total: 49 stitches)
Row 12: This row begins the shaping for the ankle opening. Ch 1, work 2 sc, 1 dec, 9 sc, 1 dec, 9 sc, 1 dec, 2 sc, and finish with a sl st. (Total: 36 stitches)
Row 13: Ch 1, work 12 sc, 12 dc, 11 sc, and finish with a sl st. To create the little pull-loop at the back, work 5 ch into the same stitch where you placed your last sl st. Fasten off and weave in all ends.
Finishing
Once your two booties are complete, it is time for the most fun part: decorating! The booties in the photo feature a beautiful, textured flower on the side.
Adding the Decorative Flower
While you can customize these as you wish, a simple crochet flower is a great way to complete the look. To make a basic flower:
- Create a magic ring.
- Work a series of petals (for example: ch 2, 2 dc, ch 2, sl st into the ring) around the circle.
- Repeat this 5 or 6 times until you have a full blossom.
- Fasten off and sew the flower onto the outer side of each bootie using your tapestry needle.
Ensure the flower is sewn on securely so it won’t come loose during play or washing.
Tips for Success
Crocheting for babies requires a little extra care and attention to detail. Here are a few professional tips to ensure your booties are perfect:
- Check Your Tension: If your stitches are too tight, the bootie will be stiff and won’t stretch over the baby’s foot. If they are too loose, the bootie may lose its shape. Aim for a consistent, medium tension.
- Yarn Choice Matters: Avoid using yarns with long “hairs” or fuzz (like mohair) as these can be irritating to newborn skin. Stick to smooth cotton or high-quality acrylic blends.
- Blocking is Your Friend: Once finished, you can lightly steam your booties or wet-block them to help the stitches settle into a professional, even shape.
- Safety First: If you decide to add buttons or beads instead of a crochet flower, ensure they are sewn on extremely tightly. For infants, crochet elements (like the flower used here) are much safer as they cannot be easily swallowed.
Happy crocheting! You have just created something beautiful and functional that will be cherished for years to come.