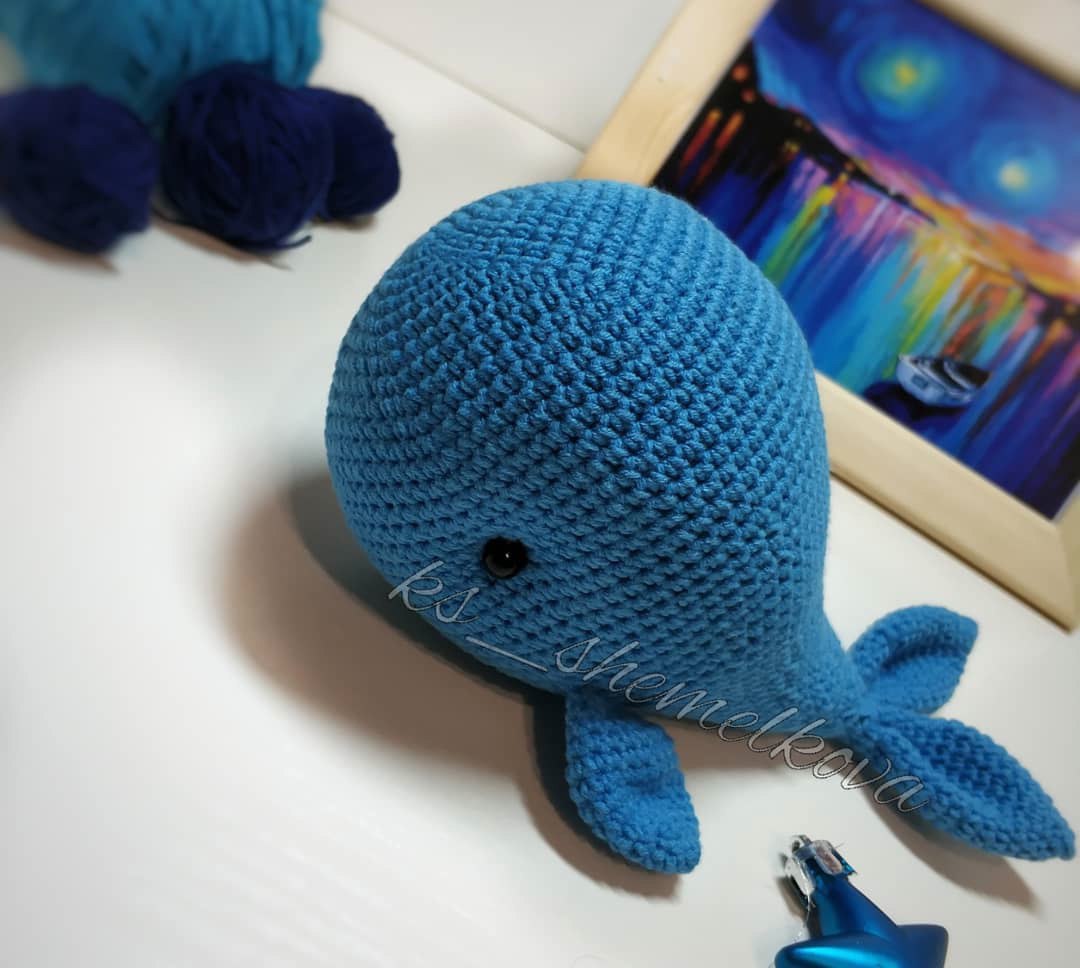
How to Crochet an Adorable Amigurumi Whale: A Step-by-Step Beginner Tutorial
Are you looking for a charming, ocean-themed project that is perfect for a nursery, a gift for a little one, or just a sweet addition to your crochet collection? This adorable amigurumi whale is the perfect solution! With its round, chunky body and tiny fins, this little sea creature is almost too cute to handle. Even if you are relatively new to the world of amigurumi, this pattern is designed to be approachable, fun, and incredibly rewarding.
Crocheting ocean animals is a wonderful way to practice your tension and shaping skills. This whale features smooth curves and a seamless transition from head to body, making it a great study in working in continuous spirals. Grab your hook and some cozy yarn, and let’s dive into this sea-inspired adventure!
Materials and Abbreviations
Before we begin, let’s make sure you have everything you need on your crochet table. Because amigurumi involves working with stuffing, it is important to use a hook size that is slightly smaller than what the yarn label suggests. This ensures your stitches are tight enough that the stuffing doesn’t peek through the gaps.
What You Will Need
- Yarn: A medium-weight cotton or cotton-blend yarn (approximately 160 yards / 146 meters per 50g ball). A bright blue or teal works beautifully for a classic whale look.
- Crochet Hook: 1.75 mm (to ensure tight, sturdy stitches).
- Eyes: Small black beads or 6mm–8mm safety eyes.
- Stuffing: Polyester fiberfill.
- Tapestry Needle: A blunt-ended needle for sewing the pieces together and weaving in ends.
- Scissors: For cutting your yarn.
Abbreviations (US Crochet Terms)
This pattern is written using standard US crochet terminology. Please ensure you are using US terms to avoid confusion with UK terminology!
- MR: Magic Ring (also known as Magic Circle)
- sc: Single crochet
- inc: Increase (2 single crochets in the same stitch)
- dec: Decrease (invisible decrease is recommended for amigurumi)
- sl st: Slip stitch
- st(s): Stitch(es)
Note: All instructions are to be worked in a continuous spiral. Do not join the rounds with a slip stitch unless specifically instructed.
Step-by-Step Instructions
The Whale Body
The body is worked as one continuous piece that transitions from a rounded head into a thicker body. As you work, remember to stuff the piece firmly but evenly as you progress to maintain its shape.
Round 1: Create a Magic Ring and work 6 sc into it. (6)
Round 2: 6 inc. (12)
Round 3: (1 sc, inc) repeat 6 times. (18)
Round 4: (2 sc, inc) repeat 6 times. (24)
Round 5: (3 sc, inc) repeat 6 times. (30)
Round 6: (4 sc, inc) repeat 6 times. (36)
Round 7: (5 sc, inc) repeat 6 times. (42)
Round 8: (6 sc, inc) repeat 6 times. (48)
Round 9: (7 sc, inc) repeat 6 times. (54)<
Round 10: (8 sc, inc) repeat 6 times. (60)
Round 11: (9 sc, inc) repeat 6 times. (66)
Round 12: (10 sc, inc) repeat 6 times. (72)
Rounds 13–24: sc in each stitch around. (72)
Round 25: (10 sc, dec) repeat 6 times. (66)
Round 26: sc in each stitch around. (66)
Round 27: (9 sc, dec) repeat 6 times. (60)
Round 28: sc in each stitch around. (60)
Round 29: (8 sc, dec) repeat 6 times. (54)
Round 30: sc in each stitch around. (54)
Round 31: (7 sc, dec) repeat 6 times. (48)
Round 32: sc in each stitch around. (48)
Round 33: (6 sc, dec) repeat 6 times. (42)
Round 34: sc in each stitch around. (42)
Round 35: dec, (8 sc, dec) repeat 4 times. (37)
Round 36: sc in each stitch around. (37)
Round 37: 1 sc, (7 sc, dec) repeat 4 times. (33)
Round 38: sc in each stitch around. (33)
Round 39: 1 sc, (6 sc, dec) repeat 4 times. (29)
Round 40: sc in each stitch around. (29)
Round 41: 1 sc, (5 sc, dec) repeat 4 times. (25)
Round 42: sc in each stitch around. (25)
Round 43: 1 sc, (4 sc, dec) repeat 4 times. (21)
Round 44: sc in each stitch around. (21)
Round 45: dec, (4 sc, dec) repeat 3 times, then 1 sc. (17)
Round 46: sc in each stitch around. (17)
Round 47: dec, (5 sc, dec) repeat 2 times, then 1 sc. (14)
Round 48: sc in each stitch around. (14)
Round 49: dec, (1 sc, dec) repeat 4 times. (9)
Fasten off with a slip stitch and leave a tail approximately 8 inches long for sewing the tail to the body.
The Tail (Make 2)
You will need to create two identical tail pieces to give your whale its signature look.
Round 1: Create a Magic Ring and work 5 sc into it. (5)
Round 2: 2 sc, inc, 2 sc. (6)
Round 3: (2 sc, inc) repeat 2 times. (8)
Round 4: (1 sc, inc) repeat 4 times. (12)
Round 5: sc in each stitch around. (12)
Round 6: (2 sc, inc) repeat 4 times. (16)
Round 7: sc in each stitch around. (16)
Round 8: (3 sc, inc) repeat 4 times. (20)
Rounds 9–11: sc in each stitch around. (20)
Round 12: (2 sc, dec) repeat 5 times. (15)
Rounds 13–14: sc in each stitch around. (15)
Round 15: (3 sc, dec) repeat 3 times. (12)
Round 16: (2 sc, dec) repeat 3 times. (9)
Round 17: sc in each stitch around. (9)
Round 18: dec, 7 sc. (8)
Fasten off with a slip stitch and leave a tail for sewing.
The Fins (Make 2)
The fins add character and help the whale “swim.” Make two of these pieces.
Round 1: Create a Magic Ring and work 6 sc into it. (6)
Round 2: (2 sc, inc) repeat 2 times. (8)
Round 3: (3 sc, inc) repeat 2 times. (10)
Round 4: (1 sc, inc) repeat 5 times. (15)
Round 5: sc in each stitch around. (15)
Round 6: (3 sc, inc) repeat 3 times. (18)
Round 7: (8 sc, inc) repeat 2 times. (20)
Rounds 8–10: sc in each stitch around. (20)
Round 11: 1 sc, (dec, 1 sc) repeat 6 times, 1 sc. (14)
Round 12: (5 sc, dec) repeat 2 times. (12)
Round 13: (1 sc, dec) repeat 4 times. (8)
Round 14: sc in each stitch around. (8)
Fasten off with a slip stitch and leave a long tail for sewing.
Finishing
Now that all your pieces are crocheted, it is time to bring your whale to life!
Assembly
- Attach the Tail: Using your tapestry needle and the tail from the body, sew the two tail pieces together at the base and then attach them to the back of the whale body.
- Attach the Fins: Position the fins on the sides of the body. Most people find that placing them roughly in the middle or slightly below the middle of the body looks most natural. Use your tapestry needle to sew them securely in place.
- Add the Eyes: This is where the personality comes in! Position your beads or safety eyes on the front of the head. A good rule of thumb is to place them slightly lower than the horizontal center of the body to give the whale an adorable, wide-eyed look.
Sculpting the Face
To give your whale a more professional, “sculpted” look, take your long tapestry needle and a piece of yarn. Pass the needle through the body where the eyes are located, pulling the yarn slightly to create a small indentation around the eye area. This mimics the look of facial features and adds depth to your amigurumi.
Tips for Success
To ensure your whale turns out as beautiful as the photo, keep these expert tips in mind:
- Use the Invisible Decrease: When working on the decreasing rounds, use the “invisible decrease” technique (inserting your hook into the front loops only of the next two stitches). This prevents large gaps from forming in your work.
- Maintain Tight Tension: Amigurumi can be tricky if your tension is too loose. If you notice stuffing showing through, try using a smaller hook or tightening your tension on the next round.
- Stuffing Technique: Stuff the body in small clumps rather than one large ball. This allows you to push the stuffing into the corners and curves, ensuring a smooth, rounded shape without lumps.
- Check Your Stitch Counts: Especially during the complex decreasing sections (like rounds 35-49), it is very easy to lose track. I highly recommend using stitch markers to keep your place in the spiral.
Happy crocheting! We hope you enjoy making this little blue friend as much as we enjoyed sharing this pattern with you.