How to Crochet a Cute Amigurumi Car: A Step-by-Step Beginner Tutorial
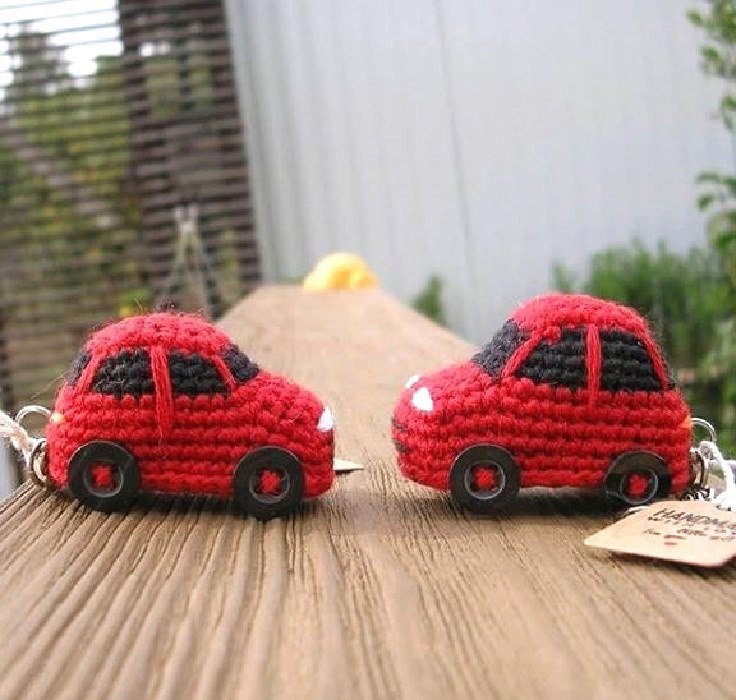
Are you looking for a fun, quick, and adorable crochet project? Whether you want to make a custom keychain, a tiny decoration for a nursery, or a charming gift for a car enthusiast, this amigurumi car pattern is the perfect solution. This little vehicle is designed to be beginner-friendly, focusing on basic stitches that allow you to practice your shaping and color changes.
Crocheting small items like this car is a fantastic way to build your confidence with amigurumi. Because the project is small, you can complete it in a single sitting, making it an ideal “palette cleanser” between larger, more complex projects. In this tutorial, we will walk through every step, from creating the base rectangle to the final embroidery that brings those little headlights to life!
Materials and Supplies
To ensure your little car turns out looking professional and holds its shape, you will need the following supplies. While you can use any colors you like, I have used red and black for this tutorial to achieve a classic look.
- Crochet Yarn: You will need two colors of medium-weight yarn.
- Main Color: This will be the body of your car (e.g., Red).
- Window Color: This will be used for the windows and cabin detail (e.g., Black).
- Crochet Hook: Choose a hook size that matches your yarn weight. A slightly smaller hook than recommended can help create tighter stitches, which prevents stuffing from showing through.
- Embroidery Thread: To add fine details, you will need:
- White: For the front headlights.
- Black: For the front radiator grille.
- Orange: For the rear taillights.
- Stuffing: High-quality polyester fiberfill to make the car plush and firm.
- Buttons: 4 small buttons of your choice to serve as the wheels.
- Sewing Needle: A blunt-tipped tapestry needle for sewing pieces together and embroidery.
- Optional: A small piece of cardboard. If you want a very sturdy base that doesn’t sag, you can place a small piece of cardboard inside the bottom before sealing it.
Crochet Abbreviations
This pattern uses standard US crochet terms. Please ensure you are following US terminology to avoid confusion with stitch heights.
- ch: chain
- sc: single crochet
- inc: increase (2 single crochets in the same stitch)
- sl st: slip stitch
- st(s): stitch(es)
- (3 sc in 1): 3 single crochets in one stitch (a triple increase)
Step-by-Step Instructions
Before we begin, it is highly recommended to use a stitch marker. This helps you keep track of the beginning of your rounds, especially when working in the round or changing colors.
Part 1: The Main Car Body (The Base)
We begin by creating the foundation of the car using your Main Color. This will be a small rectangle that we later transform into a 3D shape.
Foundation: Start by making 6 ch.
Rows 1–5: Working from the second chain from the hook, sc in each stitch across. At the end of the row, ch 1 and turn. Repeat this for a total of 5 rows.
Row 6: Sc in each of the 5 stitches. Do not turn.
Rounding the Rectangle (Row 7): To turn this flat piece into a tube, we will now work in the round around all four sides of the rectangle.
- Work 6 sc along the first side (the long edge).
- Work 5 sc along the second side (the short edge).
- Work 6 sc along the third side (the opposite long edge).
- Work 5 sc along the fourth side (the remaining short edge).
You should now have a total of 22 stitches in your round.
Part 2: Adding the Windows and Cabin Shape
Now, we will transition into the “window” section by changing colors. This gives the car its characteristic look.
Color Change: On the very last stitch of Row 7, change your yarn from the Main Color to your Window Color.
Row 8: Continue in the round. You will perform increases to expand the shape: inc, 5 sc, inc, 4 sc, inc, 5 sc, inc, 4 sc. (Total: 26 stitches).
Row 9: Sc in each of the 26 stitches. (Total: 26 stitches).
Row 10: Continue increasing: inc, 7 sc, inc, 4 sc, inc, 7 sc, inc, 4 sc. (Total: 30 stitches).
Pro Tip: If you prefer a taller car, you can add one more round of 30 sc before proceeding.
Shaping the Cabin: To create the slope for the windshield/cabin area, you will need to add a few “offset” stitches. Add 1 or 2 extra stitches as needed to reach the corner of the cabin shape. On the very last offset stitch, change your yarn back to the Main Color.
Row 11: This row creates the significant expansion needed for the cabin. Work the following: (3 sc in 1), 7 sc, (3 sc in 1), 6 sc, (3 sc in 1), 7 sc, (3 sc in 1), 6 sc. (Total: 38 stitches).
Part 3: Forming the Hood and Finishing the Body
Now we will create the hood of the car, which is worked in rows rather than rounds to create the flat front surface.
Row 12–14: Sc in the next stitch, ch 1, and turn. Continue working 8 sc across, ch 1, and turn for these three rows.
The Final Contour (Row 15): Now, we will wrap the entire car in a final round to smooth out the edges. Work in the round as follows:
- 8 sc along the front of the hood.
- 3 sc along the side of the hood.
- 30 sc around the main contour of the car body.
- 3 sc along the remaining side of the hood.
You should end with a total of 44 stitches.
Rows 16–18: Sc in each of the 44 stitches for three more rounds. This gives the car its height and volume.
To finish the body, join with a sl st, fasten off, and weave in your ends securely inside the car.
Part 4: Making the Bottom
The bottom is a separate piece that will seal the car.
Foundation: Using your Main Color, make 7 ch.
Rows 1–14: Starting from the second chain from the hook, sc in each stitch across. At the end of each row, ch 1 and turn. (Total: 6 sc per row).
Rounding the Bottom (Row 15): Work in the round around the edges of the rectangle:
- 6 sc along the first side.
- inc, 12 sc, inc along the second side.
- 6 sc along the third side.
- inc, 12 sc, inc along the fourth side.
You should end with 44 stitches. Join with a sl st, fasten off, and weave in your ends.
Assembly and Decoration
This is where your little car truly comes to life! Take your time with the assembly to ensure everything looks symmetrical.
Joining the Pieces
First, fill the car body with your stuffing. Be sure to stuff the “cabin” area firmly so the car doesn’t look deflated. If you are using a piece of cardboard for a hard bottom, place it inside now.
To join the body to the bottom, you have two options:
- Slip Stitch Method: Use a crochet hook and your main color yarn to slip stitch the 44 stitches of the body to the 44 stitches of the bottom.
- Sewing Method: Use a tapestry needle and your main color yarn to sew each stitch of the body to the corresponding stitch on the bottom. This often provides a cleaner, more secure finish.
The Finishing Touches: Embroidery and Wheels
Now for the “magic” details using your embroidery thread:
- Windows/Doors: Use your Main Color yarn to stitch simple lines or rectangles to represent the door outlines and window frames.
- Headlights: Using White thread, embroider two small circles or horizontal lines at the front of the car.
- Grille: Using Black thread, stitch a small rectangular area between the headlights to represent the radiator grille.
- Taillights: Using Orange thread, add small accents to the rear of the car.
- Wheels: Using your sewing needle, carefully sew your 4 buttons onto the sides of the car to serve as the wheels.
Pro Tips for a Perfect Crochet Car
To make your amigurumi look as professional as possible, keep these tips in mind:
Watch Your Tension: When working with amigurumi, it is tempting to pull the yarn very tight. While you want tight stitches to hide the stuffing, try to maintain a consistent tension so your increases (inc) don’t look lumpy or uneven.
Color Changing Technique: To get a clean color change, do not cut the yarn when you reach the end of a row. Instead, pull the new color through the last loop of your final stitch. This creates a seamless transition between the body and the window sections.
Use a Marker: In amigurumi, it is incredibly easy to lose count of your stitches. Always use a stitch marker at the start of your round. If you forget, a scrap piece of contrasting yarn works perfectly as a makeshift marker.
Symmetry is Key: When embroidering the headlights or attaching the wheels, step back and look at your work frequently. Ensuring the headlights are level and the wheels are at the same height will make a huge difference in the final appearance of your cute little car!