Adorable Poseable Crochet Monkey Pattern: A Complete Amigurumi Tutorial
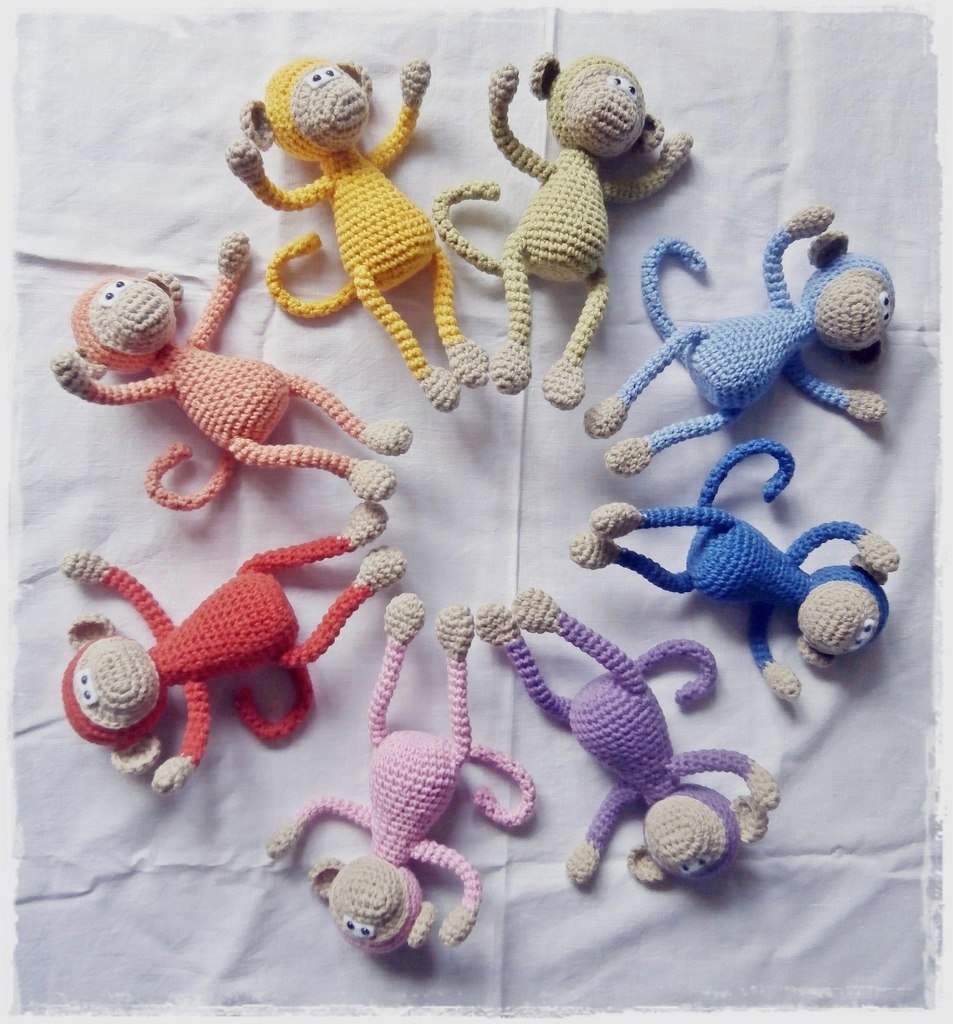
Are you looking for a fun, whimsical project to add to your crochet collection? This poseable crochet monkey is the perfect blend of cuteness and character! Whether you are making a new friend for a nursery or a quirky desk companion, this little monkey is designed to sit upright and strike adorable poses thanks to a clever wire armature. This tutorial is perfect for intermediate crocheters or ambitious beginners who want to master the art of amigurumi and limb poseability.
In this guide, we will walk through every step of the process, from crocheting the tiny head and body to assembling the limbs with wire to ensure your monkey can hang out, sit, or wave just the way you want. Grab your favorite yarn and let’s get started!
Materials & Abbreviations
To ensure your monkey turns out just like the photos, it is best to use a cotton or cotton-blend yarn. This provides the stitch definition needed for amigurumi. You will also need some craft supplies to give your monkey its “personality” and poseability.
What You Will Need:
- Yarn: DK weight yarn in two colors. You will need a main color (e.g., red, blue, or yellow) and a lighter color for the face and the tips of the paws/feet.
- Crochet Hook: 2.25mm (B-1)
- Stuffing: Polyfill or any soft fiberfill.
- Eyes: 3mm black beads or safety eyes.
- Face Detail: A small scrap of white felt (approximately 0.2 x 0.6 inches).
- Wire: 1mm craft wire (for the arms, legs, and tail).
- Weight: A small coin (like a nickel or penny) to help the monkey sit sturdily.
- Other: Scissors, tapestry needle, and some tape (clear tape, electrical tape, or masking tape) to secure the wire.
Abbreviations (US Terms):
- ch: chain
- sc: single crochet
- hdc: half double crochet
- inc: increase (2 sc in one stitch)
- dec: decrease (sc 2 together)
- st(s): stitch(es)
- […]: stitch count at the end of the round
Step-by-Step Instructions
The Head
We begin the head using the lighter color. This will form the base of the monkey’s face.
Round 1: Start with a chain of 6. In the 2nd chain from the hook, work 1 sc. Work 3 sc in the last chain. Now, turn to work on the opposite side of the foundation chain: work 3 sc, and work 2 sc in the very last chain. [12 sts]
Round 2: (1 inc, 3 sc, 3 inc, 3 sc, 2 inc) [18 sts]
Rounds 3-4: Sc in each st around [18 sts]
Round 5: Work 8 inc using hdc (half double crochet), then 10 sc [26 sts]
Pro Tip: At this point, do not cut the light yarn. Instead, carry it to the inside of the work and switch to your main color to create the outer part of the head.
Round 6: 5 sc, 2 inc, 3 sc, 2 inc, 14 sc [30 sts]
Round 7: (4 sc, 1 inc) repeat 6 times [36 sts]
Face Assembly: Before finishing the head, insert your 3mm beads into the 4th and 5th increases of Round 5. You can also use your felt scrap to create a snout or eye area.
Rounds 8-10: Sc in each st around [36 sts] for 3 rounds.
Round 11: (4 sc, 1 dec) repeat 6 times [30 sts]
Round 12: (3 sc, 1 dec) repeat 6 times [24 sts]
Round 13: (2 sc, 1 dec) repeat 6 times [18 sts]
Round 14: (1 sc, 1 dec) repeat 6 times [12 sts]
Stuff the face area lightly with polyfill, then continue stuffing the head until it reaches your desired shape.
Round 15: 6 dec [6 sts]
Fasten off, leaving a long tail for sewing.
The Body
The body is shaped like a vase to provide a stable base. Use your main color for this section.
Round 1: 6 sc [6 sts]
Round 2: 6 inc [12 sts]
Round 3: (1 sc, 1 inc) repeat 6 times [18 sts]
Round 4: (2 sc, 1 inc) repeat 6 times [24 sts]
Round 5: (3 sc, 1 inc) repeat 6 times [30 sts]
Rounds 6-8: Sc in each st around [30 sts]
Round 9: (3 sc, 1 dec) repeat 6 times [24 sts]
Rounds 10-12: Sc in each st around [24 sts]
Round 13: (2 sc, 1 dec) repeat 6 times [18 sts]
Rounds 14-16: Sc in each st around [18 sts]
Round 17: (1 sc, 1 dec) repeat 6 times [12 sts]
Rounds 18-20: Sc in each st around [12 sts]
Weighting Tip: While stuffing the body, place a small coin at the bottom. This acts as a weight to ensure the monkey stays upright and doesn’t tip over easily.
Fasten off, leaving a long tail for sewing the head to the body.
The Ears (Make 2)
Use the lighter color for the ears.
Round 1: 6 sc [6 sts]
Round 2: 6 inc [12 sts]
Round 3: 12 sc [12 sts]
Fasten off, leaving a tail for sewing.
The Arms (Make 2)
Start with the lighter color for the hands.
Round 1: 6 sc [6 sts]
Round 2: (1 sc, 1 inc) repeat 3 times [9 sts]
Rounds 3-4: 9 sc [9 sts]
Round 5: (1 sc, 1 dec) repeat 3 times [6 sts]
Switch to the main color and continue:
Rounds 6-15: 6 sc [6 sts]
Fasten off, leaving a long tail for sewing and wire insertion.
The Legs (Make 2)
Start with the lighter color for the feet.
Round 1: 6 sc [6 sts]
Round 2: 6 inc [12 sts]
Rounds 3-4: 12 sc [12 sts]
Round 5: (2 sc, 1 dec) repeat 3 times [9 sts]
Round 6: (1 sc, 1 dec) repeat 3 times [6 sts]
Switch to the main color and continue:
Rounds 7-18: 6 sc [6 sts]
Fasten off, leaving a long tail for sewing and wire insertion.
The Tail
The tail is worked in a spiral using the main color. This adds a fun, long element to your monkey.
Working in a continuous spiral, crochet 4 sc in each stitch to create a tube-like shape. Continue this until the tail is approximately 4 to 5 inches long, or until it reaches your desired length.
Fasten off, leaving a tail for the wire and for sewing.
Finishing
Preparing the Wire Armature
To make your monkey poseable, you need to prepare the wire for the limbs and tail. This is the most important step for achieving that “monkeying around” look!
- Measure: Cut lengths of 1mm wire. For the legs, add at least 1.2 inches to both ends to accommodate the feet. For the arms, add at least 1 inch to both ends. For the tail, add about 2 inches total for secure attachment.
- Create Loops: At one end of each wire, create a small loop. Secure this loop tightly using tape (clear tape or electrical tape works great). These loops will be the “anchors” inside the limbs.
- Symmetry: Create matching loops on the opposite ends of the wires.
Assembly
- Insert Limbs: Slide your prepared wire into the arms and legs. Once the wire is inside, sew the limb pieces onto the body.
- Attach Head: Sew the head onto the body. Use the long tail left from the body to ensure a sturdy connection.
- Attach Ears: Sew the ears onto the head at the level of the eyes.
- Attach Tail: Feed the wire through the tail and into the body. Sew the tail securely to the back of the monkey. To finish the tail tip, pass the yarn through the wire loop at the end and make a few small stitches to lock it in place.
Tips
- Tension Matters: When working with amigurumi, try to keep your tension tight. This prevents the stuffing from peeking through your stitches.
- Wire Safety: Always ensure the ends of your wire are well-covered with tape or tucked deeply into the stuffing so they don’t poke through the fabric.
- Customization: Don’t be afraid to play with colors! This pattern works beautifully with any color combination—try a blue monkey with light grey face/paws for a different look.
- Perfecting the Face: If your eyes aren’t perfectly symmetrical, don’t worry! The charm of amigurumi is its slight imperfection and handmade character.