Adorable Crochet Dog Pattern: A Step-by-Step Amigurumi Tutorial
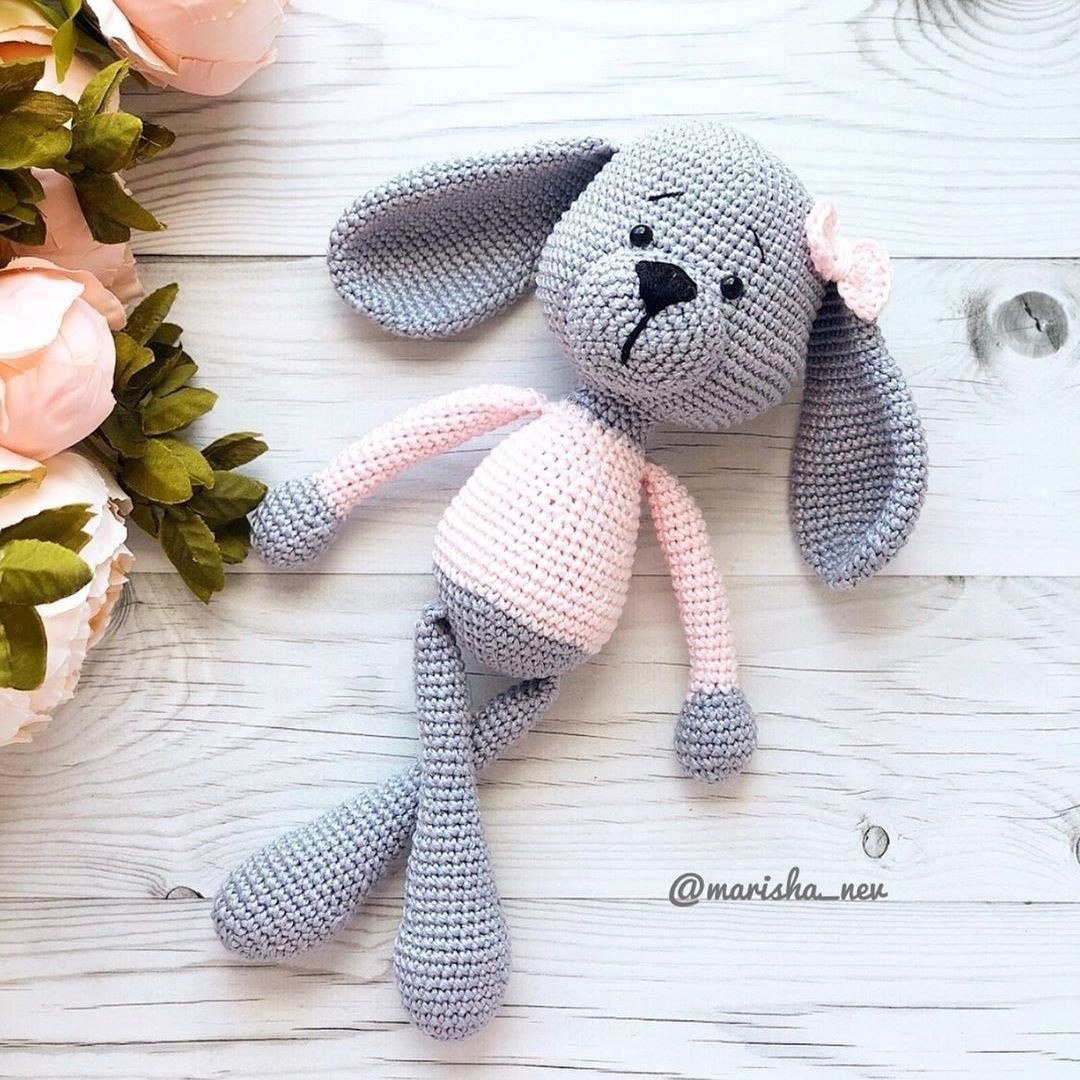
Are you looking for your next heartwarming crochet project? This adorable, floppy-eared amigurumi puppy is the perfect addition to your handmade collection. Whether you are looking to create a unique gift for a baby shower, a new companion for a child, or simply want to practice your amigurumi skills, this crochet dog pattern is designed to be charming and engaging.
This little pup features a cozy “sweater” detail and soft, long ears that make it incredibly huggable. While the design looks professional, the construction is straightforward, making it an excellent project for intermediate beginners or seasoned crocheters looking for a fun afternoon make. In this detailed tutorial, we will walk through every single stitch to ensure your puppy turns out just as cute as the pictures!
Materials & Abbreviations
Before we pick up our hooks, let’s make sure you have everything you need. To achieve the clean, polished look seen in the photos, I recommend using a smooth, non-fuzzy yarn.
Materials Needed
- Yarn: Medium weight (worsted) yarn in three colors:
- Color A: Grey (for the main body, head, ears, and limbs)
- Color B: Pink (for the sweater and ear detail)
- Color C: A secondary color for the sweater (you can use a different shade of pink or a soft white)
- Crochet Hook: 3.5mm (E) or 4.0mm (G) hook, depending on your tension.
- Safety Eyes: 8mm to 10mm black safety eyes.
- Fiberfill: High-quality polyester stuffing.
- Tapestry Needle: For sewing the pieces together and weaving in ends.
- Scissors: To trim your yarn.
- Stitch Marker: Essential for keeping track of your rounds in amigurumi.
Abbreviations (US Terms)
- MR: Magic Ring
- sc: Single crochet
- inc: Increase (2 sc in the same stitch)
- dec: Decrease (sc 2 together)
- ch: Chain
- sl st: Slip stitch
- st(s): Stitch(es)
- [ ] * 6: Repeat the instructions inside the brackets 6 times
Step-by-Step Instructions
The Head
Using Color A (Grey)
- Round 1: 6 sc in a MR (6)
- Round 2: [inc] * 6 (12)
- Round 3: [1 sc, inc] * 6 (18)
- Round 4: [2 sc, inc] * 6 (24)
- Round 5: [3 sc, inc] * 6 (30)
- Round 6: [4 sc, inc] * 6 (36)
- Round 7: [5 sc, inc] * 6 (42)
- Round 8: [6 sc, inc] * 6 (48)
- Round 9: [7 sc, inc] * 6 (54)
- Rounds 10-16: sc in each st around (54)
- Round 17: [8 sc, inc] * 6 (60)
- Round 18: [9 sc, inc] * 6 (66)
- Round 19: [10 sc, inc] * 6 (72)
- Rounds 20-22: sc in each st around (72)
- Round 23: [10 dec] * 6 (66)
- Round 24: [9 dec] * 6 (60)
- Round 25: [8 dec] * 6 (54)
- Round 26: [7 dec] * 6 (48)
- Round 27: [6 dec] * 6 (42)
- Round 28: [5 dec] * 6 (36)
- Round 29: [4 dec] * 6 (30)
- Round 30: [3 dec] * 6 (24)
- Round 31: [2 dec] * 6 (18)
Fasten off, leaving a long tail (approx. 24 inches) for sewing the head to the body.
The Muzzle
Using Color A (Grey)
- Round 1: 6 sc in a MR (6)
- Round 2: [inc] * 6 (12)
- Round 3: [1 sc, inc] * 6 (18)
- Round 4: [2 sc, inc] * 6 (24)
- Round 5: [3 sc, inc] * 6 (30)
- Rounds 6-7: sc in each st around (30)
Stuff the muzzle lightly. When sewing, follow the assembly tips in the “Finishing” section to ensure your eyes are perfectly placed!
The Body
Starting with Color A (Grey)
- Round 1: 6 sc in a MR (6)
- Round 2: [inc] * 6 (12)
- Round 3: [1 sc, inc] * 6 (18)
- Round 4: [2 sc, inc] * 6 (24)
- Round 5: [3 sc, inc] * 6 (30)
- Round 6: [4 sc, inc] * 6 (36)
- Round 7: [5 sc, inc] * 6 (42)
- Round 8: [6 sc, inc] * 6 (48)
- Round 9: sc in each st around (48)
- Round 10: sc in each st around (48)
- Round 11: Change to Color C (Sweater Color) and sc in each st around (48)
- Round 12: sc in each st around (48)
- Round 13: [6 sc, dec] * 6 (42)
- Rounds 14-16: sc in each st around (42)
- Round 17: [5 sc, dec] * 6 (36)
- Rounds 18-19: sc in each st around (36)
- Round 20: [4 sc, dec] * 6 (30)
- Round 21: sc in each st around (30)
- Round 22: Change back to Color A (Grey) and sc in each st around (30)
- Round 23: [3 sc, dec] * 6 (24)
- Round 24: sc in each st around (24)
Stuff the body firmly before closing.
The Ears (Make 2)
Using Color A (Grey)
- Round 1: 6 sc in a MR (6)
- Round 2: [inc] * 6 (12)
- Round 3: [1 sc, inc] * 6 (18)
- Round 4: [2 sc, inc] * 6 (24)
- Round 5: [3 sc, inc] * 6 (30)
- Round 6: [4 sc, inc] * 6 (36)
- Rounds 7-15: sc in each st around (36)
- Round 16: [4 dec] * 6 (30)
- Rounds 17-19: sc in each st around (30)
- Round 20: [3 dec] * 6 (24)
- Rounds 21-27: sc in each st around (24)
Flatten the ears and do not stuff them. You can add a small pink bow (using Color B) to one ear for extra cuteness!
The Tail
Using Color A (Grey)
- Round 1: 6 sc in a MR (6)
- Round 2: [inc] * 6 (12)
- Rounds 3-4: sc in each st around (12)
Fasten off and stuff lightly.
Upper Arms (Make 2)
Starting with Color A (Grey)
- Round 1: 6 sc in a MR (6)
- Round 2: [inc] * 6 (12)
- Round 3: [1 sc, inc] * 6 (18)
- Rounds 4-6: sc in each st around (18)
- Round 7: [4 sc, dec] * 3 (15)
- Round 8: [3 sc, dec] * 3 (12)
- Round 9: [2 sc, dec] * 3 (9)
Change to Color C (Sweater Color) and repeat:
- Rounds 10-27: sc in each st around (9)
Stuff only the bottom half of the arms to allow them to sit naturally. Sew to the upper part of the body.
Lower Legs (Make 2)
Using Color A (Grey)
- Round 1: 6 sc in a MR (6)
- Round 2: [inc] * 6 (12)
- Round 3: [1 sc, inc] * 6 (18)
- Round 4: [2 sc, inc] * 6 (24)
- Round 5: sc in each st around (24)
- Round 6: [11 sc, inc] * 2 (26)
- Rounds 7-9: sc in each st around (26)
- Round 10: [11 sc, dec] * 2 (24)
- Round 11: [10 sc, dec] * 2 (22)
- Round 12: [9 sc, dec] * 2 (20)
- Round 13: sc in each st around (20)
- Round 14: [8 sc, dec] * 2 (18)
- Round 15: sc in each st around (18)
- Round 16: [7 sc, dec] * 2 (16)
- Round 17: sc in each st around (16)
- Round 18: [6 sc, dec] * 2 (14)
- Round 19: sc in each st around (14)
- Round 20: [5 sc, dec] * 2 (12)
- Round 21: sc in each st around (12)
- Round 22: [4 sc, dec] * 2 (10)
- Rounds 23-33: sc in each st around (10)
Stuff completely and sew to the bottom of the body.
Finishing
Assembly is where your puppy truly comes to life! Follow these steps carefully for the best results:
- The Muzzle & Eyes: This is a pro tip for a professional look. First, stuff the muzzle lightly. Then, sew the muzzle to the head. Once the muzzle is attached, use your tapestry needle to mark the exact spots where the eyes should go. Gently pull some of the stuffing out from the head at those marks, insert your safety eyes, and then stuff the head very firmly. This ensures your eyes are centered and even.
- The Ears: Sew the ears to the top of the head, slightly to the sides to give that signature floppy look.
- The Limbs: Sew the arms to the top of the torso and the legs to the bottom.
- The Tail: Attach the tail to the back of the body.
- Details: You can use black embroidery thread to add a small nose or whiskers if desired.
Tips
To make your amigurumi puppy look its absolute best, keep these tips in mind:
- Tension is Key: Amigurumi requires tight, consistent stitches so that the stuffing doesn’t show through the gaps. If you find your stitches are too loose, try using a smaller hook.
- Use Stitch Markers: When working in continuous rounds, it is very easy to lose your place. Always use a marker to identify the first stitch of every round.
- Color Changes: When changing colors (like for the sweater or arms), pull the new color through the last two loops of the final stitch of the previous color. This creates a much cleaner transition.
- Stuffing: Don’t be afraid to stuff firmly! A well-stuffed amigurumi holds its shape much better over time.
Happy crocheting! We can’t wait to see your adorable new puppy companion!