Adorable Crochet Cookie Dragon Pattern: A Step-by-Step Amigurumi Tutorial
Introduction
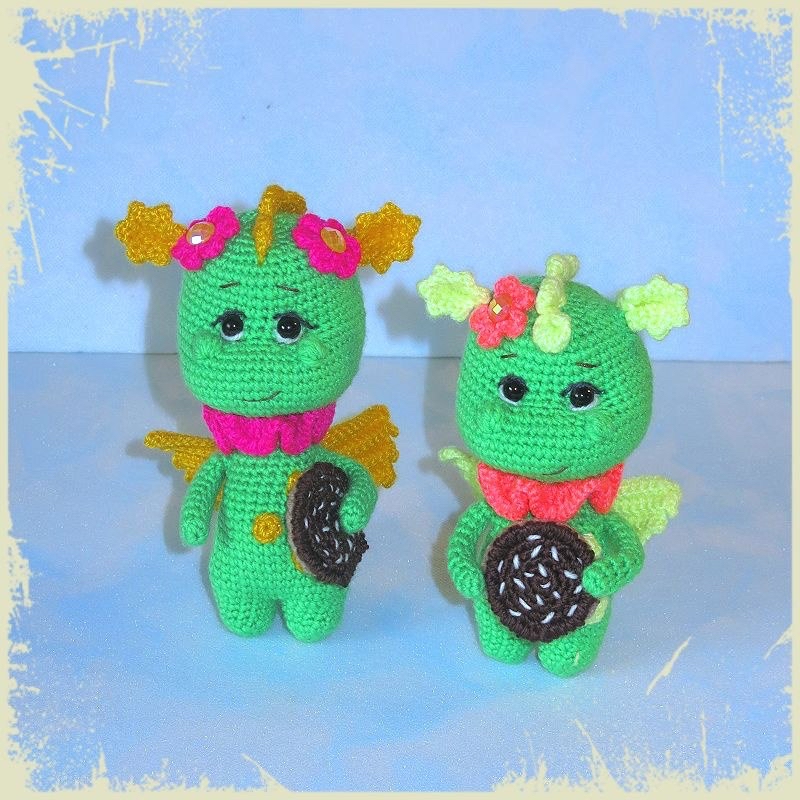
Are you looking for your next whimsical amigurumi project? Meet the Cookie Dragon! This tiny, charming companion is the perfect blend of “cute” and “fantasy.” With its bright green scales, colorful mane, and an even cuter accessory—a tiny chocolate chip cookie—this little dragon is sure to bring a smile to anyone’s face.
Whether you are looking to create a unique nursery decoration or a one-of-a-kind gift for a fellow crochet enthusiast, this pattern is designed to be engaging and rewarding. This tutorial is written with beginners in mind, walking you through every stitch to ensure your dragon turns out as magical as the photos. Grab your favorite green yarn, and let’s dive into the world of crochet dragons!
Materials & Abbreviations
Materials Needed
- Yarn: Medium weight (worsted) yarn in green (main body), yellow/gold (accents), pink/red (collar and flowers), brown/beige (for the cookie), and any accent colors for the mane.
- Hook: A crochet hook suitable for your yarn weight (typically 3.5mm or 4.0mm to ensure tight stitches).
- Eyes: Small safety eyes (approximately 6mm to 8mm).
- Stuffing: Polyester fiberfill.
- Wire: Lightweight armature wire or floral wire to create a poseable internal frame.
- Extras: A tapestry needle for sewing, scissors, and small beads or embroidery thread for facial details.
Abbreviations (US Terms)
Please note that all instructions are worked in a continuous spiral unless otherwise stated. Work in Single Crochet (sc) unless noted.
- MR: Magic Ring
- ch: Chain
- sc: Single crochet
- inc: Increase (2 sc in one stitch)
- dec: Decrease (sc 2 together)
- hdc: Half double crochet
- dc: Double crochet
- sl st: Slip stitch
- BLO: Back loop only
- FLO: Front loop only
- Popcorn stitch: 5 dc in the same stitch
- Picot: ch 2, sc in the second ch from hook
Step-by-Step Instructions
The Arms
We will make two arms. Start with a Magic Ring.
- R1: 6 sc in MR (6)
- R2: (1 sc, inc) repeat 4 times (8)
- R3-12: sc in each stitch around (8)
Fasten off the first arm. For the second arm, do not fasten off; you will use it to join the body later.
The Tail
The tail provides great character to your dragon. Ensure your increases are centered on the top for a clean look.
- R1: 6 sc in MR (6)
- R2: (1 sc, inc) repeat 4 times (10)
- R3: sc in each stitch around (10)
- R4: (3 sc, inc) repeat 2 times (12)
- R5: sc in each stitch around (12)
- R6: (4 sc, inc, 1 sc, inc, 4 sc) – adjust to maintain shape (14)
- R7: (5 sc, inc repeat 3 times, 5 sc, dec) (17)
- R8: 15 sc, dec (16)
- R9: 7 sc, inc, 6 sc, dec (16)
- R10: 7 sc, inc, 6 sc, dec (16)
The Ears
The ears feature a lovely scalloped “tooth” edge.
- R1: 6 sc in MR (6)
- R2: inc in each stitch around (12)
- R3: (1 sc, inc) repeat 6 times (18)
- R4: Work the decorative edge: (sl st, picot, sl st in the next stitch) repeat 6 times.
Note: Do not finish the entire round. Fold the piece in half and sc 3 through both layers to close the ear. To prevent the edges from unraveling, work one extra chain and pull it very tight at the end.
The Legs and Body
First, we create the legs. For the second leg, leave the yarn attached to join the body.
- Legs:
- R1: 6 sc in MR (6)
- R2: (1 sc, inc) repeat 3 times (9)
- R3: (1 sc, inc, 1 sc) repeat 3 times (12)
- R4: (3 sc, inc) repeat 3 times (15)
- R5-7: sc in each stitch around (15)
- Body:
- R1: Join the legs by working 15 sc around the first leg, then 15 sc around the second leg (30).
- R2: (2 sc, inc, 2 sc) repeat 6 times (36)
- R3: Work in the next round, incorporating the tail. (33 sc, then 6 dc worked into the tail base)
- R4: 30 sc, dec, 7 sc, dec (30)
- R5: 30 sc, dec, 6 sc, dec (30)
- R6: 29 sc, dec, 1 sc, inc repeat 2 times, 1 sc, dec (37)
- R7: 32 sc, dec, 3 sc (36)
- R8: sc in each stitch around (36)
- R9: (5 sc, dec, 5 sc) repeat 3 times (33)
- R10: sc in each stitch around (33)
- R11: (9 sc, dec) repeat 3 times (30)
- R12: sc in each stitch around (30)
- R13: (4 sc, dec, 4 sc) repeat 3 times (27)
- R14: (7 sc, dec) repeat 3 times (24)
Joining the Arms: In the next round, join the arms to the body: 1 sc, 4 dc worked into the arm, 10 sc, 4 dc worked into the other arm, 5 sc (24 total).
- R16: sc in each stitch around (24)
- R17: dec, 3 sc, dec, 8 sc, dec, 3 sc, dec, 2 sc (20)
- R18: 2 sc, dec, 11 sc, dec, 3 sc (18)
- R19-22: sc in each stitch around (18)
- R23: (1 sc, dec) repeat 6 times (12)
The Head
The head is quite large and expressive. We will create a slight indentation for the nose area.
- R24: inc in each stitch around (24)
- R25: (1 sc, inc) repeat 12 times (36)
- R26: (1 sc, inc, 1 sc) repeat 12 times (48)
- R27: (7 sc, inc) repeat 6 times (54)
- R28: (4 sc, inc, 4 sc) repeat 6 times (60)
- R29-33: sc in each stitch around (60)
Sculpting the Nose Area
This section creates the facial structure.
- R34: 23 sc, Popcorn stitch, 12 sc, Popcorn stitch, 23 sc (60)
- R35: 21 sc, (dec, 1 sc) repeat 3 times, (1 sc, dec) repeat 3 times, 21 sc (54)
- R36: 3 sc, dec, 16 sc, (dec, 1 sc) repeat 2 times, (1 sc, dec) repeat 2 times, 16 sc, dec, 3 sc (48)
- R37-41: sc in each stitch around (48)
Finishing the Head
- R42: 9 sc, 3 dc worked into the ear attachment point, 24 sc, 3 dc worked into the other ear attachment point, 9 sc (48)
- R43: (3 sc, dec, 3 sc) repeat 6 times (42)
- R44: (5 sc, dec) repeat 6 times (36)
- R45: (2 sc, dec, 2 sc) repeat 6 times (30)
- R46: (3 sc, dec) repeat 6 times (24)
- R47: (1 sc, dec, 1 sc) repeat 6 times (18)
- R48: (1 sc, dec) repeat 6 times (12)
- R49: dec repeat 6 times (6)
The Wings
Wings are worked flat using the BLO technique to create a textured edge.
- Ch 15.
- R1: From the second ch, work 14 sc. Turn.
- R2: 12 sc in BLO, picot, 12 sc in BLO. Turn.
- R3: 11 sc in BLO, picot, 11 sc in BLO. Turn.
- R4: 10 sc in BLO, picot, 10 sc in BLO. Turn.
- R5: 8 sc in BLO, picot, 8 sc in BLO, ch 1. Turn.
Note: Decrease 3 sc along the side edge to shape the wing, then fasten off.
The Cookie Accessory
Make two identical pieces. One in light brown/beige and one in dark brown (chocolate).
- R1: 6 sc in MR (6)
- R2: (1 sc, inc) repeat 6 times (12)
- R3: (1 sc, inc, 1 sc) repeat 6 times (18)
- R4: (3 sc, inc) repeat 6 times (24)
- R5: Work in reverse single crochet (crab stitch) around the edge.
On the dark brown piece, embroider small white or light brown lines to represent chocolate chips. Sew the two pieces together with the pretty sides facing out.
Decorative Elements
The Mane
Ch 56. From the second ch, work 55 sc. In the next round, work: (sl st, hdc, 3 dc in one stitch, hdc) repeat around the entire edge.
Spots
- Small Spot: 6 sc in MR.
- Large Spot: 9 hdc in MR.
The Flower
6 sc in MR. Work: (sl st, ch 2, 2 dc, ch 2, sl st) repeat 6 times.
The Collar
Ch 24. In the 3rd ch from hook, work 3 dc in every chain. Turn and work 2 sc in every stitch along the other side of the chain.
Finishing
- Stuffing: Stuff the body and head firmly. When adding the wire frame, ensure it is centered so the dragon can sit or stand easily.
- Assembly: Sew the ears to the head at R42. Sew the wings to the back of the body. Sew the collar around the neck.
- Face: Place the safety eyes between R35 and R37. Use embroidery thread to create the mouth and nostrils.
- Details: Sew the spots onto the body, the flower onto the head, and attach the cookie to one of the dragon’s hands.
Tips
- Tension is Key: For amigurumi, keep your tension tight so the stuffing doesn’t show through the stitches.
- Using the Wire: If you are new to using wire, wrap the wire in a little bit of scrap yarn or tape first. This prevents the sharp ends from poking through your crochet work.
- Color Play: Don’t be afraid to experiment! A purple dragon with a silver cookie or a blue dragon with a pink flower can look just as magical.
- Counting Stitches: Always use stitch markers. In complex rounds like the nose or the tail, it is very easy to lose track of your count.