DIY Crochet Dinosaur Purse Pattern: A Cute Amigurumi Dino Bag Tutorial
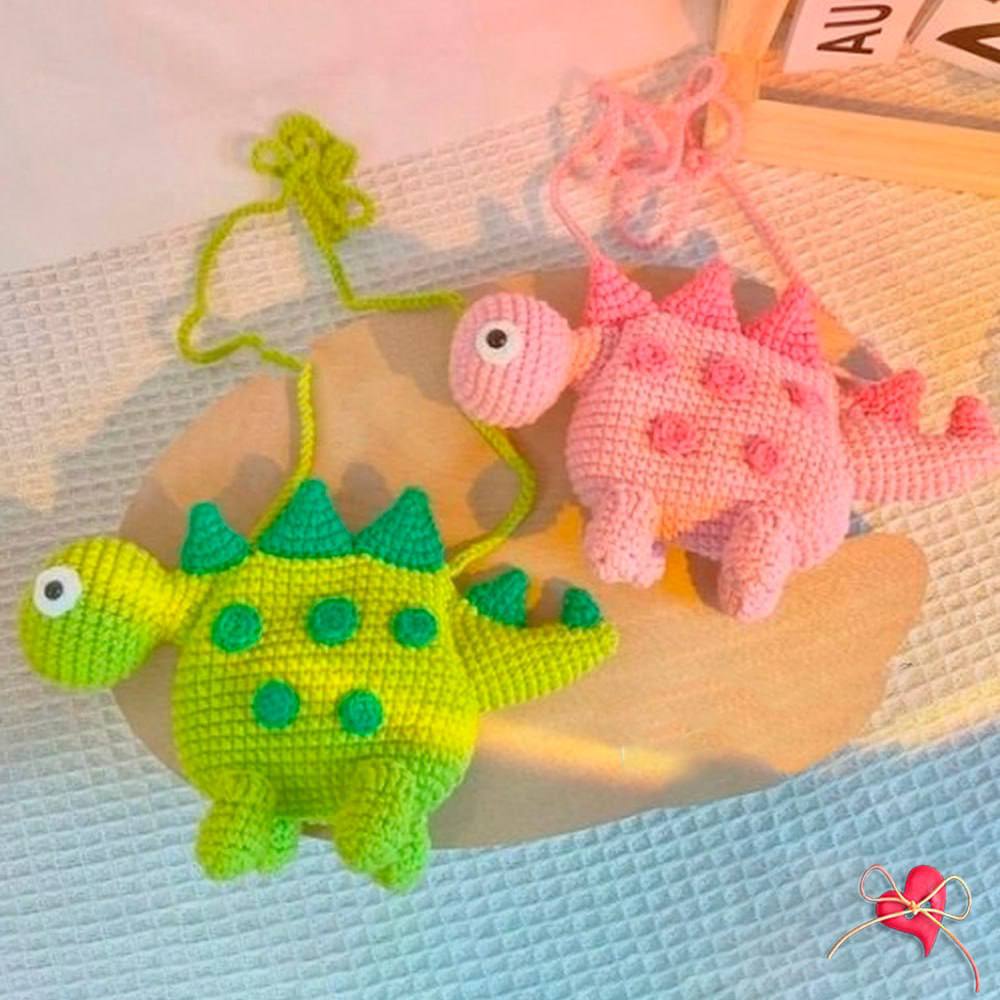
Are you looking for your next adorable crochet project? Whether you want to make a unique coin purse, a small card holder, or a whimsical accessory for your child, this crochet dinosaur purse is the perfect project! This stegosaurus-inspired bag is not only incredibly cute with its bright colors and textured spikes, but it is also highly functional for holding small treasures like coins, keys, or even a few credit cards.
This pattern is designed to be beginner-friendly, focusing on basic stitches like single crochet and double crochet. With a little bit of patience and some colorful yarn, you will have a handcrafted dinosaur friend in no time. Grab your hook and let’s dive into this prehistoric adventure!
Materials & Abbreviations
Before we begin, make sure you have all your supplies ready. For the best results, use a slightly smaller hook than recommended for your yarn to ensure your stitches are tight enough to hold small items without them slipping through the gaps.
Supplies Needed:
- Yarn: Medium weight (worsted) cotton or acrylic yarn in your choice of colors (e.g., bright green for the body, pink for the spikes, or various pastel shades).
- Crochet Hook: A 3.5mm (E) or 4.0mm (G) hook works well for amigurumi.
- Safety Eyes: 8mm to 10mm plastic safety eyes.
- Stuffing: Polyester fiberfill.
- Button: One small button for the lid closure.
- Tapestry Needle: For sewing the pieces together.
- Stitch Marker: Highly recommended to keep track of your rounds.
US Crochet Terminology:
- MR: Magic Ring
- ch: chain
- sc: single crochet
- inc: increase (2 sc in the same stitch)
- dec: decrease (sc 2 stitches together)
- hdc: half double crochet
- dc: double crochet
- dc2tog: double crochet two together (decrease)
- hdc2tog: half double crochet two together (decrease)
- sl st: slip stitch
- BLO: Back Loop Only
- st(s): stitch(es)
Step-by-Step Instructions
The Body (The Pouch)
The body forms the main compartment of your purse. We will work in a way that creates a gusset, giving the bag its shape and depth.
Round 1: Start with a foundation chain of 14 ch. In the 2nd ch from the hook, work 1 inc. Work 11 sc. In the next 4 ch, work 4 sc into each loop (this creates the curve for the bag). Work 11 sc. Work 1 inc (30).
Round 2: 2 inc, 11 sc, 4 inc, 11 sc, 2 inc (38).
Round 3: inc, (sc, inc) repeat 3 times, 13 sc, (sc, inc) repeat 3 times, sc, inc (44).
Round 4: 2 sc, (inc, 2 sc) repeat 3 times, 13 sc, (inc, 2 sc) repeat 3 times, inc (50).
Round 5: 50 sc (50).
Round 6: inc, sc, (2 sc, inc, sc) repeat 3 times, 13 sc, (2 sc, inc, sc) repeat 3 times, 2 sc (56).
Rounds 7-13: 56 sc for each round (7 rounds total).
Round 14: 2 sc, dec, 21 sc, dec, 3 sc, dec, 21 sc, dec, sc (52).
Round 15: 52 sc (52).
Round 16: 2 sc, dec, 19 sc, dec, 3 sc, dec, 19 sc, dec, sc (48).
Round 17: 48 sc (48).
Round 18: sc, dec, 19 sc, dec, sc, dec, 19 sc, dec (44).
Round 19: 44 sc (44).
Round 20: sc (place a stitch marker at this point, let’s call it Point A), dec, 17 sc, dec, sc (place marker at Point B), dec, 17 sc, dec (40).
Pro Tip: If your body is leaning to one side, you can adjust the placement of your decreases in rounds 14-20 to keep it symmetrical.
The Lid (The Flap)
The lid is worked slightly differently to create a flap that folds over the top. Note: The first round of the lid should be worked facing outward to ensure it sits correctly on the body.
Round 21: 2 ch, dc2tog, 15 dc, dc2tog, dc2tog (Note: following the sequence for shape).
Round 22: 2 ch, dc2tog, 13 dc, dc2tog, dc2tog (22).
Round 23: 2 ch, dc2tog, 11 dc, dc2tog, dc2tog (20).
Round 24: 2 ch, dc2tog, 9 dc, dc2tog, dc2tog (18).
Round 25: 2 ch, dc2tog, 7 dc, dc2tog, dc2tog (16).
Round 26: 2 ch, dc2tog, 2 dc, 1 ch (this is your button loop; you can add more chains if you need a larger loop), skip 1 st, 2 dc, dc2tog (14).
Strap: For the handle/strap, crochet a chain of approximately 200-300 ch (depending on your desired length) and join it to the opposite side of the body.
The Head
Round 1: 8 sc in a MR (8).
Round 2: 8 inc (16).
Round 3: (sc, inc) repeat 8 times (24).
Round 4: (inc, 2 sc) repeat 8 times (32).
Rounds 5-9: 32 sc (5 rounds).
Round 10: (sc, dec, sc) repeat 8 times (24).
Round 11: 24 sc (24).
Round 12: (sc, dec) repeat 8 times (16).
Rounds 13-14: 2 dec, 2 sc, 4 inc, 2 sc, 2 dec (20).
Rounds 15-16: 16 sc (2 rounds).
Stuff the head firmly before closing.
The Tail
Round 1: 6 sc in a MR (6).
Round 2: (sc, inc, sc) repeat 2 times (8).
Round 3: 8 sc (8).
Round 4: (3 sc, inc) repeat 2 times (10).
Round 5: 10 sc (10).
Round 6: (2 sc, inc, 2 sc) repeat 2 times (12).
Round 7: 12 sc (12).
Round 8: 5 sc, 2 inc, 5 sc (14).
Round 9: 6 sc, 2 inc, 6 sc (16).
Round 10: 7 sc, 2 inc, 7 sc (18).
Round 11: 8 sc, 2 inc, 8 sc (20).
Round 12: 8 sc, 4 inc, 8 sc (24).
Round 13: 24 sc (24).
Stuff the tail lightly.
The Legs (Make 4)
Round 1: 6 sc in a MR (6).
Round 2: 6 inc (12).
Round 3: 12 sc in BLO (12).
Round 4: 12 sc (12).
Round 5: (2 sc, dec, 2 sc) repeat 2 times (10).
Round 6: Work a combination of hdc2tog and dc2tog to shape the foot (approx. 12 stitches).
Stuff the legs lightly.
The Spikes
You will need three different sizes of spikes to give your dinosaur that iconic look!
Large Spikes
Round 1: 3 sc in a MR (3).
Round 2: 3 inc (6).
Round 3: (sc, inc) repeat 3 times (9).
Round 4: (sc, inc, sc) repeat 3 times (12).
Round 5: (3 sc, inc) repeat 3 times (15).
Round 6: (2 sc, inc, 2 sc) repeat 3 times (18).
Round 7: (5 sc, inc) repeat 3 times (21).
Medium Spikes
Round 1: 3 sc in a MR (3).
Round 2: 3 inc (6).
Round 3: (sc, inc) repeat 3 times (9).
Round 4: (sc, inc, sc) repeat 3 times (12).
Round 5: (3 sc, inc) repeat 3 times (15).
Small Spikes
Round 1: 3 sc in a MR (3).
Round 2: 3 inc (6).
Round 3: (sc, inc) repeat 3 times (9).
Details: Eye Circles & Side Circles
To make the eyes pop, crochet small circles:
- Eye Circles: 6 sc in a MR.
- Side Circles (Large): 8 sc in a MR.
- Side Circles (Medium): 6 sc in a MR.
- Side Circles (Small): 5 sc in a MR.
Finishing
Now for the fun part—assembly! Use your tapestry needle and matching yarn to sew the pieces together.
- Attach Head and Tail: Sew the head to one end of the body and the tail to the other. Make sure they are centered.
- Attach Legs: Sew the four legs to the bottom of the body.
- Add Spikes: Carefully sew the large, medium, and small spikes along the “spine” of the dinosaur.
- Eyes & Details: Sew the eye circles onto the head and insert your safety eyes. If you’ve made side circles for texture, sew those onto the body as well.
- The Lid: Sew the lid/flap onto the top edge of the body. Ensure it aligns with the button loop.
- Final Touches: Sew your button onto the body where it meets the loop on the lid. Attach your long chain strap to the sides of the bag.
Tips for Success
Tension is Key: When working with amigurumi, try to keep your tension consistent. If your stitches are too loose, the stuffing might show through. If you are a beginner, don’t worry—your first dinosaur might be a little wonky, and that just adds to its charm!
Color Play: This pattern looks amazing in “food-inspired” colors. Try a matcha green body with pink strawberry jam spikes, or a chocolate brown body with yellow buttercream spikes!
Stuffing: Don’t be afraid to stuff the body firmly, but be careful not to overstuff the head or tail, as you want them to retain their natural shape.
Happy Crocheting! Share your finished dinosaur purse with your friends and family—it makes a wonderful handmade gift!