Free Amigurumi Goldfish Crochet Pattern: Easy Step-by-Step Tutorial
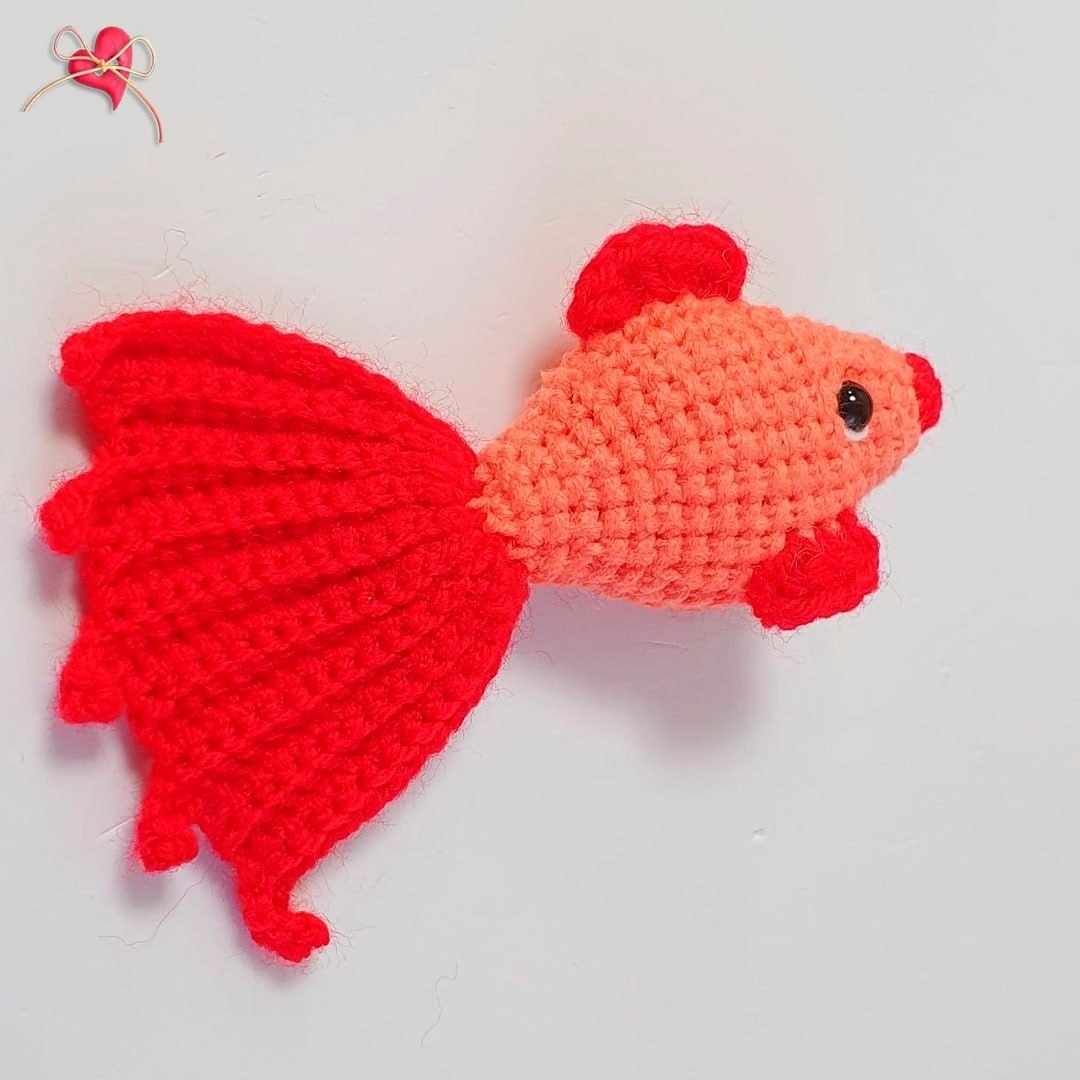
Are you looking for a quick, adorable crochet project that brings a splash of color to your home? This free amigurumi goldfish crochet pattern is the perfect afternoon project! With its bright orange body, beautiful wavy red tail, and cute little fins, this little fish makes a wonderful keychain, desk buddy, or gift for any sea-life enthusiast.
This tutorial is designed with beginners in mind, using standard US crochet terminology and easy-to-follow instructions. Let’s dive in and learn how to make your very own crochet goldfish!
Materials & Abbreviations
Before we begin, gather your crochet supplies. You only need a few basic tools and some scrap yarn to complete this project.
Materials Needed:
- Yarn: Sport weight (Category 2) or DK weight (Category 3) yarn in two colors:
- Orange (approx. 20 yards)
- Red (approx. 15 yards)
- Crochet Hook: 2.0 mm (US Size B-1) to ensure tight, neat stitches so the stuffing doesn’t show through.
- Safety Eyes: 8 mm (approx. 0.3 inches) black plastic safety eyes.
- Fiberfill: High-quality polyester stuffing.
- Tools: Tapestry needle (with a large eye), scissors, and a stitch marker.
Crochet Abbreviations (US Terms):
- ch: chain
- sc: single crochet
- dc: double crochet
- inc: increase (work 2 single crochets into the same stitch)
- dec: decrease (work 2 single crochets together using the invisible decrease method)
- BLO: back loops only
- st(s): stitch(es)
- Rnd / Row: round / row
- MR: magic ring
Step-by-Step Instructions
Part 1: The Goldfish Body
The body is worked in continuous spiral rounds using the orange yarn. Do not join or chain at the end of each round. Use your stitch marker to keep track of the first stitch of each round.
- Rnd 1: Ch 2, work 6 sc in the 2nd chain from hook (or make a Magic Ring and work 6 sc into it). (6 sts)
- Rnd 2: Work 1 inc in each of the next 6 sts. (12 sts)
- Rnd 3 – 4: Work 1 sc in each st around. (12 sts for 2 rounds)
- Rnd 5: [1 inc, sc in the next 5 sts] repeat 2 times. (14 sts)
- Rnd 6: Sc in the next st, 1 inc, sc in the next 6 sts, 1 inc, sc in the next 5 sts. (16 sts)
- Rnd 7: [1 inc, sc in the next 7 sts] repeat 2 times. (18 sts)
Eye Placement Tip: At this point, pause to insert the 8 mm safety eyes. Place them between Rounds 5 and 6, centering them symmetrically on opposite sides of the head. Secure the washers firmly inside.
- Rnd 8: Sc in the next st, 1 inc, sc in the next 8 sts, 1 inc, sc in the next 7 sts. (20 sts)
- Rnd 9: [1 inc, sc in the next 9 sts] repeat 2 times. (22 sts)
- Rnd 10: Sc in the next st, 1 inc, sc in the next 10 sts, 1 inc, sc in the next 9 sts. (24 sts)
- Rnd 11 – 13: Work 1 sc in each st around. (24 sts for 3 rounds)
- Rnd 14: [sc in the next 2 sts, 1 dec] repeat 6 times. (18 sts)
- Rnd 15 – 16: Work 1 sc in each st around. (18 sts for 2 rounds)
Stuffing: Stuff the body firmly with fiberfill, ensuring the head shape remains rounded and plump.
- Rnd 17: [sc in the next st, 1 dec] repeat 6 times. (12 sts)
- Rnd 18 – 19: Work 1 sc in each st around. (12 sts for 2 rounds)
- Rnd 20: Work 6 dec. (6 sts)
Fasten off, leaving a short tail. Thread your tapestry needle through the front loops of the remaining 6 stitches and pull tightly to close the opening. Weave in the yarn tail securely.
Part 2: The Ribbed Tail
The tail is worked in flat rows using red yarn. To create the gorgeous, flowing pleated texture of a real goldfish fin, we will work exclusively in the Back Loops Only (BLO) throughout this entire section.
- Row 1: Ch 15. Starting in the 2nd ch from hook, work 14 sc. Ch 1, turn. (14 sts)
- Row 2: Work 12 sc in BLO. Leave the remaining 2 stitches unworked. Ch 1, turn. (12 sts)
- Row 3: Work 12 sc in BLO. Ch 1, turn. (12 sts)
- Row 4: Work 12 sc in BLO, then chain 2. Make 1 turning chain, then turn your work. (14 sts on the next row)
- Row 5: Work 14 sc in BLO (start by crocheting in the 2 chains you just made, then continue in the BLO of the 12 sc from the previous row). Ch 1, turn. (14 sts)
- Row 6: Work 12 sc in BLO, leaving 2 stitches unworked. Ch 1, turn. (12 sts)
- Row 7: Work 12 sc in BLO. Ch 1, turn. (12 sts)
- Row 8: Work 12 sc in BLO, then chain 2. Make 1 turning chain, then turn your work. (14 sts)
- Row 9: Work 14 sc in BLO. Ch 1, turn. (14 sts)
- Row 10: Work 12 sc in BLO, leaving 2 stitches unworked. Ch 1, turn. (12 sts)
- Row 11: Work 12 sc in BLO. Ch 1, turn. (12 sts)
- Row 12: Work 12 sc in BLO, then chain 2. Make 1 turning chain, then turn your work. (14 sts)
- Row 13: Work 14 sc in BLO. Ch 1, turn. (14 sts)
- Row 14: Work 12 sc in BLO, leaving 2 stitches unworked. Ch 1, turn. (12 sts)
- Row 15: Work 12 sc in BLO. Ch 1, turn. (12 sts)
- Row 16: Work 12 sc in BLO, then chain 2. Make 1 turning chain, then turn your work. (14 sts)
- Row 17: Work 14 sc in BLO. (14 sts)
Fasten off, leaving a long tail for sewing. Thread the tail onto a tapestry needle and weave it back and forth through the flat edge of the tail piece. Pull the yarn tight to gather/scrunch the tail up, then sew the gathered end securely to Round 20 of the goldfish’s body.
Part 3: The Fins
The fins are worked directly onto the body using red yarn. This technique eliminates sewing later and makes the fins very secure!
Lower Fins (Make 2)
Locate the bottom center of the fish’s body. Symmetrically isolate 3 stitches on the left side and 3 stitches on the right side where the lower fins should sit.
- Attach the red yarn with a slip stitch to the first of the 3 stitches.
- Work 2 dc in each of the 3 stitches. (6 dc total)
- Fasten off, pull the yarn through, and weave in the ends neatly inside the body. Repeat for the second lower fin.
Upper Fin (Dorsal Fin)
Locate the top centerline of the fish’s body. Identify a straight line of 5 stitches along the spine of the fish.
- Attach the red yarn with a slip stitch to the first of the 5 stitches.
- Work 2 dc in each of the 5 stitches. (10 dc total)
- Fasten off and weave in the ends securely.
Finishing
The final step is to add the cute little red lips to your goldfish!
Thread a length of red yarn onto your tapestry needle. Gently insert the needle and stitch around the circumference of Round 1 of the fish’s face (the nose). Go around in a neat circle, sewing over the stitches to create raised, defined red lips. Fasten off and hide the yarn tails inside the body.
Tips for a Perfect Amigurumi Goldfish
- Stitch Tension: Keep your stitches tight! If you notice your fiberfill stuffing peeking through your stitches, switch to a slightly smaller hook size.
- Yarn Choices: Cotton or cotton blend yarns (like sport/DK weight) work best for amigurumi because they offer excellent stitch definition and don’t pill easily.
- Safety First: If you are making this goldfish as a toy for a child under three years old, replace the plastic safety eyes with embroidered black French knots to prevent choking hazards.