Crochet Jellyfish Rattle: Free Amigurumi Pattern & Tutorial
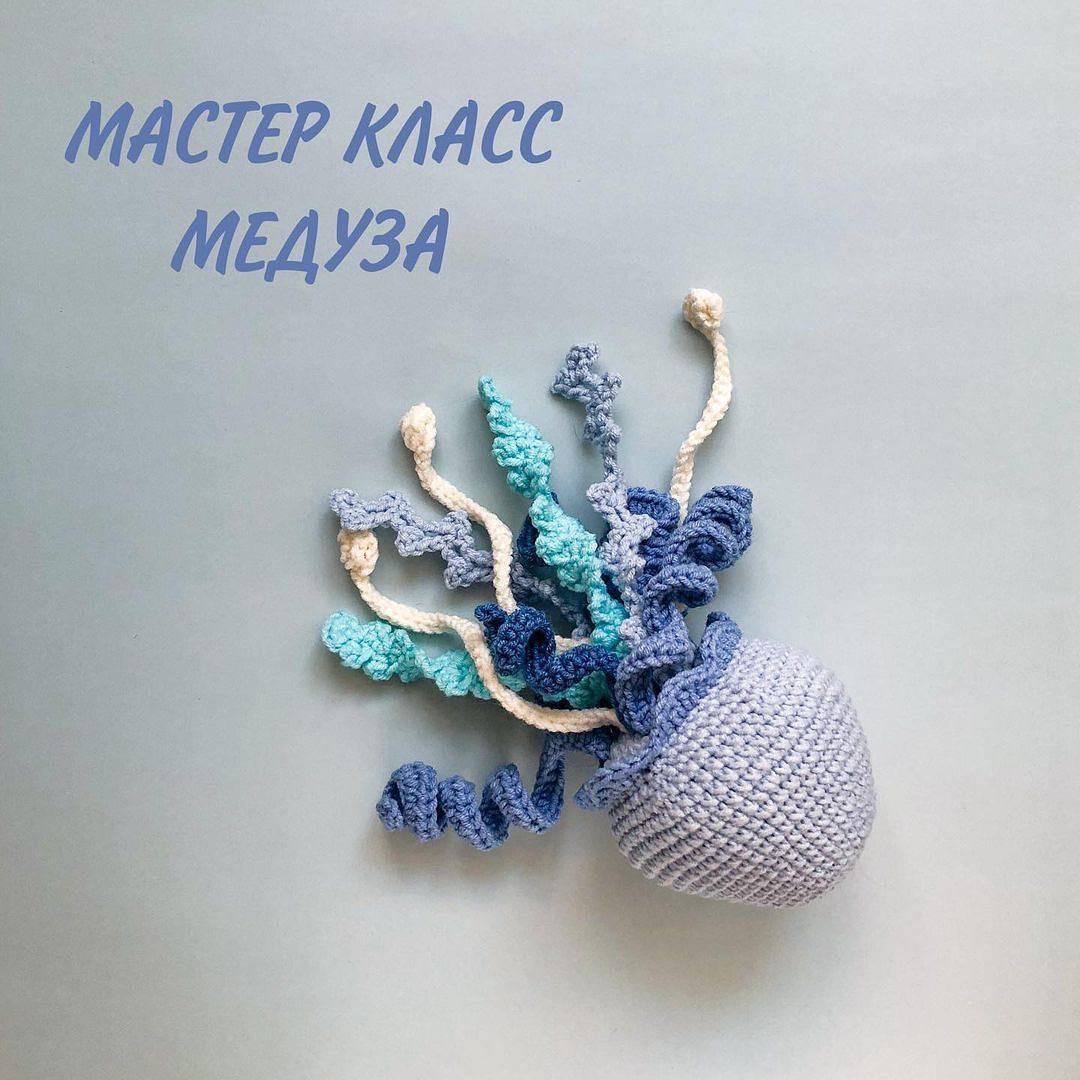
Are you looking for the perfect handmade baby shower gift? This adorable crochet jellyfish rattle is not only incredibly cute, but it also makes a wonderful sensory toy for babies. With its long, springy tentacles and textured ribbons, it is perfect for tiny hands to grasp, pull, and explore. Plus, the built-in rattle insert adds a delightful sound that will keep any little one entertained!
This beginner-friendly amigurumi pattern features five different types of beautifully textured tentacles, allowing you to practice various crochet stitches while creating a unique sea creature. Best of all, it is an excellent stash-buster for leftover sport-weight cotton yarn.
Materials & Abbreviations
Materials Needed
- Yarn: Sport weight (Category 2) cotton or cotton-blend yarn (such as YarnArt Jeans) in 5 coordinating colors. You will need a main color for the jellyfish body and cap, and 4 contrasting shades of blues, aquas, and creams for the tentacles.
- Crochet Hook: Size US B-1 (2.0 mm) or C-2 (2.25 mm) crochet hook.
- Rattle Insert: 1 plastic rattle disc/ball (approx. 1 inch in diameter).
- Stuffing: High-quality polyester fiberfill.
- Tools: Tapestry needle, stitch markers, and scissors.
Abbreviations (US Crochet Terms)
- MR: Magic Ring
- ch: Chain
- sc: Single crochet
- inc: Increase (work 2 single crochets into the same stitch)
- dec: Decrease (single crochet 2 stitches together)
- hdc: Half double crochet
- hdc-inc: Half double crochet increase (work 2 half double crochets into the same stitch)
- dc: Double crochet
- dc-inc: Double crochet increase (work 2 double crochets into the same stitch)
- sl st: Slip stitch
- st(s): Stitch(es)
- rep: Repeat
Step-by-Step Instructions
The Jellyfish Belly (Base)
The belly is crocheted first as a flat circular disc. We will attach the tentacles to this base before joining it to the main body cap.
Using your main body color:
- Round 1: Work 6 sc into a Magic Ring. (6 sts)
- Round 2: Work [inc] in each stitch around. (12 sts)
- Round 3: Work [1 sc, inc] 6 times. (18 sts)
- Round 4: Work [2 sc, inc] 6 times. (24 sts)
- Round 5: Work [3 sc, inc] 6 times. (30 sts)
- Round 6: Work [4 sc, inc] 6 times. (36 sts)
- Round 7: Work [5 sc, inc] 6 times. (42 sts)
Fasten off with a slip stitch, leaving a short tail. Weave in the yarn end securely.
Textured Tentacles
To give our jellyfish sensory appeal, we will make five distinct types of tentacles. Crochet each set in your chosen contrasting colors.
Tentacle Type 1: Spiral Curly-Q (Make 3)
This classic spiral tentacle bounces delightfully when pulled.
- Ch 43.
- Row 1: Starting in the 2nd ch from the hook, work [1 hdc, hdc-inc] repeatedly all the way to the end of the chain.
Fasten off, leaving a 4-inch tail for assembly.
Tentacle Type 2: Simple Straight Ribbon (Make 3)
A simpler, thinner strand that balances out the curly spirals.
- Ch 30.
- Row 1: Starting in the 2nd ch from the hook, sc in each chain to the end of the row. (29 sts)
Fasten off, leaving a 4-inch tail for assembly.
Tentacle Type 3: Bubble Streamer (Make 3)
This fun style features a textured bubble/bobble stitch at the very end.
- Ch 39 (this is 35 chains for the stem + 4 chains for the bubble).
- Row 1: In the 5th ch from your hook, work a 4-dc cluster (work 4 double crochets with a common top). Ch 4, then work 1 sl st back into that same 5th chain to close the bubble. Slip stitch in each of the remaining 34 chains to the end of the stem.
Fasten off, leaving a 4-inch tail for assembly.
Tentacle Type 4: Zig-Zag Wave (Make 2)
A flat, geometric zig-zag ribbon worked in short rows.
- Ch 3.
- Row 1: Work 1 sc in the 2nd ch from the hook, and 1 sc in the next ch. Turn. (2 sts)
- Row 2: Ch 1, work 1 inc in the first st, then 1 sc in the next st. Turn. (3 sts)
- Row 3: Ch 1, work 1 dec over the first 2 sts, then 1 sc in the next st. Turn. (2 sts)
- Rows 4–19: Repeat Rows 2 and 3 sequentially to create a wavy zig-zag ribbon. Feel free to continue repeating to make it longer if desired!
Fasten off, leaving a 4-inch tail for assembly.
Tentacle Type 5: Picot Ladder (Make 2)
A beautiful openwork lace strand trimmed with small picots.
- Ch 4.
- Row 1: Work 1 dc in the 4th ch from your hook. Ch 3, then sl st into the top of the dc just made (picot completed). Turn.
- Row 2: Ch 3. Work 1 dc in the space between the chain and the dc post of the previous row. Ch 3, then sl st into the top of the dc just made (picot completed). Turn.
- Rows 3–13: Repeat Row 2 to reach your desired length.
Fasten off, leaving a 4-inch tail for assembly.
The Jellyfish Body (Cap)
The main body is worked in continuous spiral rounds. Do not join at the end of each round unless instructed; use a stitch marker to keep track of your rounds.
Using your main body color:
- Round 1: Work 6 sc into a Magic Ring. (6 sts)
- Round 2: Work [inc] in each stitch around. (12 sts)
- Round 3: Work [1 sc, inc] 6 times. (18 sts)
- Round 4: Work [1 sc, inc] 9 times. (27 sts)
- Round 5: Work [2 sc, inc] 9 times. (36 sts)
- Rounds 6–7: Work 1 sc in each stitch around. (36 sts for 2 rounds)
- Round 8: Work [5 sc, inc] 6 times. (42 sts)
- Round 9: Work 1 sc in each stitch around. (42 sts)
- Round 10: Work [6 sc, inc] 6 times. (48 sts)
- Rounds 11–12: Work 1 sc in each stitch around. (48 sts for 2 rounds)
- Round 13: Work [7 sc, inc] 6 times. (54 sts)
- Round 14: Work [8 sc, inc] 6 times. (60 sts)
- Rounds 15–17: Work 1 sc in each stitch around. (60 sts for 3 rounds)
- Round 18: Work [8 sc, dec] 6 times. (54 sts)
- Round 19: Work [7 sc, dec] 6 times. (48 sts)
- Round 20: Work [6 sc, dec] 6 times. (42 sts)
Do not break or fasten off the yarn! Keep your working loop on the hook as we prepare to join the pieces.
Finishing & Assembly
1. Attaching the Tentacles to the Belly
Before closing up the body, we need to attach our colorful collection of tentacles to the flat circular belly disc.
- Thread the yarn tails of each tentacle through the center and inner rounds of the belly disc using your tapestry needle.
- Arrange them evenly so the weight is distributed nicely.
- On the inside (wrong side) of the belly disc, tie the yarn ends together in secure double knots. Trim any excess thread, leaving short ends hidden inside.
2. Joining the Cap and Belly
- Align the 42 stitches of the final round of your Jellyfish Body Cap with the 42 stitches of the outer edge of your Jellyfish Belly.
- Insert your hook through both layers (one stitch of the body and the corresponding stitch of the belly) and work a single crochet to join them.
- Continue working single crochets around to join the pieces together.
- When you are about 3/4 of the way around, stuff the body firmly with polyester fiberfill. Push the fiberfill to the sides and place your plastic rattle insert directly in the center. Surround the rattle with more stuffing so it stays cushioned inside.
- Finish working single crochets in the remaining stitches to close the opening completely. You should have 42 sc in this joining round.
3. Crocheting the Ruffled Skirt
To finish off your jellyfish, we will add a gorgeous wavy ruffle right over the joining seam!
- If desired, change to a contrasting color yarn, or continue with your main body color.
- Into the joining stitches, work the following repeating pattern:
- Ruffle Round: *1 sc, 1 hdc, dc-inc, dc-inc, 1 hdc, 1 sc, 1 sl st* repeat from * to * 6 times around. (This will give you 6 lovely waves).
- Fasten off, weave in all loose yarn tails securely, and hide them inside the body.
Tips for Success
- Baby Safety First: Since this is a baby toy, ensure that all knots securing the tentacles to the belly are extremely tight. Pull on each tentacle firmly to test it before finishing the toy. Avoid using safety eyes; instead, keep it embroidered or minimalist without a face as pictured.
- Stitch Marker Magic: Use a stitch marker on the first stitch of each round of the body to keep track of your stitch counts easily.
- Perfect Tension: Keep your tension slightly tight to prevent the polyester fiberfill from showing through the stitches. If your stitches look loose, try sizing down to a 1.75 mm or 2.0 mm hook.