Free Crochet Horse Pattern: Easy Amigurumi Toy Tutorial
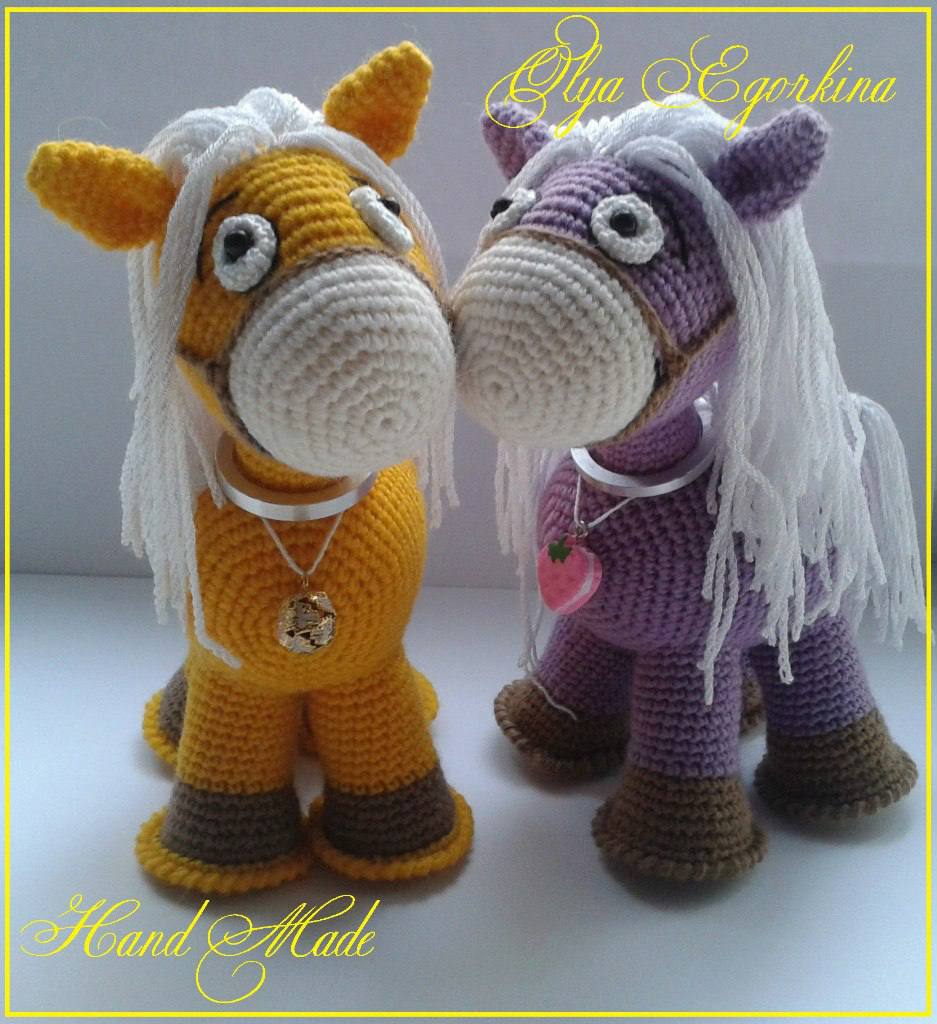
Are you looking for your next adorable crochet project? Whether you want to make a cute handmade gift or add a charming piece to your amigurumi collection, this free crochet horse pattern is perfect for you! This delightful little pony stands on its own, features a gorgeously fluffy mane, and has the most expressive, character-filled eyes.
This tutorial is designed with intermediate beginners in mind. We will guide you step-by-step through crocheting each piece, assembling your horse, and using clever structural hacks—like using plastic inserts in the hooves and a wooden bead in the neck—to give your finished toy amazing stability and professional form.
Materials & Abbreviations
Materials Needed
- Yarn: Medium weight (Category 4) yarn. You will need approximately 100 yards of your main body color (such as yellow, purple, or brown), 40 yards of an accent color for the hooves, and 30 yards of yarn for the mane/tail (such as white or cream).
- Eye Accent Yarn: A small amount of white cotton lace-weight yarn or size 10 crochet thread for the whites of the eyes.
- Embroidery Thread: Black cotton embroidery thread or thin black yarn to embroider the mouth, eyebrows, and eye details.
- Crochet Hook: US size E-4 (3.5 mm) crochet hook (or size needed to obtain a tight gauge so stuffing does not show). Use a smaller hook (such as US size C-2 / 2.75 mm) for the white eye backs.
- Safety Eyes or Beads: Two black beads or safety eyes (approx. 6 mm to 8 mm).
- Sole Inserts: A piece of thin, sturdy plastic (such as a clean plastic lid) or thick cardboard. You will cut 4 circular inserts, each about 1 inch (2.5 cm) in diameter.
- Neck Support: One 0.7-inch (18 mm) wooden bead to support the head.
- Stuffing: High-quality polyester fiberfill.
- Tools: Long tapestry needle, scissors, and stitch markers.
Abbreviations (US Terms)
- ch: chain
- sc: single crochet
- inc: single crochet increase (2 single crochets in the same stitch)
- dec: single crochet decrease (invisible decrease recommended)
- sl st: slip stitch
- BLO: back loops only
- FLO: front loops only
- st(s): stitch(es)
- rnd: round
Note on Construction: To prevent the seams from slanting and to keep the shapes perfectly symmetrical, this pattern is worked in joined rounds. This means you will join the end of each round to the first stitch with a slip stitch, then chain 1 to start the next round. The slip stitch and chain-1 do not count as stitches.
Step-by-Step Instructions
The Legs (Make 4)
Start with your hoof accent yarn (e.g., brown).
Chain 5 and join with a slip stitch to form a ring (or start with a magic ring if preferred).
- Rnd 1: Ch 1, work 6 sc into the ring, sl st to first sc to join. (6 sts)
- Rnd 2: Ch 1, inc in each st around, sl st to join. (12 sts)
- Rnd 3: Ch 1, *1 sc, inc* repeat from * to * around, sl st to join. (18 sts)
- Rnd 4: Ch 1, *2 sc, inc* repeat from * to * around, sl st to join. (24 sts)
- Rnd 5: Ch 1, *3 sc, inc* repeat from * to * around, sl st to join. (30 sts)
- Rnd 6: Ch 1, working in BLO, sc in each st around, sl st to join. (30 sts)
- Rnd 7: Ch 1, sc in each st around, sl st to join. (30 sts)
- Rnd 8: Ch 1, *3 sc, dec* repeat from * to * around, sl st to join. (24 sts)
At this point, insert one of your 1-inch plastic or cardboard circles into the bottom of the hoof. This provides a flat, sturdy base for your horse to stand on.
- Rnd 9: Ch 1, sc in each st around, sl st to join. (24 sts)
- Rnd 10: Ch 1, *4 sc, dec* repeat from * to * 4 times, sl st to join. (20 sts)
Stuff the hoof portion firmly with fiberfill.
- Rnd 11: Switch to your main body color yarn. Ch 1, sc in each st around, sl st to join. (20 sts)
- Rnds 12–22: Ch 1, sc in each st around, sl st to join. (20 sts for 11 rounds)
Fasten off, leaving an 8-inch tail for sewing the legs to the body. Continue to stuff the rest of the leg firmly.
Optional Hoof Trim: Join your hoof accent yarn to the unworked front loops of Rnd 5. Work one round of single crochet, then work one round of reverse single crochet (crab stitch) for a beautifully textured hoof edge.
The Ears (Make 2)
Using your main body color yarn, chain 5 and join with a slip stitch to form a ring.
- Rnd 1: Ch 1, work 6 sc into the ring, sl st to join. (6 sts)
- Rnd 2: Ch 1, *1 sc, inc* repeat from * to * 3 times, sl st to join. (9 sts)
- Rnd 3: Ch 1, sc in each st around, sl st to join. (9 sts)
- Rnd 4: Ch 1, *2 sc, inc* repeat from * to * 3 times, sl st to join. (12 sts)
- Rnd 5: Ch 1, *3 sc, inc* repeat from * to * 3 times, sl st to join. (15 sts)
- Rnd 6: Ch 1, sc in each st around, sl st to join. (15 sts)
- Rnd 7: Ch 1, *3 sc, dec* repeat from * to * 3 times, sl st to join. (12 sts)
- Rnd 8: Ch 1, *2 sc, dec* repeat from * to * 3 times, sl st to join. (9 sts)
Fasten off, leaving a 6-inch tail for sewing. Do not stuff the ears.
The Body
Using your main body color yarn, chain 5 and join with a slip stitch to form a ring.
- Rnd 1: Ch 1, work 6 sc into the ring, sl st to join. (6 sts)
- Rnd 2: Ch 1, inc in each st around, sl st to join. (12 sts)
- Rnd 3: Ch 1, *1 sc, inc* repeat from * to * around, sl st to join. (18 sts)
- Rnd 4: Ch 1, *2 sc, inc* repeat from * to * around, sl st to join. (24 sts)
- Rnd 5: Ch 1, *3 sc, inc* repeat from * to * around, sl st to join. (30 sts)
- Rnd 6: Ch 1, *4 sc, inc* repeat from * to * around, sl st to join. (36 sts)
- Rnd 7: Ch 1, *5 sc, inc* repeat from * to * around, sl st to join. (42 sts)
- Rnd 8: Ch 1, *6 sc, inc* repeat from * to * around, sl st to join. (48 sts)
- Rnds 9–14: Ch 1, sc in each st around, sl st to join. (48 sts for 6 rounds)
- Rnd 15: Ch 1, *7 sc, inc* repeat from * to * around, sl st to join. (54 sts)
- Rnds 16–28: Ch 1, sc in each st around, sl st to join. (54 sts for 13 rounds)
- Rnd 29: Ch 1, *7 sc, dec* repeat from * to * around, sl st to join. (48 sts)
- Rnd 30: Ch 1, *6 sc, dec* repeat from * to * around, sl st to join. (42 sts)
- Rnd 31: Ch 1, *5 sc, dec* repeat from * to * around, sl st to join. (36 sts)
- Rnd 32: Ch 1, *4 sc, dec* repeat from * to * around, sl st to join. (30 sts)
- Rnd 33: Ch 1, *3 sc, dec* repeat from * to * around, sl st to join. (24 sts)
Stuff the body very firmly with fiberfill, ensuring it holds a solid oval shape.
- Rnd 34: Ch 1, *2 sc, dec* repeat from * to * around, sl st to join. (18 sts)
- Rnd 35: Ch 1, *1 sc, dec* repeat from * to * around, sl st to join. (12 sts)
- Rnd 36: Ch 1, work 6 decreases around, sl st to join. (6 sts)
Fasten off, weave the tail through the remaining 6 stitches, pull tight to close, and hide the thread inside the body.
The Neck
You can make the neck using one of two methods:
Method 1 (Worked separately): Chain 25, join into a ring. Work 6 rounds of 25 sc. Fasten off, leaving a tail. Sew the base of the neck to the body between Rounds 11 and 12.
Method 2 (Worked directly onto the body): Place a marker on the body between Rounds 11 and 12. Attach your main body yarn and pick up 25 single crochet stitches in a circle around your marker. Work 6 rounds of 25 sc. Fasten off, leaving a long tail for sewing the head.
Pro Stabilizing Trick: Do not stuff the neck with fiberfill! Instead, place an 18 mm (0.7-inch) wooden bead inside the neck cavity. This keeps the neck straight and stops the head from drooping.
The Head
Start with white or cream yarn for the muzzle.
Chain 5 and join with a slip stitch to form a ring.
- Rnd 1: Ch 1, work 6 sc into the ring, sl st to join. (6 sts)
- Rnd 2: Ch 1, inc in each st around, sl st to join. (12 sts)
- Rnd 3: Ch 1, *1 sc, inc* repeat from * to * around, sl st to join. (18 sts)
- Rnd 4: Ch 1, *2 sc, inc* repeat from * to * around, sl st to join. (24 sts)
- Rnd 5: Ch 1, *3 sc, inc* repeat from * to * around, sl st to join. (30 sts)
- Rnd 6: Ch 1, *4 sc, inc* repeat from * to * around, sl st to join. (36 sts)
- Rnd 7: Ch 1, sc in each st around, sl st to join. (36 sts)
- Rnd 8: Ch 1, *5 sc, inc* repeat from * to * around, sl st to join. (42 sts)
- Rnds 9–10: Ch 1, sc in each st around, sl st to join. (42 sts for 2 rounds)
- Rnd 11: Switch to your main body color yarn. Ch 1, sc in each st around, sl st to join. (42 sts)
- Rnd 12: Ch 1, sc in each st around, sl st to join. (42 sts)
- Rnd 13: Ch 1, *6 sc, inc* repeat from * to * around, sl st to join. (48 sts)
- Rnds 14–22: Ch 1, sc in each st around, sl st to join. (48 sts for 9 rounds)
- Rnd 23: Ch 1, *6 sc, dec* repeat from * to * around, sl st to join. (42 sts)
- Rnd 24: Ch 1, sc in each st around, sl st to join. (42 sts)
- Rnd 25: Ch 1, *5 sc, dec* repeat from * to * around, sl st to join. (36 sts)
- Rnd 26: Ch 1, *4 sc, dec* repeat from * to * around, sl st to join. (30 sts)
- Rnd 27: Ch 1, *3 sc, dec* repeat from * to * around, sl st to join. (24 sts)
Stuff the head firmly with fiberfill, shaping the muzzle and back of the head evenly.
- Rnd 28: Ch 1, *2 sc, dec* repeat from * to * around, sl st to join. (18 sts)
- Rnd 29: Ch 1, *1 sc, dec* repeat from * to * around, sl st to join. (12 sts)
- Rnd 30: Ch 1, work 6 decreases around, sl st to join. (6 sts)
Fasten off, weave the tail through the remaining stitches, pull tight to close, and hide the end.
The Whites of the Eyes (Make 2)
Using a smaller hook and white cotton lace yarn, chain 5 and join with a slip stitch to form a ring.
- Rnd 1: Work 6 sc into the ring. (6 sts)
- Rnd 2: Work 2 sc in each st around. (12 sts)
- Rnds 3–4: Sc in each st around. (12 sts)
- Rnd 5: Work 6 decreases around. (6 sts)
Fasten off, leaving a tail for sewing. This makes a small, slightly domed white shape that gives the horse’s eyes a lively, 3D look.
Finishing
1. Assembly
- Sewing the Ears: Position the ears on top of the head, leaving about 12 to 13 stitches between them. Pinch the base of each ear slightly to give it depth before sewing it down.
- Attaching the Eyes: Place the white eye domes on either side of the head, right where the muzzle transitions to the main body color. Insert a black safety eye or sew a black bead directly through the middle of the white dome, pulling slightly to sink them gently into the head for a sculpted look.
- Embroidering Facial Details: Use black embroidery thread to outline the white eye domes to make them stand out. Embroider small, angled eyebrows above the eyes and a sweet, simple curved line on the muzzle for the mouth.
- Attaching the Head: Sew the neck securely to the bottom of the head, making sure the wooden bead inside is pushed into place to hold the neck upright.
- Sewing the Legs: Position the legs on the bottom of the body. Sew the front legs first, then the back legs, keeping about 6 rounds of distance between the front and back sets. Make sure they are perfectly aligned so your horse stands level.
2. Mane & Tail
- The Mane: Cut strands of mane yarn to about 10 inches (25 cm) long. Fold a strand in half, insert your crochet hook under a stitch on the horse’s head (starting between the ears), pull the loop through, and pull the tails through the loop to secure it like fringe. Make a row of fringe running from the crown of the head down the neck. To make it thicker, add 2 more rows in front of the ears (e.g., 10 strands in the main center row, 8 strands in the middle row, and 6 strands in the front row). Trim the hair to your preferred style!
- The Tail: Cut several 8-inch (20 cm) strands of yarn. Attach them to the rear of the body using the same fringe method. Tie a knot around the bundle close to the body to keep the tail neat.
- Optional Bridle: Crochet a simple chain of about 150 stitches with your hoof accent yarn. Wrap it around the muzzle and secure it under the mane for a lovely equestrian touch.
Tips for Amigurumi Success
- Keep Your Stitches Tight: To prevent the stuffing from peeking out through your stitches, make sure to use a hook size smaller than what is recommended on your yarn label.
- Choosing the Sole Inserts: Plastic inserts are highly recommended over cardboard because they allow you to wash your crochet horse without losing structural stability! Cutting circular pieces from empty plastic tubs or yogurt containers works wonderfully.
- Use the Wooden Bead: The wooden bead hack in the neck is a game-changer. Standard stuffing can compress over time, leading to a drooping head, but a solid bead keeps the head beautifully upright forever.