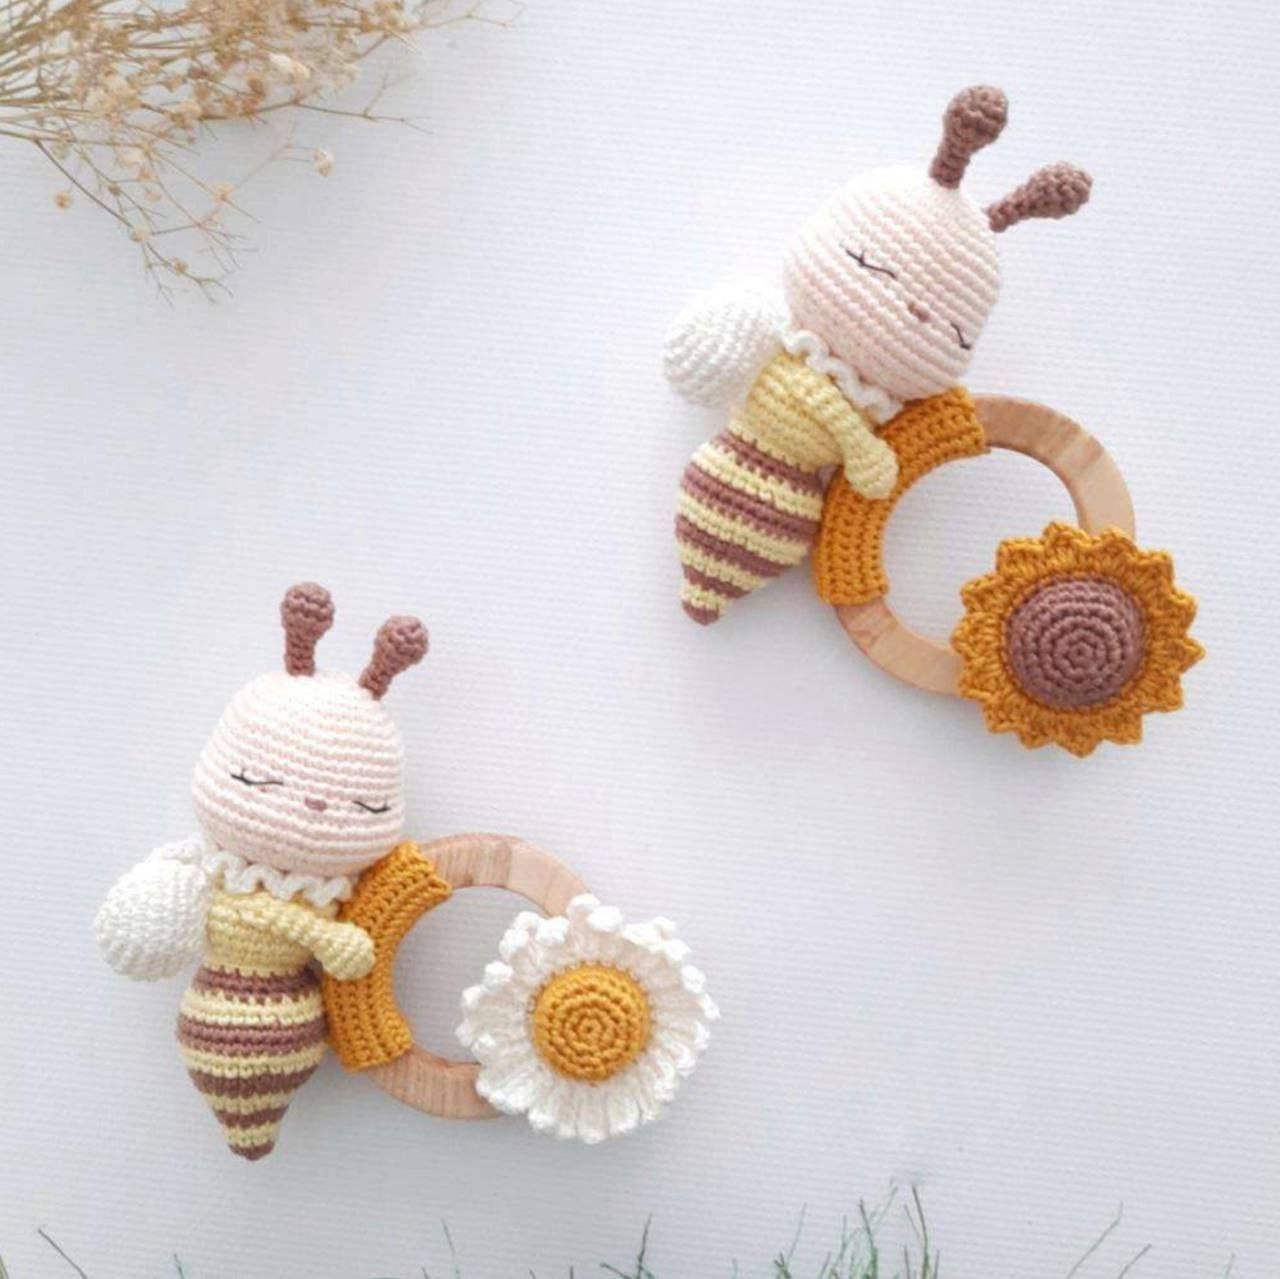
Crochet Bee Rattle Pattern: An Adorable Amigurumi Baby Toy Tutorial
Are you looking for the perfect handmade baby gift or a sweet addition to your nursery decor? This DIY crochet bee rattle is a charming, sensory-friendly toy that combines the soft texture of amigurumi with the soothing sound of a rattle. Mounted on a natural maple ring, this little bee is not only cute but also designed to be easy for tiny hands to grasp and explore.
In this detailed tutorial, we will walk through the process of creating a striped bumblebee, complete with delicate wings and a beautiful flower attachment. Whether you are a seasoned crocheter or looking to practice your amigurumi skills, this pattern is a wonderful project to tackle. Let’s get started!
Materials & Abbreviations
To ensure your bee turns out as professional and polished as the photos, I recommend using high-quality cotton yarn and a small hook to keep your stitches tight. Tight stitches are essential in amigurumi to prevent the stuffing from peeking through.
Materials Needed
- Yarn: Cotton yarn (such as Schachenmayr Catania) in the following colors:
- Beige/Skin Tone
- White
- Brown
- Mustard
- Yellow
- Hook: 2.00 mm crochet hook
- Eyes: Thin black embroidery thread for detailing
- Stuffing: High-quality fiberfill (polyester stuffing)
- Rattle: 15 mm rattle bell
- Ring: 70 mm (approx. 2.75 inches) flat maple wood ring
- Extras: Tapestry needle for sewing and a sharp pair of scissors
Abbreviations (US Terms)
- MR: Magic Ring
- ch: Chain
- sc: Single Crochet
- inc: Increase (2 sc in one stitch)
- dec: Decrease (sc 2 together)
- sl st: Slip Stitch
- dc: Double Crochet
- BLO: Back Loop Only
Step-by-Step Instructions
The Bee Head
Start with the beige/skin tone yarn.
- MR, 6 sc in ring [6]
- 6 inc [12]
- (1 sc, inc) x 6 [18]
- (2 sc, inc) x 6 [24]
- (3 sc, inc) x 6 [30]
- (4 sc, inc) x 6 [36]
- (5 sc, inc) x 6 [42]
- 9 sc, (1 sc, inc) x 12, 9 sc [54]
- 9 sc, (1 sc, dec) x 12, 9 sc [42]
- (5 sc, dec) x 6 [36]
- 2 sc, dec, (4 sc, dec) x 5, 2 sc [30]
- (3 sc, dec) x 6 [24]
- (6 sc, dec) x 3 [21]
Fasten off, leaving a long tail for sewing. Before closing the head completely, stuff it firmly with fiberfill. Use your black embroidery thread to create the eyes on row 12. The nose should be placed between rows 12 and 13.
The Antennae
Use the brown yarn.
- MR, 5 sc in ring [5]
- 5 inc [10]
- 3-4. 10 sc [10]
- 5 dec [5]
Stuff the antennae lightly with fiberfill up to the decrease row. Work rows 6-8 with 5 sc [5]. Fasten off, leaving a long tail for sewing to the head.
The Arms
Use the white yarn.
- MR, 5 sc in ring [5]
- 5 inc [10]
- 3-4. 10 sc [10]
- 5 dec [5]
- 6-10. 5 sc [5]
Note: Do not stuff the arms. Slip stitch the end to the beginning to close the tube and leave a long tail. These will be sewn to the body between rows 25 and 26.
The Wings
Use the white yarn.
- MR, 6 sc in ring [6]
- 6 inc [12]
- (1 sc, inc) x 6 [18]
- (2 sc, inc) x 6 [24]
- 5-6. 24 sc [24]
- (2 sc, dec) x 6 [18]
- (1 sc, dec) x 6 [12]
Note: Do not stuff the wings. Fasten off, leaving a long tail for sewing.
The Striped Body
This section uses a colorwork technique. Start with the brown yarn. You will alternate between 2 rows of brown and 2 rows of yellow. To ensure smooth color transitions, perform a slip stitch and 1 chain at the end of each color row before starting the next color.
- MR, 6 sc in ring [6]
- (1 sc, inc) x 3 [9]
- 9 sc [9]
- (2 sc, inc) x 3 [12]
- 12 sc [12]
- (1 sc, inc) x 6 [18]
- 18 sc [18]
- (2 sc, inc) x 6 [24]
- 24 sc [24]
- (3 sc, inc) x 6 [30]
- 30 sc [30]
- (9 sc, inc) x 3 [33]
- 13/14. 33 sc [33] (Note: For row 13, use (9 sc, dec) x 3 [30] to shape)
- 14. 30 sc [30]
- (3 sc, dec) x 6 [24]
- 24 sc [24]
- (6 sc, dec) x 3 [21]
- 24 sc [24]
- (2 sc, dec) x 6 [18]
- (2 sc, inc) x 6 [24]
- (3 sc, inc) x 6 [30]
- (4 sc, inc) x 6 [36]
- 23/25. 36 sc [36]
- 26. 2 sc, dec, (4 sc, dec) x 5, 2 sc [30]
- (3 sc, dec) x 6 [24]
- (6 sc, dec) x 3 [21]
From row 19 onwards, use only the yellow yarn. Remember to stuff the body firmly with fiberfill, ensuring you place the rattle bell inside before you close the bottom.
The Neck
Use the white yarn.
- Chain 29.
- Working in both sides of the chain (to create a tube), skip the first ch and work 3 sc in every subsequent ch.
This should result in approximately 84 sc. Fasten off, leaving a long tail for sewing the head to the body.
The Ring Attachment Piece
This piece secures the bee to the wooden ring. Use the mustard/yellow yarn.
- Chain 21.
- Working in both sides of the chain, work 20 sc in each ch.
This will create a small strip. Fasten off, leaving long tails for sewing.
The Flower Attachment (Choose Your Style!)
You can choose to make either a Daisy or a Sunflower to decorate your ring.
Option 1: The Daisy
Yellow Center:
- MR, 6 sc [6]
- 6 inc [12]
- (1 sc, inc) x 6 [18]
- (2 sc, inc) x 6 [24]
- 5-6. 24 sc [24]
White Petals: Join white yarn to any stitch. Ch 6, skip the first ch, work 5 sc in the next ch, and sl st in the next stitch. Repeat this pattern until you have 25 petals.
Option 2: The Sunflower
Brown Center:
- MR, 6 sc [6]
- 6 inc [12]
- (1 sc, inc) x 6 [18]
- (2 sc, inc) x 6 [24]
- (5 sc, inc) x 3 [27]
- 27 sc [27]
Yellow Petals: Join yellow yarn. In the next sc, work: [1 sc, 2 dc, ch 1, 2 dc] all in the same stitch. Then, sl st in the next sc. Repeat for a total of 14 petals.
To attach the flower to the ring, crochet a small strip with yellow yarn: Chain 5, work 4 sc in both sides of the chain, repeating for 8-9 rows.
Finishing
Assembly is where the magic happens! Follow these steps carefully:
- Attach Head and Body: Use the neck piece to sew the head to the top of the body.
- Attach Arms: Sew the arms to the sides of the body between rows 25 and 26.
- Attach Wings: Sew the wings to the back of the bee.
- Mount to Ring: Use the attachment piece to sew the bee onto the maple ring. Secure the ends of the arms to the ring as well to ensure the toy is sturdy.
- Add Flower: Use the flower attachment strip to sew your daisy or sunflower onto the ring.
Tips for Success
- Safety First: Since this is a baby toy, ensure all sewing is extremely secure. If you are giving this to a newborn, consider using embroidered eyes rather than plastic safety eyes to prevent choking hazards.
- Consistent Tension: Try to keep your tension even, especially when working the color changes in the body, to avoid gaps in your stitches.
- Seamless Transitions: When changing colors, always use a slip stitch and a chain to “bridge” the gap; this makes the stripes look much cleaner.
- Stuffing Technique: Stuff in small clumps rather than one large ball to avoid lumps in your amigurumi.