How to Crochet an Adorable Amigurumi Bunny: A Step-by-Step Tutorial
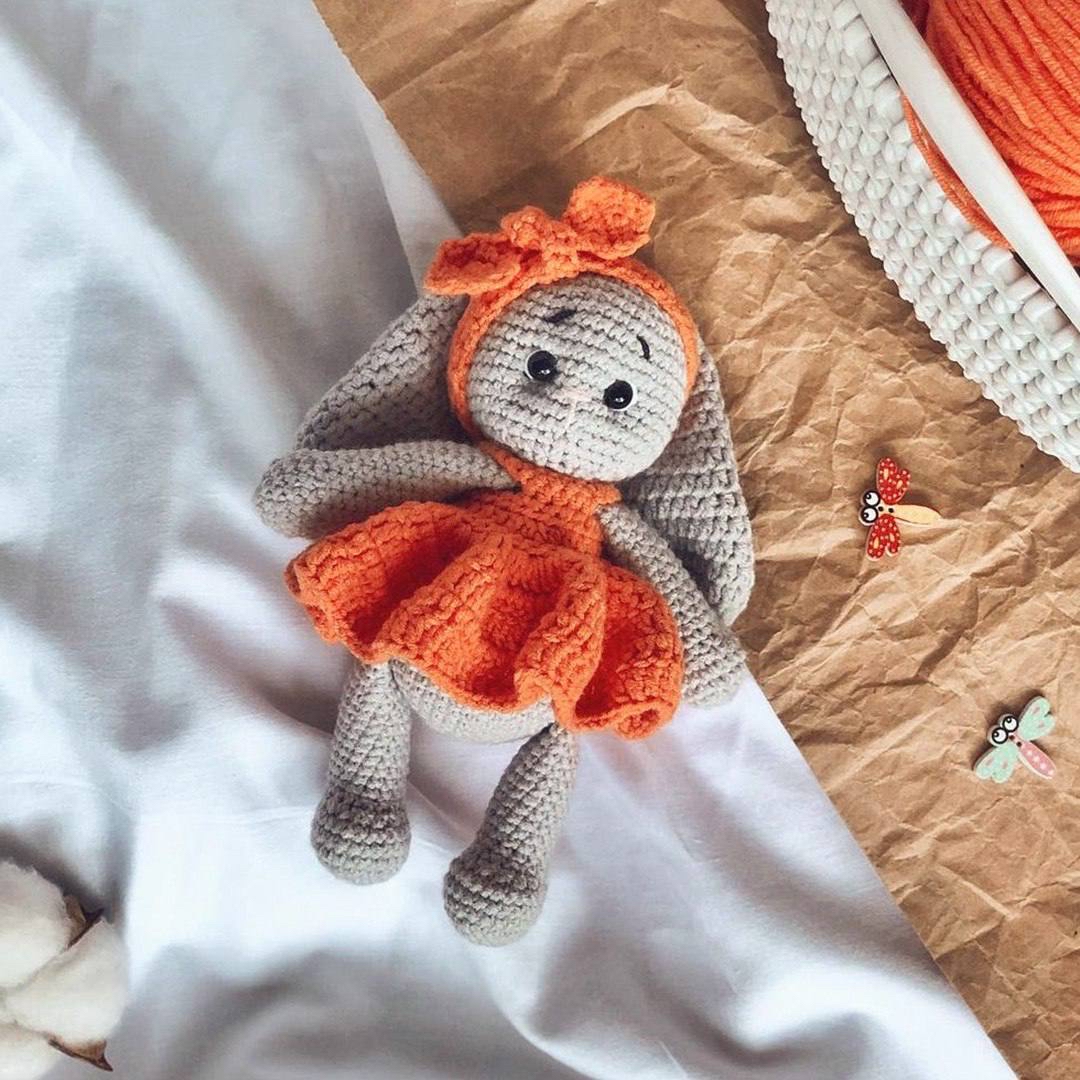
If you are looking for your next crochet project, there is nothing quite as charming as a handmade amigurumi bunny. This little bunny, featuring a cozy orange dress and a matching headband, is the perfect project for anyone looking to add more character to their crochet collection. Whether you are making a nursery decoration, a gift for a loved one, or just a little friend for your own shelf, this bunny is sure to bring a smile to anyone’s face.
In this tutorial, we will walk through the entire process of creating this sweet character from scratch. This pattern is designed to be beginner-friendly, focusing on basic stitches like single crochet and half double crochet. By the time you finish, you will have a wonderful little toy standing approximately 6.5 inches tall!
Materials and Tools
Before you dive into the stitches, make sure you have all your supplies ready. Using the right yarn weight and hook size is key to getting that tight, professional amigurumi look that keeps the stuffing from peeking through.
- Yarn: You will need a fine/sport weight cotton yarn (such as Yarn Art Jeans). You will need two colors:
- Color A (Main Color): Grey (approximately 100 yards)
- Color B (Accent Color): Orange (approximately 100 yards)
- Hook: A 2.0mm (B) crochet hook.
- Stuffing: Polyfill or polyester fiberfill.
- Eyes: 7mm safety eyes.
- Details: A small amount of black, pink, and white yarn for the facial embroidery.
- Button: One 10mm button for the back of the dress.
- Notions: Scissors, a tapestry needle for sewing, and a stitch marker.
Abbreviations
To keep things simple, we will use standard US crochet terminology. Please ensure you are familiar with these terms before starting:
- MR: Magic Ring
- ch: Chain
- sc: Single crochet
- hdc: Half double crochet
- inc: Increase (2 stitches in one)
- dec: Decrease (sc 2 together)
- sl st: Slip stitch
Step-by-Step Instructions
The Head
Start with your main grey yarn.
- 6 sc in a MR (6)
- 6 inc (12)
- (1 sc, inc) repeat 6 times (18)
- (2 sc, inc) repeat 6 times (24)
- (3 sc, inc) repeat 6 times (30)
- (4 sc, inc) repeat 6 times (36)
- (5 sc, inc) repeat 6 times (42)
- (6 sc, inc) repeat 6 times (48)
- Rounds 9–16: 48 sc
- (6 sc, dec) repeat 6 times (42)
- (5 sc, dec) repeat 6 times (36)
- (4 sc, dec) repeat 6 times (30)
- (3 sc, dec) repeat 6 times (24)
Note: Before closing the head, insert your 7mm safety eyes between rounds 13 and 14. Ensure they are spaced exactly 8 stitches apart. Stuff the head firmly with polyfill. Fasten off and weave in the ends.
The Arms (Make 2)
Use your main grey yarn.
- 6 sc in a MR (6)
- 6 inc (12)
- (1 sc, inc) repeat 6 times (18)
- Rounds 4–5: 18 sc
- (1 sc, dec) repeat 6 times (12)
- Rounds 7–21: 12 sc
Stuff the arm halfway through the process. Fold the arm in half and sc through both layers for 6 stitches to close it. Fasten off, leaving a long tail for sewing.
The Legs (Make 2)
Use your main grey yarn.
- 6 sc in a MR (6)
- 6 inc (12)
- (1 sc, inc) repeat 6 times (18)
- (2 sc, inc) repeat 6 times (24)
- Rounds 5–7: 24 sc
- 6 sc, 6 dec, 6 sc (18)
- 6 sc, 3 dec, 6 sc (15)
- Rounds 10–21: 15 sc
Stuff the legs firmly. Fold the leg in half; if necessary, add a few more sc rounds so the foot sits flat facing forward. Sc through both layers for 7 stitches to close. Fasten off, leaving a tail for sewing.
The Body
Use your main grey yarn. Stuff firmly as you go.
- 6 sc in a MR (6)
- 6 inc (12)
- (1 sc, inc) repeat 6 times (18)
- (2 sc, inc) repeat 6 times (24)
- (3 sc, inc) repeat 6 times (30)
- (4 sc, inc) repeat 6 times (36)
- (5 sc, inc) repeat 6 times (42)
- 42 sc
- Attach the legs here (42)
- Rounds 10–12: 42 sc
- (5 sc, dec) repeat 6 times (36)
- Rounds 14–17: 36 sc
- (4 sc, dec) repeat 6 times (30)
- Rounds 19–20: 30 sc
- (3 sc, dec) repeat 6 times (24)
- Attach the arms here (24)
- 24 sc
Fasten off, leaving a long tail to sew the head to the body.
The Tail
Use your main grey yarn.
- 6 sc in a MR (6)
- (1 sc, inc) repeat 3 times (9)
- Rounds 3–4: 9 sc
- (1 sc, dec) repeat 3 times (6)
Stuff lightly, fasten off, and leave a tail for sewing.
The Ears (Make 2)
Use your main grey yarn.
- 6 sc in a MR (6)
- 6 hdc inc (12)
- (1 hdc, inc) repeat 6 times (18)
- (2 hdc, inc) repeat 6 times (24)
- (3 hdc, inc) repeat 6 times (30)
- Rounds 6–8: 30 hdc
- (3 hdc, dec) repeat 6 times (24)
- Rounds 10–12: 24 hdc
- (2 hdc, dec) repeat 6 times (18)
- Rounds 14–16: 18 hdc
- (1 hdc, dec) repeat 6 times (12)
- Rounds 18–20: 12 hdc
Fold the ears in half and sc through both layers for 6 stitches to close. Fasten off, leaving a tail to sew to the top of the head.
The Orange Dress
Use your orange accent yarn. This part is worked in rows (turn your work after each row).
- Ch 30
- 29 sc
- 5 hdc, ch 7 (skip 7 stitches to create an armhole), 5 hdc, ch 7 (skip 7 stitches), 5 hdc (Total 29)
- Note: Row 4 is implied as a transition; proceed to Row 5.
- Work 3 hdc into every stitch (this creates the ruffle effect)
- (1 hdc, inc) repeat until the end of the row
- Rounds 7–9: Simple hdc rows
Fasten off. Sew a 10mm button to the back of the dress.
The Headband and Bow
The Base: Using orange yarn, ch 5. Work rows of 4 sc until the band is long enough to fit comfortably around the bunny’s head. Fasten off and sew the ends together.
The Bow: Work in rows with orange yarn.
- Ch 2
- 2 inc (4)
- 4 inc (8)
- 8 sc
- 4 dec (4)
- 2 dec (2)
- Rounds 7–13: 2 sc
- 2 inc (4)
- 4 inc (8)
- 8 sc
- 4 dec (4)
- 2 dec (2)
- 1 dec, fasten off.
Tie or sew the bow onto the headband.
Finishing
Now comes the fun part—bringing your bunny to life! Use your tapestry needle and the remaining yarn tails to assemble the pieces. Follow this order for the best results:
- Sew the Head to the Body: Ensure it is centered and secure.
- Attach Ears: Position them on top of the head, ensuring they are symmetrical.
- Attach Limbs: Sew the legs to the bottom of the body (round 9) and the arms to the sides (round 22).
- Attach Tail: Sew the tail to the back of the body.
- Dress and Headband: Pull the dress over the body and secure the headband.
- Face Details: Using your black, pink, and white yarn, embroider a small nose and mouth. You can also add tiny pink circles under the eyes for a blushing effect!
Tips for Success
Crocheting amigurumi can be tricky if you are new to the craft. Here are a few expert tips to ensure your bunny turns out perfect:
- Use Stitch Markers: Amigurumi is worked in continuous spirals. It is very easy to lose your place, so always use a marker to identify the start of your round.
- Mind Your Tension: Try to keep your stitches tight. If your tension is too loose, the stuffing will show through the gaps, making the toy look messy.
- Don’t Skimp on Stuffing: A well-stuffed toy holds its shape much better. When stuffing the head and body, push the polyfill into all the corners.
- The “Magic Ring” Trick: If you struggle with the Magic Ring, you can alternatively chain 2 and work your first round of stitches into the second chain from the hook.