Adorable Amigurumi Walrus Crochet Pattern: A Step-by-Step Tutorial
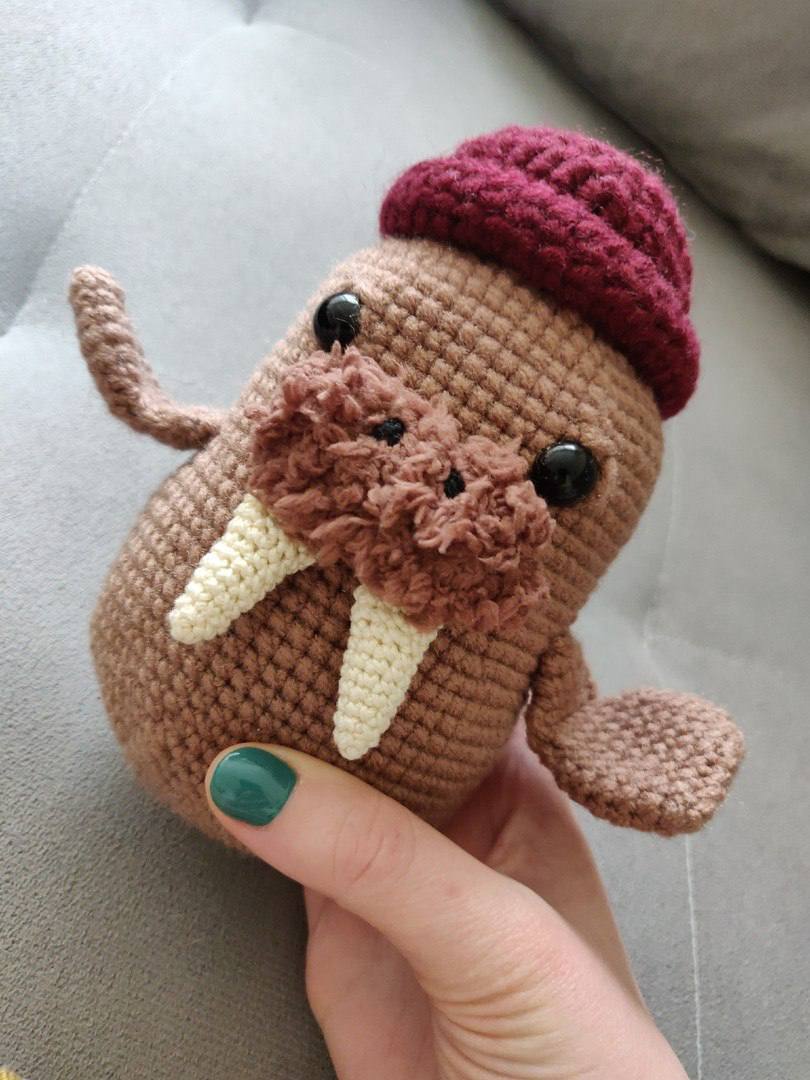
Looking for a cozy and charming project to add to your crochet collection? This cute amigurumi walrus is the perfect companion for any crochet lover. With his chunky body, signature tusks, and a tiny burgundy hat, he is sure to bring a smile to anyone’s face. Whether you are looking for a unique gift or a relaxing weekend project, this pattern is designed to be accessible for beginners while providing a professional, high-quality result.
In this tutorial, we will guide you through every stitch needed to create your own little walrus. We will use standard US crochet terms and imperial measurements to ensure your process is smooth and stress-free. Let’s dive in!
Materials & Abbreviations
To get started, gather the following supplies. For the best results, we recommend using a medium-weight acrylic or cotton blend yarn for the body to provide a sturdy structure.
Materials Needed
- Yarn:
- Brown Medium (Worsted) Yarn (for the body and flippers)
- Brown Fuzzy/Chenille Yarn (for the muzzle texture)
- Beige Cotton Yarn (for the tusks)
- Burgundy Yarn (for the hat)
- Crochet Hooks: 3.0 mm and 1.5 mm
- Safety Eyes: 15 mm
- Stuffing: Polyester fiberfill
- Other Tools: Yarn needle, scissors, and a few scraps of black embroidery thread for the nostrils.
Abbreviations (US Terms)
- MR: Magic Ring
- ch: Chain
- sc: Single Crochet
- inc: Increase (2 sc in the same stitch)
- dec: Decrease (sc 2 together)
- sl st: Slip Stitch
- st(s): Stitch(es)
Step-by-Step Instructions
The Muzzle
For the muzzle, we will use a combination of the main brown yarn and the brown fuzzy yarn, crocheting them together to create a textured, realistic look. Use a 3.0 mm hook.
- Round 1: Ch 8. Starting in the 2nd ch from hook, work 6 sc, inc, 6 sc across the bottom of the chain, and inc in the last chain. (16 sts)
- Round 2: 6 sc, 2 inc, 6 sc, 2 inc, sl st to join. (20 sts)
Fasten off, leaving a long tail for sewing.
The Tusks (Make 2)
Switch to the beige cotton yarn and a 1.5 mm hook for a tighter, firmer stitch.
- Round 1: 4 sc in MR (4)
- Round 2: (sc, inc) x 2 (6)
- Round 3: 6 sc (6)
- Round 4: (sc, inc) x 3 (9)
- Rounds 5–8: 9 sc (9)
- Round 9: (2 sc, inc) x 3 (12)
- Rounds 10–11: 12 sc (12)
Fasten off, leaving a long tail. Lightly stuff the tusks, but leave the top open for a cleaner look. Sew the sides together and attach them to the muzzle as shown in the finished model.
The Body
Using brown yarn and a 3.0 mm hook, we will work from the top of the head downwards.
- Round 1: 6 sc in MR (6)
- Round 2: inc x 6 (12)
- Round 3: (sc, inc) x 6 (18)
- Round 4: (2 sc, inc) x 6 (24)
- Round 5: (3 sc, inc) x 6 (30)
- Round 6: (4 sc, inc) x 6 (36)
- Round 7: (5 sc, inc) x 6 (42)
- Round 8: (6 sc, inc) x 6 (48)
- Round 9: (7 sc, inc) x 6 (54)
- Round 10: (8 sc, inc) x 6 (60)
- Rounds 11–20: sc in each st around (60)
- Round 21: (8 sc, dec) x 6 (54)
- Rounds 22–23: sc in each st around (54)
- Round 24: (8 sc, inc) x 6 (60)
- Round 25: (9 sc, inc) x 6 (66)
- Rounds 26–34: sc in each st around (66)
Assembly Note: This is the ideal time to sew the muzzle to the body and embroider the eyebrows for better placement. Attach the muzzle one round below the safety eyes. Begin stuffing the body firmly as you continue.
- Round 35: (9 sc, dec) x 6 (60)
- Round 36: (8 sc, dec) x 6 (54)
- Round 37: (7 sc, dec) x 6 (48)
- Round 38: (6 sc, dec) x 6 (42)
- Round 39: (5 sc, dec) x 6 (36)
- Round 40: (4 sc, dec) x 6 (30)
- Round 41: (3 sc, dec) x 6 (24)
- Round 42: (2 sc, dec) x 6 (18)
- Round 43: (1 sc, dec) x 6 (12)
- Round 44: dec x 6 (6)
Fasten off and weave in the end.
The Tail and Back Flippers
The tail is created by first making two small flippers and then joining them together. Use brown yarn and a 3.0 mm hook.
For each flipper:
- Round 1: 4 sc in MR (4)
- Round 2: (sc, inc) x 2 (6)
- Round 3: inc x 6 (12)
- Round 4: (sc, inc) x 6 (18)
- Rounds 5–6: sc around (18)
- Round 7: (sc, dec) x 6 (12)
- Round 8: (sc, dec) x 4 (8)
- Rounds 9–10: sc around (8)
Fasten off the first flipper. For the second, do not cut the yarn. Join them by working across both pieces:
- Round 11: 8 sc in first flipper, 8 sc in second (16)
- Round 12: sc around (16)
- Round 13: (7 sc, inc) x 2 (18)
- Round 14: (2 sc, inc) x 6 (24)
- Round 15: (3 sc, inc) x 6 (30)
- Round 16: (4 sc, inc) x 6 (36)
- Round 17: (5 sc, inc) x 6 (42)
- Round 18: (6 sc, inc) x 6 (48)
- Rounds 19–20: sc around (48)
- Round 21: Work 10 sc to reach the center.
- Round 22: 24 inc across the top, 24 sc across the bottom (72)
- Rounds 23–25: sc around (72)
Fasten off, leaving a long tail for sewing.
Front Flippers (Arms) (Make 2)
- Round 1: Ch 7. Starting in 2nd ch from hook: 5 sc, 3 sc in next st, 5 sc, 3 sc in next st (16)
- Rounds 2–3: sc around (16)
- Round 4: (3 sc, inc) x 4 (20)
- Round 5: (8 sc, dec) x 2 (18)
- Round 6: (7 sc, dec) x 2 (16)
- Round 7: (6 sc, dec) x 2 (14)
- Round 8: sc around (14)
- Round 9: Flatten and join the sides with 7 sc (7)
- Round 10: Work 7 sc on each side of the piece (14)
- Rounds 11–12: sc around (14)
Fasten off, leaving a long tail for sewing.
The Little Hat
Use burgundy yarn and a 3.0 mm hook.
- Round 1: 6 sc in MR (6)
- Round 2: inc x 6 (12)
- Round 3: (sc, inc) x 6 (18)
- Round 4: (2 sc, inc) x 6 (24)
- Round 5: (3 sc, inc) x 6 (30)
- Round 6: (4 sc, inc) x 6 (36)
- Rounds 7–10: sc around (36)
Fasten off. Fold the bottom edge up by about two rounds to create a brim.
Finishing Touches
Now it is time to put your walrus together!
- Tail Attachment: Sew the tail to the center back of the body. Ensure the sides of the tail are two stitches away from the front flippers. The bottom of the tail should be sewn to Round 36 of the body.
- Front Flippers: Sew the front flippers to the sides of the body, ensuring they are symmetrical.
- The Hat: Add a small amount of stuffing to the top of the hat to give it shape, then sew it securely to the head.
- Details: Use black embroidery thread to stitch small nostrils on the muzzle.
Tips for a Perfect Walrus
- Tension Matters: When working the tusks with the 1.5 mm hook, keep your tension tight so the stuffing doesn’t peek through.
- Invisible Decreases: To make your walrus look more professional, use the “invisible decrease” method (working through the front loops only of the next two stitches).
- Stuffing: Stuff the body firmly, especially the neck area, to ensure he holds his shape and doesn’t slouch.
- Yarn Choice: If you can’t find “fuzzy” yarn, a small amount of brushed acrylic or a scrap of faux fur yarn works beautifully for the muzzle!