Crochet Luna Moth Pattern: A Step-by-Step Guide to a Realistic Saturnia Luna Moth
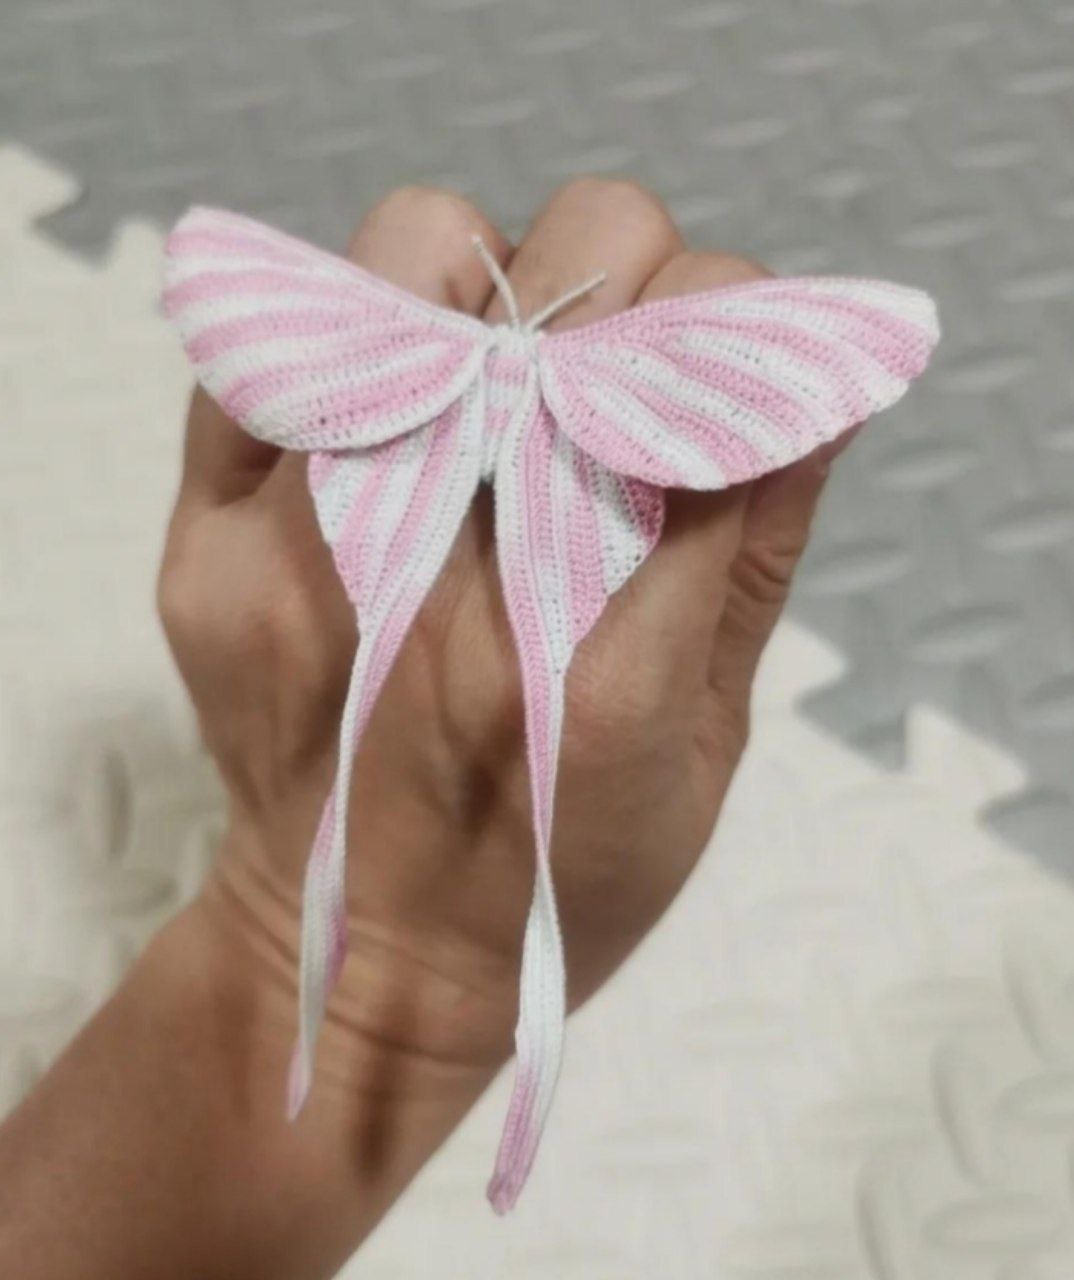
If you are looking for a unique, nature-inspired crochet project, look no further! The Luna Moth, also known as the Saturnia Luna, is one of the most beautiful insects in the world. With its ethereal lime-green color and long, elegant tails, it makes for a stunning piece of home decor or a magical addition to a fairy garden.
This project is a micro-crochet masterpiece. Because it uses incredibly fine thread and wire, it requires a bit of patience and a steady hand, but the result is a lifelike, delicate moth that looks like it just landed from a dream. Whether you are an experienced micro-crocheter or an intermediate crafter looking for a new challenge, this tutorial will guide you through every tiny stitch.
Materials & Abbreviations
To achieve the level of detail seen in this pattern, you will need specialized, fine materials. This is a delicate project, so precision is key!
Materials Needed
- Crochet Hook: 0.3mm (This is a very fine hook used for micro-crochet).
- Thread: Fine white cotton thread (Weight 80# / approx. 168m per 10g).
- Wire: 30-gauge paper-wrapped wire (for the wing structure, legs, and antennae).
- Acrylic Paints: Various shades of green and pink/yellow to achieve the moth’s natural coloring.
- Hardener/Sealer: A craft hardener or matte/gloss sealer to set the paint.
- Tools: Needle-nose pliers, glue (clear craft glue works best), scissors, and small brushes for painting.
US Crochet Abbreviations
- ch: chain
- sl st: slip stitch
- sc: single crochet
- hdc: half double crochet
- dc: double crochet
- tr: treble crochet
- inc: increase
- dec: decrease
- BLO: back loop only
- FLO: front loop only
- MR: magic ring
Step-by-Step Instructions
Before starting, remember that since we are working with such fine thread, your tension should be consistent. If the wings feel too flimsy, ensure your stitches are tight.
Large Wings (Make 2)
The wings are built around a wire frame to give them their signature shape. Fold your wire in half and secure the thread to the loop created by the fold.
Row 1: Work 42 sc along one half of the wire (42).
Row 2: Turn, join the second half of the wire, and work 42 sc (42).
Row 3: Turn, ch 2, 4 dc, 5 hdc, 3 sc, 2 sl st.
Row 4: Turn, skip 1 stitch, sl st, 11 sc, 2 hdc.
Row 5: Turn, ch 2, skip 1 stitch, 5 dc, 1 dec (dc2tog), 7 hdc. Continue working down the “steps” created by the previous rows and into the base stitches: (2 hdc, 3 sc, 2 sl st).
Note: Any stitches indicated in parentheses () are worked downwards into the base stitches or previous turning rows.
Row 6: Turn, skip 1 stitch, skip 1 stitch, 16 sc, 3 hdc.
Row 7: Turn, ch 2, skip 1 stitch, 3 dc, 1 dec, 3 dc, 1 dec, 2 dc, 1 dec, 5 hdc, 1 dc, (2 hdc, 1 sc, 2 sl st).
Row 8: Turn, skip 1 stitch, 19 sc, 2 hdc.
Row 9: Turn, ch 2, 5 dc, 1 dec, 4 dc, 1 dec, 2 dc, 7 hdc, 1 dc, (3 hdc, 1 sc, 2 sl st).
Row 10: Turn, skip 1 stitch, sl st, 24 sc, 1 hdc.
Row 11: Turn, ch 2, skip 1 stitch, 3 dc, 1 dec, 3 dc, 1 dec, 6 hdc, 4 sc, 3 sl st.
Row 12: Turn, skip 1 stitch, 18 sc, 2 hdc.
Row 13: Turn, ch 2, skip 1 stitch, 2 dc, 1 dec, 2 dc, 1 dec, 9 dc, 7 hdc, (1 hdc, 1 sc, 2 sl st).
Row 14: Turn, skip 1 stitch, sl st, 23 sc, 1 hdc, 1 dc.
Row 15: Turn, ch 2, 1 hdc, 3 dc, 1 dec, 3 dc, 1 dec, 5 dc, 1 dec, 4 dc, 2 hdc, 2 sc, 1 hdc, (1 sc, 2 sl st).
Row 16: Turn, skip 1 stitch, sl st, 19 sc, 5 hdc, 1 dc.
Row 17: Turn, ch 2, 1 hdc, 2 dc, 1 dec, 6 dc, 6 hdc, 7 sc, 2 sl st.
Row 18: Turn, skip 1 stitch, sl st, 22 sc, 1 hdc.
Row 19: Turn, ch 2, skip 1 stitch, 1 hdc, 2 dc, 1 dec, 1 dc, 1 dec, 3 dc, 1 dec, 7 dc, 5 hdc, (1 sc, sl st).
Row 20: Turn, skip 1 stitch, 1 sc, 1 hdc, 1 dec, 5 dc, 1 dec, 5 dc, 4 hdc, 2 sc, sl st.
Row 21: Turn, skip 1 stitch, sl st, 1 sc, 3 hdc, 3 dc, 1 inc (dc2tog), 5 sc, 2 hdc, 1 inc (hdc2tog), 2 hdc, 1 sc, (sl st).
Fasten off and hide the yarn tails.
Small Wings (Make 2)
The small wings are also worked around a wire frame. When working downwards toward the base row, you may also need to work into the side stitches created by your turning rows.
Row 1: Along one half of the wire, work 4 sc, 7 hdc, 81 dc, 3 hdc, 2 sc. Join the second half of the wire: [ch 3, sl st in the same stitch], 2 sc, 6 hdc, 17 dc, 10 hdc, 61 sc.
Row 2: Turn, skip 1 stitch, sl st, 1 sc, 1 hdc, 4 dc, 1 dec, 3 dc, 1 dec, 11 dc, 4 hdc, 3 sc, 2 sl st.
Row 3: Turn, ch 1, skip 2 stitches, 25 sc, 2 sl st.
Row 4: Turn, skip 1 stitch, sl st, 1 sc, 1 hdc, 18 dc, 1 hdc, 2 sc, sl st.
Row 5: Turn, ch 1, skip 2 stitches, 1 sc, 1 hdc, 2 dc, 1 inc, 7 dc, 5 hdc, 7 sc, 2 sl st.
Row 6: Turn, skip 1 stitch, sl st, 1 sc, 1 hdc, 1 sc, 1 inc, 13 dc, 2 hdc, 1 sc, sl st.
Row 7: Turn, ch 1, skip 2 stitches, 1 sc, 1 hdc, 1 sc, 1 inc, 5 hdc, 8 sc, 1 inc, 4 sc, sl st.
Row 8: Turn, skip 1 stitch, sl st, 3 sc, 1 inc, 3 sc, 3 hdc, 5 dc, 2 hdc, 1 sc, 2 sl st.
Row 9: Turn, ch 1, skip 2 stitches, 1 sc, 1 hdc, 1 sc, 2 hdc, 1 inc, 4 hdc, 11 sc, sl st.
Fasten off and hide the yarn tails.
The Body
For the body, use a slightly larger crochet hook to ensure the stitches are easy to work with and to provide a bit more structure.
R1: 6 sc in a magic ring (6).
R2: (2 sc, inc) * 2 (8).
R3: (3 sc, inc) * 2 (10).
R4: (2 sc, inc, 2 sc) * 2 (12).
R5: (3 sc, inc) * 3 (15).
R6: 15 sc (15).
R7: (2 sc, inc, 2 sc) * 3 (18).
R8-9: 18 sc (18).
R10: (inc, 5 sc) * 3 (21).
R11: 21 sc (21).
R12: (3 sc, inc, 3 sc) * 3 (24).
R13: 24 sc (24).
R14: (3 sc, dec, 3 sc) * 3 (21).
R15: 21 sc (21).
R16: (dec, 5 sc) * 3 (18).
R17: (2 sc, dec, 2 sc) * 3 (15).
R18: (3 sc, dec) * 3 (12).
Important: Do not stuff the body. Instead, fold it in half lengthwise and sew the edges together to create a slim, tapered shape.
Finishing
Assembly
Now it is time to bring your Luna moth to life! The sewn body you just completed will serve as the head/body connection point.
- Prepare the Wire: Take your wire pieces and strip the paper coating off the ends so you have bare metal.
- Insert the Framework: Carefully insert the wires into the body. You will need enough wire to create 2 antennae and 6 legs. Spread the wire ends out on the opposite side of the body to create the structure.
- Attach the Wings: Once the body/head structure is ready, insert the wings into the body at the appropriate junction.
- Trim: Use your pliers to snip off any excess wire protruding from the body or wings.
- Secure: Use a small amount of glue to secure the points where the wire exits the crochet work.
- Detailing: To make the legs and antennae look natural, wrap them in fine thread and secure them with a tiny dot of glue.
Painting and Final Touches
To give your moth its iconic look, use acrylic paints. Start with a base color and layer different shades of green and hints of pink or yellow to mimic the natural patterns of a Saturnia Luna.
Once the paint is completely dry, apply a hardener or a craft sealer. This will protect the paint and give the moth a more organic, slightly firm texture. Once the hardener has set, your moth is ready to display!
Tips
- Lighting is Everything: When doing micro-crochet, use a bright desk lamp. It is very difficult to see these tiny stitches in dim light.
- Use Tweezers: Tweezers are your best friend when working with a 0.3mm hook. They help you manipulate the tiny stitches and wire ends.
- Don’t Rush the Paint: When painting, use very little water. You want the pigment to stay concentrated so it doesn’t soak through the fine cotton fibers too much.
- Wire Tension: When assembling, don’t pull the wire too tight, or you might tear the delicate crochet fabric.