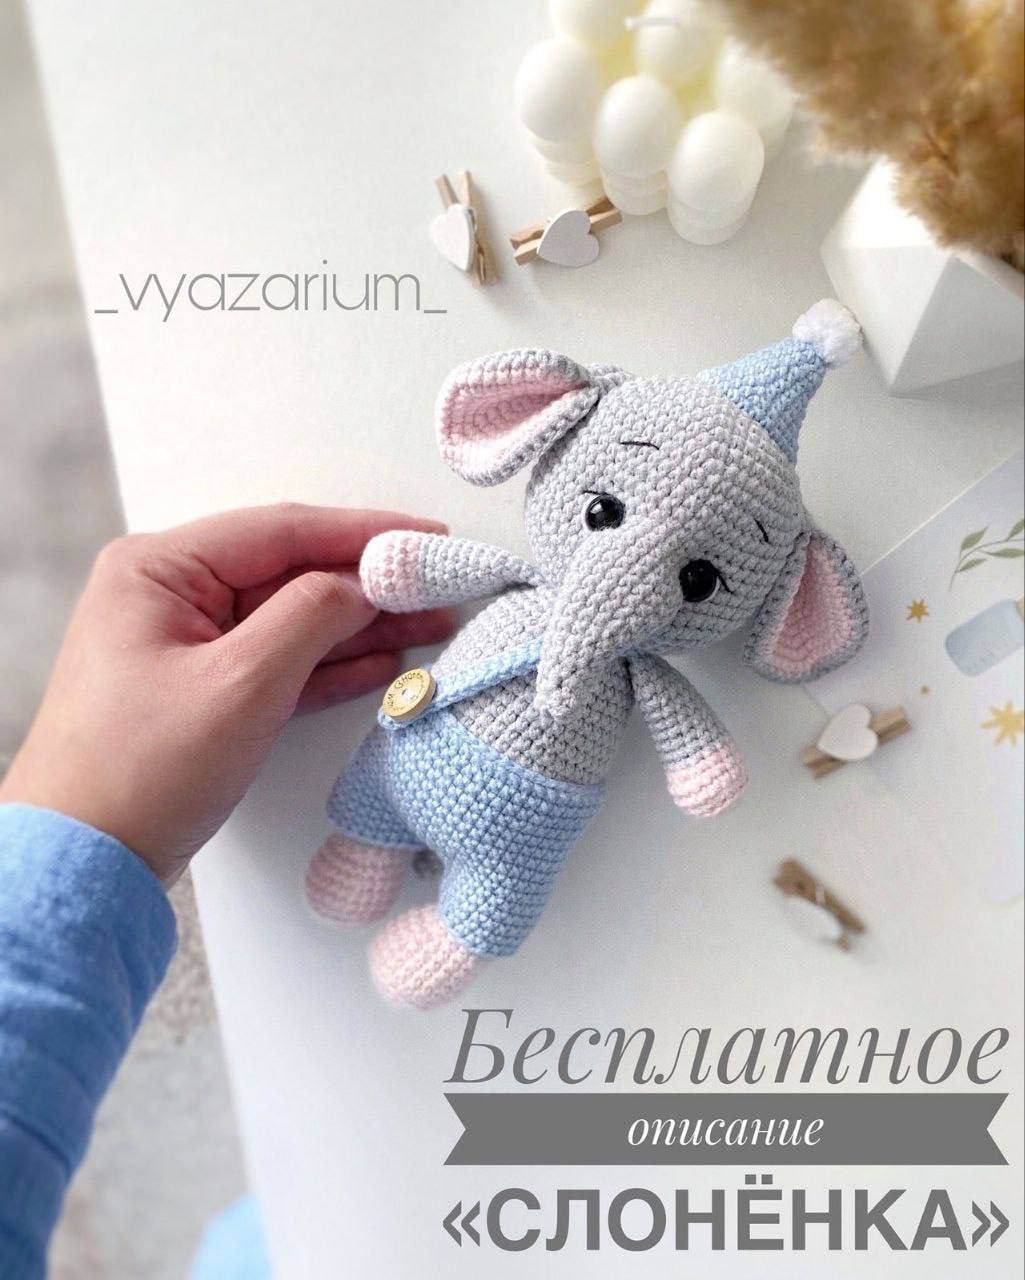
Adorable Amigurumi Baby Elephant Crochet Pattern
Welcome to this cozy crochet tutorial! If you are looking for a project that is equal parts challenging and rewarding, this adorable baby elephant is the perfect choice. Whether you are making a gift for a newborn, a nursery decoration, or just adding to your own amigurumi collection, this little guy is sure to bring a smile to anyone’s face. This pattern is designed to be beginner-friendly, provided you know the basics of working in the round.
In this guide, we will walk through every step of creating your elephant, from the trunk and tiny toes to his dapper little overalls. Grab your hook and yarn, and let’s get started!
Materials & Abbreviations
To achieve the look in the photos, I recommend using a sport-weight cotton blend yarn. This keeps the stitches tight so the stuffing doesn’t peek through and gives the toy a professional, clean finish.
Materials Needed
- Yarn: Sport weight yarn (such as YarnArt Jeans or similar) in the following colors:
- Gray (Main color for body and head)
- Light Pink (For the inner ears, hands, and feet)
- Light Blue (For the overalls and hat)
- Small amounts of White and Black (For facial embroidery)
- Crochet Hook: 2.0mm (or a size that gives you a tight fabric)
- Safety Eyes: 8mm or 10mm diameter
- Stuffing: Polyester fiberfill
- Tools: Stitch markers, yarn needle, and scissors
US Crochet Terms & Abbreviations
- MR: Magic Ring
- sc: Single crochet
- inc: Increase (2 sc in one stitch)
- dec: Decrease (sc 2 together)
- sl st: Slip stitch
- ch: Chain
- hdc: Half double crochet
- ( )* x: Repeat the instructions inside the parentheses the specified number of times
Step-by-Step Instructions
The Head
Using gray yarn, we will create a spherical head with a specific opening for the trunk.
- Round 1: 6 sc in MR (6)
- Round 2: 6 inc (12)
- Round 3: (1 sc, inc) * 6 (18)
- Round 4: (2 sc, inc) * 6 (24)
- Round 5: (3 sc, inc) * 6 (30)
- Round 6: (4 sc, inc) * 6 (36)
- Round 7: (5 sc, inc) * 6 (42)
- Round 8: (6 sc, inc) * 6 (48)
- Round 9: (7 sc, inc) * 6 (54)
- Rounds 10-15: sc in each stitch around (54)
- Round 16 (The Trunk Hole): sc 23, ch 8, skip 8 stitches, sc 23 (54)
- Rounds 17-19: sc in each stitch around, including the chain stitches (54)
Eye Placement: Insert your safety eyes between rounds 15 and 16. Position them about 8 stitches away from the edges of the trunk hole.
- Round 20: (7 sc, dec) * 6 (48)
- Round 21: sc in each stitch around (48)
- Round 22: (6 sc, dec) * 6 (42)
- Round 23: (5 sc, dec) * 6 (36)
- Round 24: (4 sc, dec) * 6 (30)
- Round 25: (3 sc, dec) * 6 (24)
- Round 26: (2 sc, dec) * 6 (18)
Fasten off with a slip stitch, leaving a long tail for sewing.
The Legs
Make two legs. Start with pink yarn for the feet, then switch to gray.
- Round 1: 6 sc in MR (6)
- Round 2: 6 inc (12)
- Round 3: (1 sc, inc) * 6 (18)
- Round 4: (2 sc, inc) * 6 (24)
- Round 5: sc in the back loops only (BLO) for 24 stitches (24)
- Rounds 6-7: sc in each stitch around (24)
- Round 8: sc 6, (2 sc, dec) * 3, sc 6 (21)
- Round 9: sc in each stitch around (21)
- Round 10: sc 6, dec 5 times, sc 5 (16). Change to gray yarn here.
- Rounds 11-18: sc in each stitch around (16)
- Round 19: (2 sc, dec) * 4 (12)
- Round 20: sc 12. For the left leg, add 2 extra sc to shift the position for better alignment.
Stuff the legs up to round 16. Flatten the top and crochet 6 sc across to close the opening. Leave a short tail.
The Arms
Make two arms. Start with pink, then switch to gray.
- Round 1: 6 sc in MR (6)
- Round 2: 6 inc (12)
- Round 3: (1 sc, inc) * 6 (18)
- Round 4: sc in the back loops only (BLO) for 18 stitches (18)
- Rounds 5-6: sc in each stitch around (18)
- Round 7: sc 6, dec 3 times, sc 6 (15). Change to gray yarn here.
- Rounds 8-15: sc in each stitch around (15)
- Round 16: (3 sc, dec) * 3 (12)
- Round 17: sc 12, plus 2 extra sc for alignment shift.
Stuff the arms up to round 15. Flatten the top and crochet 6 sc across to close. Leave a short tail.
The Trunk
The trunk is worked by attaching gray yarn to the bottom center of the hole we created in the head.
- Round 1: Ch 1, in that same stitch work 1 sc. Continue around the hole: sc 3, 1 sc in the corner, sc 8, 1 sc in the corner, sc 4, sl st. (18)
- Round 2: sc in each stitch around (18)
- Rounds 3-14: In each round, work sc around and finish with one decrease (dec) at the end of the round. This will gradually taper the trunk (17, 16, 15… down to 6 stitches).
Stuff the trunk lightly, sew the end closed, and hide the yarn tail.
The Tail
Using gray yarn:
- Round 1: 6 sc in MR (6)
- Rounds 2-11: sc in each stitch around (6)
Fold the piece in half and crochet 3 sc across the opening to flatten it. Leave a tail for sewing.
The Body
Using gray yarn, we will now assemble the base of the elephant.
- Round 1: 6 sc in MR (6)
- Round 2: 6 inc (12)
- Round 3: (1 sc, inc) * 6 (18)
- Round 4: (2 sc, inc) * 6 (24)
- Round 5: (3 sc, inc) * 6 (30)
- Round 6: (4 sc, inc) * 6 (36)
- Round 7: (5 sc, inc) * 6 (42)
- Round 8: (6 sc, inc) * 6 (48)
- Round 9: sc 47, and 1 sc worked together with the tail (48)
- Round 10: 2 sc together with the tail, sc 7, 6 sc together with the first leg, sc 18, 6 sc together with the second leg, sc 9 (48)
- Rounds 11-14: sc in each stitch around (48)
- Round 15: (14 sc, dec) * 3 (45)
- Rounds 16-17: sc in each stitch around (45)
- Round 18: (13 sc, dec) * 3 (42)
- Rounds 19-20: sc in each stitch around (42)
- Round 21: (5 sc, dec) * 6 (36)
- Rounds 22-23: sc in each stitch around (36)
- Round 24: (4 sc, dec) * 6 (30)
- Round 25: (3 sc, dec) * 6 (24)
- Round 26: sc 6, 6 sc together with the first arm, sc 6, 6 sc together with the second arm (24)
- Round 27: sc in each stitch around (24)
- Round 28: (2 sc, dec) * 6 (18)
Finish with a slip stitch and leave a long tail for attaching the head.
The Ears
Make 4 circles in total: 2 in gray and 2 in pink.
- Round 1: 6 sc in MR (6)
- Round 2: 6 inc (12)
- Round 3: (1 sc, inc) * 6 (18)
- Round 4: (2 sc, inc) * 6 (24)
- Round 5: (3 sc, inc) * 6 (30)
- Round 6: (4 sc, inc) * 6 (36)
- Round 7: (5 sc, inc) * 6 (42)
For the pink circles, fasten off with a slip stitch. For the gray circles, do not cut the yarn. Place the pink circle on the wrong side of the gray circle and sc around the edges to join them. Fold the finished ear in half and crochet 5 sc across the fold to create a slight dip. Leave a long tail for sewing.
The Overalls (Pants)
Using light blue yarn, chain 50 and join with a sl st to form a ring. Work in rounds, starting each row with a ch 1 (counts as first sc) and ending with a sl st.
- Rounds 1-5: sc in each stitch around (50)
- Round 6 (Tail Hole): sc 47, ch 3, skip 3 stitches, sl st (50)
- Rounds 7-13: sc in each stitch around (50)
The Legs: Join yarn to the bottom. Crochet 22 sc and join in a circle with a sl st. Work one round of 22 sc. Skip 3 stitches (across the tail area) and repeat the process for the second leg. Sew the gap between the legs closed.
The Straps: Join yarn at the top of the pants. Work a row of sl st around the waist. From the top edge, ch 40 + 2. Starting in the 3rd chain from the hook, work hdc back down the chain to the waist. Repeat for the other strap.
The Hat
Using light blue yarn:
- Round 1: 6 sc in MR (6)
- Rounds 2-3: sc in each stitch around (6)
- Round 4: 6 inc (12)
- Rounds 5-6: sc in each stitch around (12)
- Round 7: (1 sc, inc) * 6 (18)
- Rounds 8-9: sc in each stitch around (18)
- Round 10: (2 sc, inc) * 6 (24)
- Round 11: (3 sc, inc) * 6 (30)
- Round 12: sc in each stitch around (30)
Fasten off with a sl st and leave a tail for sewing. Attach a white pompom to the top.
Finishing
Now comes the assembly! This is where your elephant really comes to life.
- Body Assembly: Sew the head to the body using the long yarn tails, ensuring the neck is secure and doesn’t wobble.
- Details: Sew the ears to the sides of the head and attach the hat.
- Clothing: Slip the overalls onto the body. You can add a small wooden button to the straps for an extra touch of cuteness.
- Facial Embroidery: Using a needle and black yarn, embroider small eyebrows and eyelashes. Use white yarn to add a tiny highlight (a small vertical stitch) in the upper corner of the safety eyes to make them look shiny and alive.
Tips for Success
- Keep it Tight: When crocheting amigurumi, tension is everything. If you see holes, try dropping down a hook size.
- Marker Your Rounds: Because you are working in continuous spirals, it is very easy to lose your place. Use a stitch marker in the first stitch of every round.
- Stuff as You Go: Stuff your pieces firmly but not so tight that the fabric stretches out. This ensures your elephant keeps its shape over time.
- Embroidery First: I find it easier to do the facial embroidery before sewing the head to the body so I have a flatter surface to work on.