Adorable Crochet Lamb Amigurumi Pattern: A Step-by-Step Tutorial
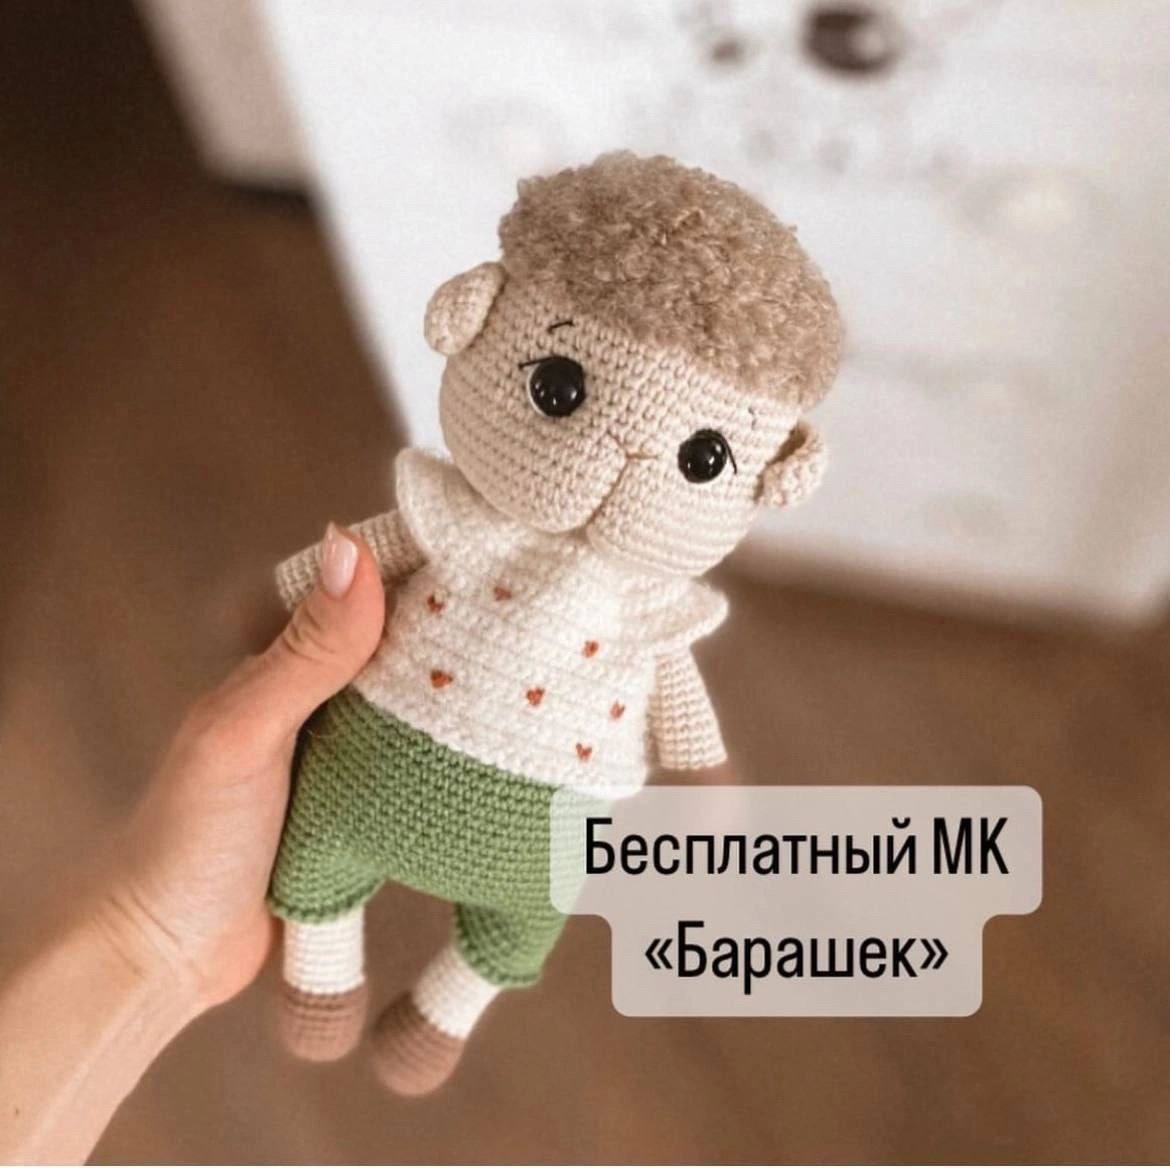
There is nothing quite as cozy as a handmade crochet animal! This adorable little lamb is the perfect project for anyone looking to create a sweet, huggable companion for a child or a charming addition to a nursery. With its fluffy hair, tiny cardigan, and sweet expression, this lamb is sure to be a favorite.
This pattern is designed to be accessible for beginner-to-intermediate crocheters. We will be using the amigurumi technique of working in continuous spirals, meaning you won’t need to join your rounds with a slip stitch unless specifically mentioned. Grab your hooks and yarn, and let’s get started!
Materials & Abbreviations
To create this little lamb, you will need a few different colors of yarn and some basic crochet supplies. For a standard-sized plush, we recommend using a medium weight (worsted) yarn and a hook size that prevents stuffing from showing through.
Materials
- Yarn:
- Cream/Off-white (for the body and head)
- Light Brown/Tan (for the hooves)
- Green (for the pants)
- Bouclé yarn or fluffy yarn (for the hair)
- Small amount of pink or red yarn for heart details
- Crochet Hook: 2.5mm or 3.0mm (adjust based on your tension)
- Larger Hook: 3.5mm or 4.0mm (specifically for the hair)
- Safety Eyes: 10mm or 12mm black safety eyes
- Stuffing: Polyfill or fiberfill
- Notions: Yarn needle, stitch markers, and small buttons for the cardigan
Abbreviations (US Terms)
- MR: Magic Ring
- Sc: Single Crochet
- Inc: Increase (two sc in one stitch)
- Dec: Decrease (sc two stitches together)
- Ch: Chain
- Sl st: Slip Stitch
- BLO: Back Loop Only
- Hdc: Half Double Crochet
- St(s): Stitch(es)
Step-by-Step Instructions
The Arms (Make 2)
Start with the brown yarn for the hooves.
- Round 1: 6 sc in MR (6)
- Round 2: Inc in every st (12)
- Round 3: (1 sc, inc) * 6 (18)
- Round 4: 18 sc in BLO (18)
- Rounds 5-7: 18 sc (18)
- Round 8: (Dec, 4 sc) * 3 (15)
Switch to the cream yarn.
- Rounds 9-27: 15 sc (15)
Finishing the Arms: Stuff the hoof area firmly. From round 10 to 20, stuff lightly. If the color change doesn’t align perfectly with the inside of the arm, add a few extra sc stitches. Fold the arm in half and sc 7 across both layers to close the bottom. Leave a long tail for sewing to the body.
The Legs (Make 2)
Start with the brown yarn for the hooves.
- Round 1: 8 sc in MR (8)
- Round 2: Inc in every st (16)
- Round 3: (1 sc, inc) * 8 (24)
- Round 4: 24 sc in BLO (24)
- Rounds 5-9: 24 sc (24)
- Round 10: (2 sc, dec) * 6 (18)
Switch to the cream yarn.
- Rounds 11-31: 18 sc (18)
Finishing the Legs: Stuff the hooves firmly. Stuff the cream portion loosely up to round 24. Fold the leg in half and sc 9 across both layers. Leave a short tail for attaching to the body.
The Tail
Use the cream yarn.
- Round 1: 6 sc in MR (6)
- Round 2: Inc in every st (12)
- Rounds 3-6: 12 sc (12)
You can leave the tail empty or add a tiny bit of stuffing. Fold in half and sc 6 across both layers. Leave a long tail for sewing.
The Body
Use the cream yarn. Stuff as you go.
- Round 1: 8 sc in MR (8)
- Round 2: Inc in every st (16)
- Round 3: (1 sc, inc) * 8 (24)
- Round 4: (2 sc, inc) * 8 (32)
- Round 5: (3 sc, inc) * 8 (40)
- Round 6: 2 sc, inc, (4 sc, inc) * 7, 2 sc (48)
- Round 7: 48 sc (48)
- Round 8: (5 sc, inc) * 8 (56)
- Round 9: 56 sc (56)
- Round 10: 3 sc, inc, (6 sc, inc) * 7, 3 sc (64)
- Rounds 11-12: 64 sc (64)
- Round 13 (Attaching Legs): 12 sc on body, 9 sc around the leg, 22 sc on body, 9 sc around the second leg, 12 sc on body (64). Tip: This leaves about 22 stitches between the legs in the front and 24 in the back.
- Rounds 14-17: 64 sc (64)
- Round 18: Dec, 14 sc, dec, 12 sc, dec, 14 sc, dec, 16 sc (60)
- Round 19: 60 sc (60)
- Round 20: 4 sc, dec, (8 sc, dec) * 5, 4 sc (54)
- Rounds 21-22: 54 sc (54)
- Round 23: (7 sc, dec) * 6 (48)
- Rounds 24-25: 48 sc (48)
- Round 26: 3 sc, dec, (6 sc, dec) * 5, 3 sc (42)
- Rounds 27-28: 42 sc (42)
- Round 29: (5 sc, dec) * 6 (36)
- Rounds 30-31: 36 sc (36)
- Round 32: 2 sc, dec, (4 sc, dec) * 5, 2 sc (30)
- Round 33: 30 sc (30)
Stuff the body very firmly now.
- Round 34 (Attaching Arms): 6 sc on body, 7 sc around the arm, 8 sc on body, 7 sc around the second arm, 2 sc on body (30).
- Round 35: (8 sc, dec) * 3 (27)
- Round 36: 27 sc (27)
Leave a long tail for sewing the head to the body.
The Head
Use the cream yarn. Stuff as you go.
- Round 1: 8 sc in MR (8)
- Round 2: Inc in every st (16)
- Round 3: (1 sc, inc) * 8 (24)
- Round 4: (2 sc, inc) * 8 (32)
- Round 5: (3 sc, inc) * 8 (40)
- Round 6: 2 sc, inc, (4 sc, inc) * 7, 2 sc (48)
- Round 7: 48 sc (48)
- Round 8: (5 sc, inc) * 8 (56)
- Round 9: 56 sc (56)
- Round 10: 3 sc, inc, (6 sc, inc) * 7, 3 sc (64)
- Round 11: 64 sc (64)
- Round 12: Inc, 31 sc, inc, 31 sc (66)
- Rounds 13-20: 66 sc (66)
Eyes: Place safety eyes between rounds 18 and 19. Find the center of the round (33rd stitch), place a marker, and count 5 stitches to the left and 5 stitches to the right to place the eyes.
- Round 21: 20 sc, (1 sc, inc) * 13, 20 sc (79)
- Rounds 22-25: 79 sc (79)
- Round 26: 77 sc, dec (78)
- Round 27: (11 sc, dec) * 6 (72)
- Round 28: 5 sc, dec, (10 sc, dec) * 5, 5 sc (66)
- Round 29: 7 sc, dec, (6 sc, dec) * 6, 7 sc, dec (58)
- Round 30: (1 sc, dec) * 19, 1 sc (39)
- Round 31: (2 sc, dec) * 9, 3 sc (30)
- Round 32: (3 sc, dec) * 6 (24)
Stuff the head firmly.
- Round 33: (2 sc, dec) * 6 (18)
- Round 34: (1 sc, dec) * 6 (12)
- Round 35: 6 dec (6)
Close the hole by sewing through the front loops and fasten off.
Ears & Hair
Ears (Make 2): Chain 9. Starting from the 2nd chain from the hook: Row 1: 8 sc, ch 1, turn. Row 2: 8 sc, ch 1. Then, sc around the entire edge of the piece. Leave a long tail for sewing.
Hair: Using the larger hook and Bouclé yarn, attach the yarn to round 13 of the head. Work in a spiral moving toward the magic ring. Alternate between 1 and 2 sc and skip a row between spirals to create a fluffy, textured look. Keep your stitches loose!
Finishing
Assembly
- Ears: Sew the ears 2 stitches below the hair line and about 6 stitches away from the eyes.
- Tail: Sew the tail between rounds 11 and 12 of the body.
- Head: Sew the head securely to the body using the long tail.
- Face: Embroider small eyebrows one row above the eyes. Embroider a small nose between and slightly below the eyes.
The Little Pants
Use the green yarn.
- Ch 60, join with a sl st to form a circle.
- Rounds 1-2: 60 sc (60)
- Round 3: (29 sc, inc) * 2 (62)
- Rounds 4-9: 62 sc (62)
- Round 10 (Tail Hole): 13 sc, ch 6, skip 6 sc, 43 sc (62)
- Rounds 11-20: 62 sc (62)
Legs: Divide the stitches to create legs (24 sc for the first leg, 7 sc gap, 24 sc for the second leg, 7 sc gap). For the first leg: join the 24 sc in a circle with a sl st and work in rounds until the desired length is reached. Finish with a border of (sl st, ch 1) * 24. Repeat for the second leg, then sew the 7-stitch gap closed.
The Cardigan
Use the cream yarn. This is worked in rows (turning), not spirals.
- Ch 27. Row 1: 26 sc. Row 2: Inc in every st (52). Row 3-6: 52 sc.
- Row 7: 5 sc, 12 inc hdc, 18 sc, 12 inc hdc, 5 sc (76).
- Row 8 (Sleeves): 5 sc, ch 12, skip 24 hdc, 18 sc, ch 12, skip 24 hdc, 5 sc (52).
- Rounds 9-11: 52 sc.
- Row 12: 10 sc, inc, 30 sc, inc, 10 sc (54).
- Row 13: 54 sc.
- Row 14: 12 sc, inc, 28 sc, inc, 12 sc (56).
- Row 15: 56 sc.
- Row 16: 16 sc, inc, 22 sc, inc, 16 sc (58).
- Row 17: 58 sc.
- Row 18: 12 sc, inc, 32 sc, inc, 12 sc (60).
Finish the bottom edge with (sl st, ch 1). Sc around the front openings and neckline. Sew on small buttons and create loops on the opposite side. For an extra touch, embroider small pink hearts on the front!
Tips for Success
- Tension: Amigurumi requires tight tension so the stuffing doesn’t leak. If you see holes, try dropping down half a hook size.
- Stitch Markers: Since we work in spirals, markers are essential! Mark the first stitch of every round.
- Color Changes: To get a clean color transition, change the yarn on the last pull-through of the previous stitch.
- Stuffing: Use a chopstick or a crochet hook to push stuffing into the narrow arms and legs for a plump, professional look.