Adorable Crochet Baby Chick Pattern: Easy Amigurumi Tutorial
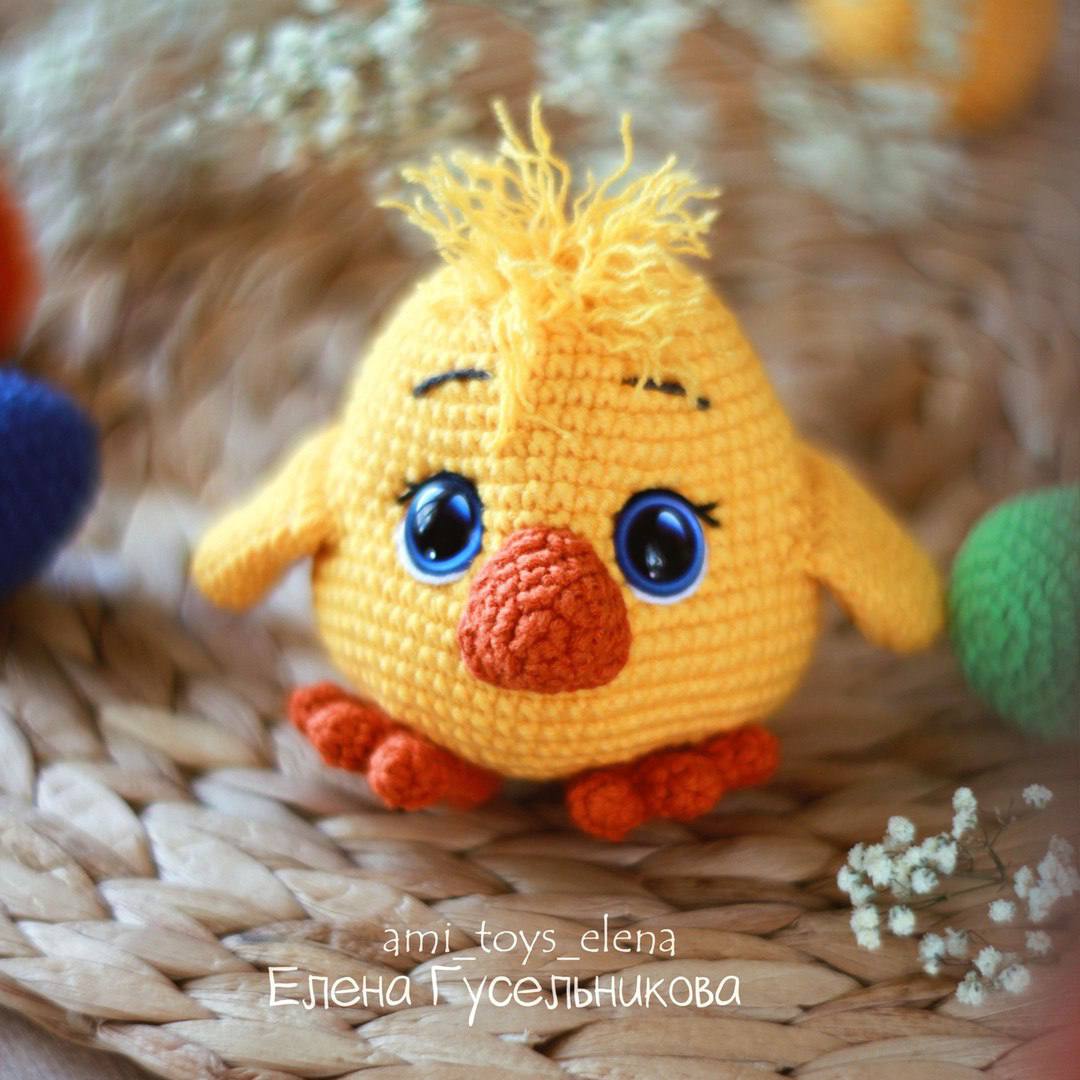
Looking for a quick, sweet, and incredibly cute crochet project? Whether you are preparing for Easter, creating a gift for a baby shower, or simply want to add a little cheer to your home, this baby chick amigurumi is the perfect choice. With its round, plump body and expressive eyes, this little bird is designed to be an instant favorite.
This tutorial is written with beginners in mind. We will guide you through the process of creating a tiny, fluffy companion using basic crochet stitches. The finished chick stands approximately 3.5 inches tall, making it the ideal size for a palm-sized toy or a cute desk accessory. Grab your yellow yarn and let’s get started!
Materials & Abbreviations
To ensure your chick turns out just like the photos, we recommend using a sport-weight yarn. This provides a tight stitch that prevents the stuffing from showing through.
Materials Needed
- Yarn: Sport weight yarn (such as YarnArt Jeans or similar) in Yellow and Terracotta. You will need approximately 175 yards of yellow and a small amount of terracotta.
- Crochet Hook: 1.75 mm hook (or the smallest size that works for your yarn to keep the fabric dense).
- Safety Eyes: 14 mm plastic safety eyes.
- Stuffing: High-quality polyester fiberfill.
- Embroidery Thread: Thin black and white thread for the eye details and eyebrows.
- Tools: Yarn needle, scissors, and a small amount of craft glue.
US Crochet Abbreviations
- MR: Magic Ring
- ch: Chain
- sc: Single crochet
- inc: Increase (two single crochets in one stitch)
- dec: Decrease (single crochet two stitches together)
- sl st: Slip stitch
- (…) * n: Repeat the instructions inside the parentheses n times
- (Number): Total stitch count at the end of the round
Step-by-Step Instructions
The Head and Body
The head and body are worked as one continuous piece in yellow yarn. We will work in continuous spirals, so using a stitch marker is highly recommended to keep track of your rounds.
- Round 1: 6 sc in MR (6)
- Round 2: 6 inc (12)
- Round 3: (1 sc, inc) * 6 (18)
- Round 4: 1 sc, inc, (2 sc, inc) * 5, 1 sc (24)
- Round 5: (3 sc, inc) * 6 (30)
- Round 6: 2 sc, inc, (4 sc, inc) * 5, 2 sc (36)
- Round 7: 36 sc (36)
- Round 8: (5 sc, inc) * 6 (42)
- Round 9: 42 sc (42)
- Round 10: 3 sc, inc, (6 sc, inc) * 5, 3 sc (48)
- Rounds 11-12: 48 sc (48)
- Round 13: (7 sc, inc) * 6 (54)
- Rounds 14-15: 54 sc (54)
Pro Tip: If you are using safety eyes, insert them now between rounds 15 and 16. Leave a gap of 9 single crochet stitches between the two eyes.
- Round 16: 4 sc, inc, (8 sc, inc) * 5, 4 sc (60)
- Round 17: 60 sc (60)
- Round 18: (9 sc, inc) * 6 (66)
- Rounds 19-24: 66 sc (66)
- Round 25: (4 sc, dec) * 11 (55)
- Round 26: (3 sc, dec) * 11 (44)
- Round 27: (2 sc, dec) * 11 (33)
- Round 28: (9 sc, dec) * 3 (30)
At this point, stop and stuff the head and body firmly with fiberfill. Make sure the stuffing is evenly distributed so your chick is nice and round.
- Round 29: (3 sc, dec) * 6 (24)
- Round 30: (2 sc, dec) * 6 (18)
- Round 31: (1 sc, dec) * 6 (12)
- Round 32: 6 dec (6)
Cut the yarn, leaving a tail. Use your yarn needle to weave the tail through the remaining 6 stitches and pull tight to close the hole. Secure the end inside the body.
The Wings
Using yellow yarn, make two wings. These are not stuffed.
- Round 1: 6 sc in MR (6)
- Round 2: 6 inc (12)
- Round 3: 12 sc (12)
- Round 4: (3 sc, inc) * 3 (15)
- Round 5: 15 sc (15)
- Round 6: (4 sc, inc) * 3 (18)
- Round 7: 18 sc (18)
- Round 8: (5 sc, inc) * 3 (21)
- Round 9: 21 sc (21)
Fold the wing in half and crochet 10 sc across the edge to join the sides together. Fasten off, leaving a tail for sewing.
The Feet
Using terracotta yarn, make two feet. We start by making three small toes for each foot.
Toes: For each toe, work: R1: 6 sc in MR (6), R2: 6 sc (6). Make 3 toes in total. After the third toe, do not cut the yarn; you will use it to join them.
Joining the Toes:
- Round 3: 3 sc across the 2nd toe, 6 sc across the 1st toe, 3 sc across the 2nd toe, 6 sc across the 3rd toe (18)
- Round 4: (4 sc, dec) * 3 (15)
- Round 5: 15 sc (15)
- Round 6: (3 sc, dec) * 3 (12)
- Round 7: 12 sc (12)
- Round 8: 6 dec (6)
Fasten off and weave in the ends. Do not stuff the feet.
The Beak
Using terracotta yarn:
- Round 1: 6 sc in MR (6)
- Round 2: 6 inc (12)
- Round 3: 12 sc (12)
- Round 4: (3 sc, inc) * 3 (15)
- Round 5: (3 sc, 2 inc) * 3 (21)
Fasten off, leaving a long tail for sewing.
Finishing
Now comes the magic part—assembly! This is where your chick gets its personality.
Shaping the Face
To give the chick a cute “dip” between the eyes, use a needle and thread to create a cinch. Mark the spots between rounds 15 and 16 where the eyes are. Pull the thread firmly across the face from one eye to the other and tie it off. This creates a more realistic, three-dimensional face.
Adding Details
- Beak: Stuff the beak very lightly with fiberfill and sew it to the center of the face, just below the eye dip.
- Eyes: If you haven’t already, secure your safety eyes. Use your black and white embroidery thread to add small highlights and outlines around the eyes to make them look expressive.
- Feet: Sew the feet to the bottom of the body.
- Wings: Sew the wings to the sides of the body.
- The Tuft: Cut several pieces of yellow yarn about 2 inches long. Using your hook, loop them onto the very top of the head and pull them through to create a messy, cute tuft of hair.
- Eyebrows: Use black thread to embroider two small, slightly curved lines above the eyes to give your chick a curious expression.
Tips for Success
If you are new to amigurumi, here are a few pointers to make your process smoother:
- Tight Tension: Amigurumi requires a tight tension so the stuffing doesn’t leak out. If you see gaps in your stitches, try a smaller hook size.
- Stitch Markers: Because we work in spirals, it is very easy to lose your place. Always place a marker in the first stitch of every round.
- Invisible Decrease: For a cleaner look, use the “invisible decrease” method (working in the front loops only) to avoid small bumps on the surface of the chick.
- Symmetry: When sewing the wings and feet, use sewing pins to mark the placement first. This ensures everything is centered and symmetrical before you commit with a stitch.