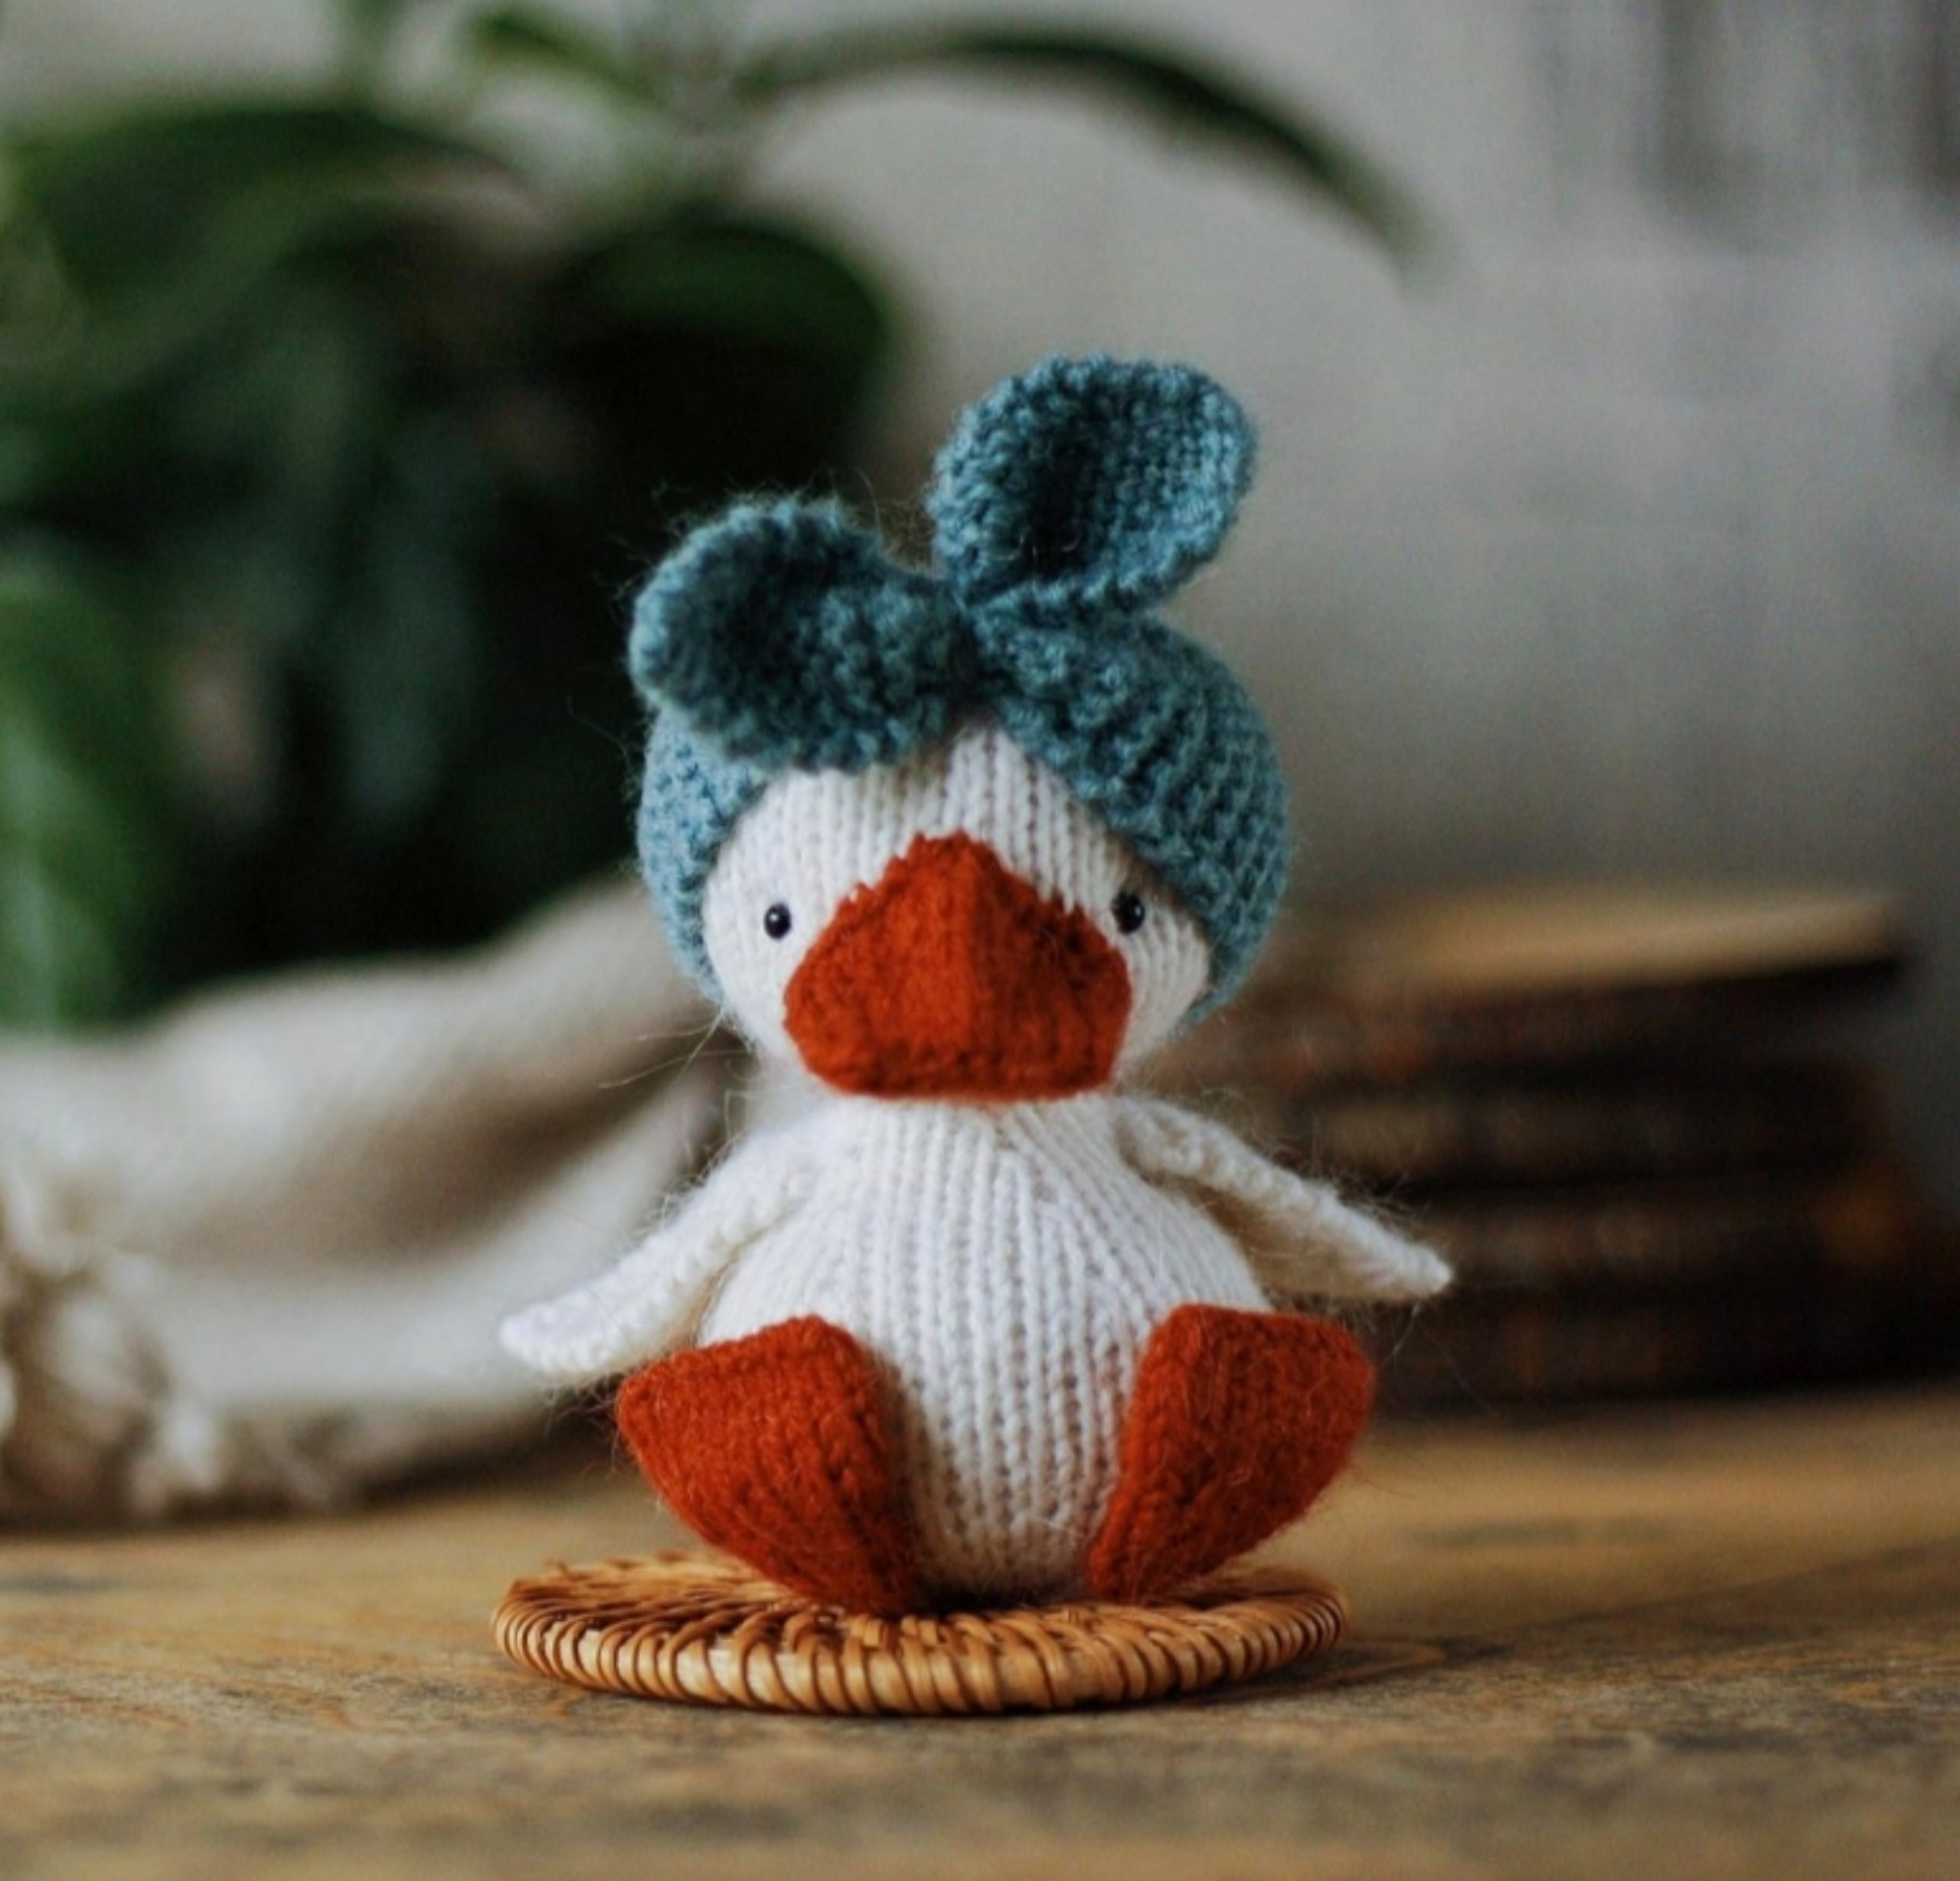
Knit Your Very Own Tiny Goose: An Adorable Step-by-Step Amigurumi Tutorial
“`html
DIY Knitted Little Goose Pattern: Step-by-Step Tutorial
Create your own adorable mini goose with this detailed knitting pattern. This project is perfect for beginners and experienced knitters alike who enjoy making small, cute amigurumi-style toys.
Materials Needed
- Yarn:
- Cream-colored alpaca blend yarn (for the body)
- Terracotta-colored alpaca blend yarn (for the beak and feet)
- Blue yarn (for the headband)
- Needles: 1.5mm double-pointed needles (DPNs)
- Eyes: Two 3mm black beads
- Stuffing: High-quality fiberfill
- Tools: Sewing needle, stitch pins, scissors, and tweezers for stuffing
Important Knitting Notes
To achieve the desired look and texture, please follow these specific techniques:
- Stitch Style: All main parts are worked in the round using knit stitches through the front loop only.
- Increases: Perform increases using a yarn over (YO). To avoid holes in the fabric, knit the YO through the back loop if the YO is toward you, and through the front loop if the YO is away from you.
- Decreases: Perform decreases by knitting two stitches together (k2tog) through the front loop.
Step 1: The Head
Cast on 12 stitches and distribute them evenly across three double-pointed needles (4 stitches per needle). Join to work in the round.
- Row 1: (K1, YO, K2, YO, K1) repeat 3 times = 18 sts.
- Row 2: Knit all 18 sts.
- Row 3: (K2, YO, K3, YO, K1) repeat 3 times = 24 sts.
- Row 4: Knit all 24 sts.
- Row 5: (K3, YO, K4, YO, K1) repeat 3 times = 30 sts.
- Row 6: Knit all 30 sts.
- Row 7: (K4, YO, K5, YO, K1) repeat 3 times = 36 sts.
- Rows 8-23: Knit all 36 sts for 16 rows.
- Row 24: (K4, dec, K4, dec) repeat 3 times = 30 sts.
- Row 25: (K3, dec, K3, dec) repeat 3 times = 24 sts.
- Row 26: (K2, dec, K2, dec) repeat 3 times = 18 sts.
- Row 27: (K1, dec, K1, dec) repeat 3 times = 12 sts.
Cut the yarn, leaving a 20cm tail. Remove the stitches from the needles using a sewing needle. Do not tighten immediately; leave an opening for stuffing. Tighten the very top of the head to create a “snowflake” point and hide the tail. Fill the head with fiberfill using tweezers, then sew the bottom opening shut.
Step 2: The Body
Cast on 12 stitches and distribute them across three needles (4 stitches per needle). Join to work in the round.
- Row 1: (K1, YO, K2, YO, K1) repeat 3 times = 18 sts.
- Row 2: Knit all 18 sts.
- Row 3: (K2, YO, K3, YO, K1) repeat 3 times = 24 sts.
- Row 4: Knit all 24 sts.
- Row 5: (K3, YO, K4, YO, K1) repeat 3 times = 30 sts.
- Row 6: Knit all 30 sts.
- Row 7: (K4, YO, K5, YO, K1) repeat 3 times = 36 sts.
- Rows 8-19: Knit all 36 sts for 12 rows.
- Row 20: (K4, dec, K4, dec) repeat 3 times = 30 sts.
- Rows 21-23: Knit all 30 sts for 3 rows.
- Row 24: (K3, dec, K3, dec) repeat 3 times = 24 sts.
- Rows 25-26: Knit all 24 sts for 2 rows.
- Row 27: (K2, dec, K2, dec) repeat 3 times = 18 sts.
- Rows 28-29: Knit all 18 sts for 2 rows.
- Row 30: (K1, dec, K1, dec) repeat 3 times = 12 sts.
- Rows 31-32: Knit all 12 sts for 2 rows.
Cut the yarn, leaving a 20cm tail. Remove stitches from the needles. Tighten the top and hide the tail. Stuff the body firmly with fiberfill and sew the bottom opening closed. Do not cut the final thread, as you will use it to sew the body to the head.
Step 3: The Wings (Make 2)
Cast on 9 stitches. Leave a 15cm tail for sewing.
- Rows 1-20: K1, K8 = 9 sts.
- Row 21: K1, dec, K3, dec, K1 = 7 sts.
- Row 22: K1, K6 = 7 sts.
- Row 23: K1, dec, K1, dec, K1 = 5 sts.
- Row 24: K1, K4 = 5 sts.
- Row 25: K1, (dec) repeat 2 times = 3 sts.
Remove stitches from the needles, tighten the end, and hide the tail.
Step 4: The Feet (Make 2)
Using the Judy’s cast-on method, cast on 20 stitches (10 per needle).
- Rows 1-2: Knit all 20 sts.
- Distribution: Distribute stitches onto three needles (7, 7, and 6 stitches respectively).
- Rows 3-7: Knit all 20 sts.
- Row 8: K1, dec, K4, dec, K2, dec, K4, dec, K1 = 16 sts.
- Rows 9-10: Knit all 16 sts.
- Row 11: K1, (dec, K2) repeat 3 times, dec, K1 = 12 sts.
- Rows 12-14: Knit all 12 sts.
Remove stitches from the needles, tighten, and leave a 20cm tail for sewing.
Step 5: The Beak
You can choose between two styles of beaks:
Option 1: Flat Beak (Classic Look)
- Cast on 30 stitches using Judy’s cast-on (15 per needle).
- Rows 1-2: Knit all 30 sts.
- Distribution: Divide into 10 stitches per needle.
- Rows 3-7: Knit all 30 sts.
- Bind off and leave a 20cm tail.
Option 2: Rounded Beak (Cute Look)
- Cast on 18 stitches and distribute across three needles (6 per needle). Join in the round.
- Rows 1-2: Knit all 18 sts.
- Row 3: K1, YO, K7, YO, K2, YO, K7, YO, K1 = 22 sts.
- Row 4: Knit all 22 sts.
- Row 5: K1, YO, K9, YO, K2, YO, K9, YO, K1 = 26 sts.
- Row 6: Knit all 26 sts.
- Row 7: K1, YO, K11, YO, K2, YO, K11, YO, K1 = 30 sts.
- Row 8: Knit all 30 sts.
- Bind off and leave a 20cm tail. Sew the beginning of the round together.
Step 6: The Tail
Cast on 6 stitches and distribute them across three needles (2 per needle). Join in the round.
- Rows 1-2: Knit all 6 sts.
- Row 3: (K1, YO) repeat 2 times, K2, (YO, K1) repeat 2 times = 10 sts.
- Row 4: Knit all 10 sts.
- Row 5: K1, YO, K3, YO, K2, YO, K3, YO, K1 = 14 sts.
- Row 6: Knit all 14 sts.
Bind off, leave a 20cm tail, and tighten the start of the knitting.
Step 7: Final Assembly
- Body to Head: Use the remaining thread from the body to sew the head onto the body, capturing stitches from both pieces alternately. Hide the tail.
- The Beak: Position the beak on the head. Fix the sides around Row 18, the top around Row 14, and the bottom around Row 24. Sew around the edges and hide the tails.
- The Eyes: Secure the two 3mm beads into the head just above the beak.
- Wings: Pin the wings to the sides of the body at a slight downward angle (as if the goose is resting its wings). Sew them firmly in place.
- Feet and Tail: Place the goose on a flat surface. Position the feet and tail so the goose sits balanced without tipping over. Once positioned, sew them securely to the body.
Step 8: The Headband
Note: Work this piece using a double strand of blue yarn.
- Cast on 3 stitches.
- Rows 1-2: K1, K2.
- Row 3: K1, YO, K1, YO, K1 = 5 sts.
- Row 4: K1, K4.
- Row 5: K1, YO, K3, YO, K1 = 7 sts.
- Row 6: K1, K6.
- Row 7: K1, YO, K5, YO, K1 = 9 sts.
- Row 8: K1, K8.
- Row 9: K1, YO, K7, YO, K1 = 11 sts.
- Row 10: K1, K10.
- Row 11: K1, YO, K9, YO, K1 = 13 sts.
- Rows 12-121: Knit all 13 sts for 110 rows.
- Row 122: K1, dec, K7, dec, K1 = 11 sts.
- Row 123: Knit all 11 sts.
- Row 124: K1, dec, K5, dec, K1 = 9 sts.
- Row 125: Knit all 9 sts.
- Row 126: K1, dec, K3, dec, K1 = 7 sts.
- Row 127: Knit all 7 sts.
- Row 128: K1, dec, K1, dec, K1 = 5 sts.
- Row 129: Knit all 5 sts.
- Row 130: K1, (dec) repeat 2 times = 3 sts.
- Row 131: K1, K2.
Remove stitches and tighten. Wrap the headband around the goose’s head, determine the correct fit, and sew the ends together, pulling the edges in opposite directions to create a bow effect.
Your little goose is now complete!
“`