Adorable Crochet Baby Elephant Pattern: A Step-by-Step Amigurumi Tutorial
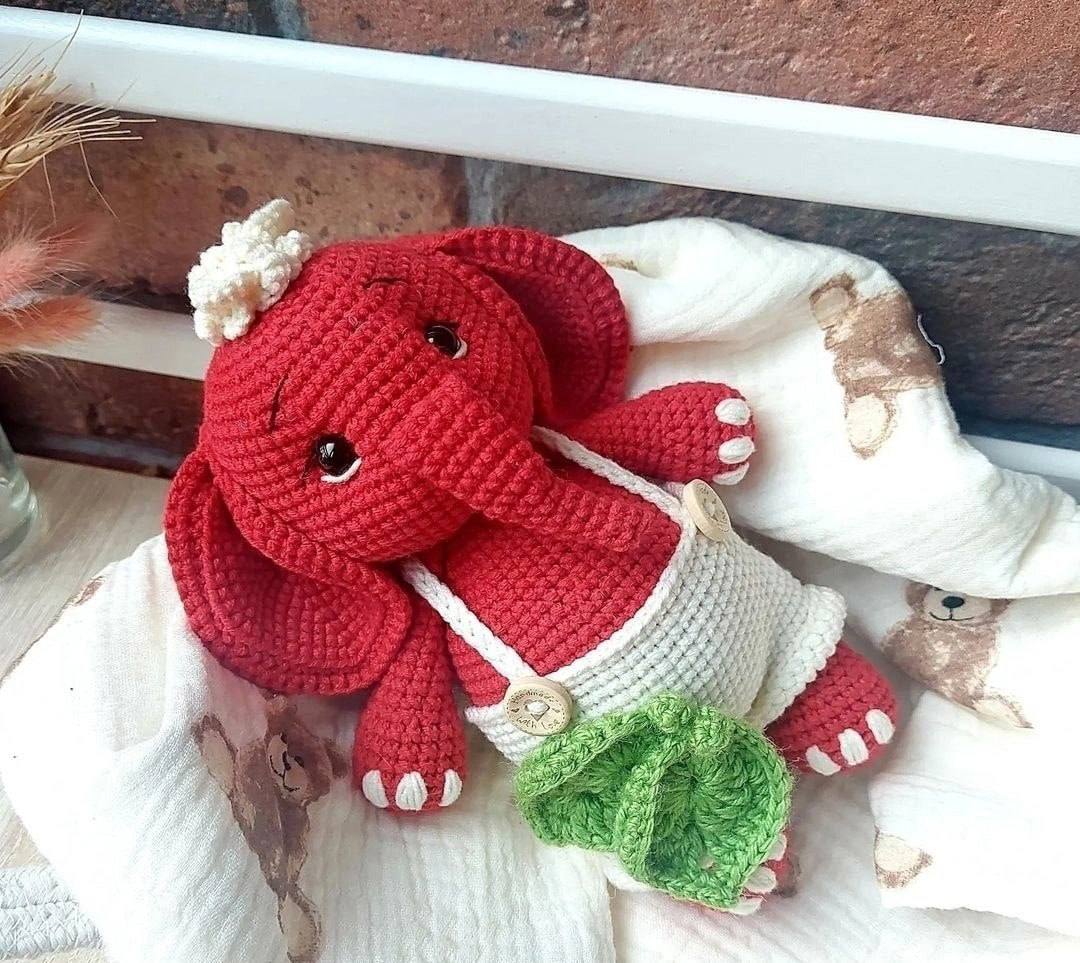
There is nothing quite as charming as a handmade crochet animal to brighten up a nursery or to give as a heartfelt baby shower gift. This sweet little elephant, with its oversized ears and gentle expression, is the perfect project for anyone looking to create a cuddly companion for a little one. Whether you are an experienced amigurumi artist or a beginner looking for a rewarding project, this detailed guide will walk you through every stitch.
This pattern creates a plush, durable toy using standard crochet techniques. We will work the body and head as one continuous piece to minimize sewing and ensure a seamless look. By the end of this tutorial, you’ll have a darling elephant that is as soft to the touch as it is lovely to look at.
Materials & Abbreviations
To get started, gather your materials. While the sample is red, you can use any color yarn—soft greys, pastel pinks, or baby blues all work wonderfully for this pattern.
Suggested Materials
- Yarn: Approximately 200-300 yards of medium weight (worsted) acrylic or cotton blend yarn in your choice of color.
- Crochet Hook: 2.5mm or 3.0mm hook (use a size smaller than recommended on your yarn label to ensure the stuffing doesn’t show through).
- Safety Eyes: 8mm or 10mm black safety eyes.
- Stuffing: High-quality polyester fiberfill.
- Tools: Yarn needle, stitch markers, and scissors.
- Optional: Small buttons and white yarn for the nails/details.
Abbreviations (US Terms)
- MR: Magic Ring
- sc: Single crochet
- inc: Increase (2 sc in the same stitch)
- dec: Decrease (sc 2 stitches together)
- BLO: Back loop only
- st(s): Stitch(es)
- ch: Chain
- (…) * X: Repeat the instructions inside the parentheses X times
Step-by-Step Instructions
The Lower Paws (Legs) – Make 2
The legs provide the sturdy base for our elephant to sit comfortably.
- Round 1: 6 sc in MR (6)
- Round 2: inc in each st around (12)
- Round 3: (1 sc, inc) * 6 (18)
- Round 4: (2 sc, inc) * 6 (24)
- Rounds 5-6: sc in BLO around (24)
- Rounds 7-8: sc around (24)
- Round 9: (2 sc, dec) * 6 (18)
- Rounds 10-14: sc around (18)
- Round 15: (1 sc, dec) * 6 (12)
- Rounds 16-20: sc around (12)
Note: If you plan to sew the legs on later, flatten the opening and crochet 6 sc across the top to close it, leaving a long tail for sewing. If you prefer to crochet them directly into the body, leave the stitch open.
The Upper Paws (Arms) – Make 2
The arms are slightly slimmer than the legs and give the elephant its huggable shape.
- Round 1: 6 sc in MR (6)
- Round 2: inc in each st around (12)
- Round 3: (1 sc, inc) * 6 (18)
- Rounds 4-5: sc in BLO around (18)
- Rounds 6-8: sc around (18)
- Round 9: (1 sc, dec) * 6 (12)
- Rounds 10-19: sc around (12)
- Round 20: (2 sc, dec) * 3 (9)
Note: Similar to the legs, you can flatten and sew these closed or leave them open to be joined to the body.
The Trunk
The trunk is a signature feature! We create this by working in a tube shape.
- Start: Chain 12 and join into a ring with a slip stitch.
- Rounds 1-7: sc in each st around (12)
- Round 8: (2 sc, dec) * 3 (9)
- Rounds 9-11: sc around (9)
- Round 12: dec, 7 sc (8)
- Round 13: dec, 6 sc (7)
- Round 14: sc around (7)
Fasten off, leaving a long tail for sewing to the face.
The Body and Head (One Piece)
We will start from the bottom of the body and work our way up to the top of the head.
The Body Section
- Round 1: 6 sc in MR (6)
- Round 2: inc in each st around (12)
- Round 3: (1 sc, inc) * 6 (18)
- Round 4: (2 sc, inc) * 6 (24)
- Round 5: (3 sc, inc) * 6 (30)
- Round 6: (4 sc, inc) * 6 (36)
- Round 7: sc around (36)
- Round 8: (5 sc, inc) * 6 (42)
- Round 9: (6 sc, inc) * 6 (48)
- Round 10: (7 sc, inc) * 6 (54)
- Round 11: sc around (54)
- Round 12: (8 sc, inc) * 6 (60)
- Round 13 (Joining Legs): 12 sc, join next 6 sc to the first leg, 24 sc, join next 6 sc to the second leg, 12 sc (60)
- Rounds 14-20: sc around (60)
- Round 21: 18 sc, (6 sc, dec) * 3, 18 sc (57)
- Round 22: 18 sc, (5 sc, dec) * 3, 18 sc (54)
- Round 23: sc around (54)
- Round 24: (7 sc, dec) * 6 (48)
- Round 25: sc around (48)
- Round 26: (6 sc, dec) * 6 (42)
- Round 27: sc around (42)
- Round 28: (5 sc, dec) * 6 (36)
- Round 29: (4 sc, dec) * 6 (30)
- Round 30: sc around (30)
- Round 31: (3 sc, dec) * 6 (24)
- Round 32 (Joining Arms): 4 sc, join to first arm, 4 sc, 8 sc, join to second arm, 4 sc (24)
- Round 33: sc around (24)
The Head Section
- Round 34: inc in each st around (48)
- Round 35: (7 sc, inc) * 6 (54)
- Round 36: sc around (54)
- Round 37: (8 sc, inc) * 6 (60)
- Rounds 38-42: sc around (60)
- Round 43 (Joining Trunk): Crochet around, joining the base of the trunk in the center of the face.
- Rounds 44-48: sc around (60)
- Round 49: (8 sc, dec) * 6 (54)
- Round 50: 2 sc, dec, (7 sc, dec) * 5, 5 sc (48)
- Round 51: (6 sc, dec) * 6 (42)
- Round 52: 2 sc, dec, (5 sc, dec) * 5, 3 sc (36)
- Round 53: (4 sc, dec) * 6 (30)
- Round 54: (3 sc, dec) * 6 (24)
- Round 55: (2 sc, dec) * 6 (18)
- Round 56: (1 sc, dec) * 6 (12)
Continue to decrease until the hole is closed and fasten off.
The Ears – Make 4 Pieces
To create a thick, professional-looking ear, we crochet two pieces and join them together.
- Round 1: 6 sc in MR (6)
- Round 2: inc in each st around (12)
- Round 3: (1 sc, inc) * 6 (18)
- Round 4: (2 sc, inc) * 6 (24)
- Round 5: (3 sc, inc) * 6 (30)
- Round 6: (4 sc, inc) * 6 (36)
- Round 7: (5 sc, inc) * 6 (42)
- Round 8: (6 sc, inc) * 6 (48)
- Round 9: (7 sc, inc) * 6 (54)
Assembling the Ears: Take two ear pieces. Place them wrong sides together. Starting at Round 9, crochet through both layers for 2 rounds of 54 sc. Repeat for the second set of ears.
Finishing Touches
Now it is time to bring your elephant to life!
Assembly and Stuffing
Stuff the legs, arms, and body firmly as you go. Be extra careful to stuff the head and the trunk well so they maintain their shape. Use your yarn needle to sew the ears to the sides of the head, roughly level with the eyes.
The Face
Insert the safety eyes between Rounds 45 and 46 of the head. For an added touch of personality, use a small amount of black embroidery thread to sew little eyelids or eyelashes above the eyes, and a small smile under the trunk.
Optional Embellishments
To make your elephant extra special, you can crochet a pair of small overalls using white or cream yarn. Add two small wooden buttons for a rustic look. A tiny white flower or bow crocheted and sewn to the top of the head adds a lovely final detail.
Tips for Success
- Invisible Decreases: To keep your amigurumi looking smooth, use the “invisible decrease” method. Instead of a standard dec, insert your hook into the front loop of the first stitch and then the front loop of the second stitch, completing the sc.
- Stitch Markers: Because we are working in continuous spirals, it is very easy to lose track of where your round ends. Always use a stitch marker in the first stitch of every round.
- Tension Control: Keep your tension tight. If you notice gaps where the stuffing is peeking through, try dropping down a hook size.
- Symmetry: When joining the arms and legs, double-check that you have the same number of stitches between each limb to ensure your elephant is balanced and sits upright.