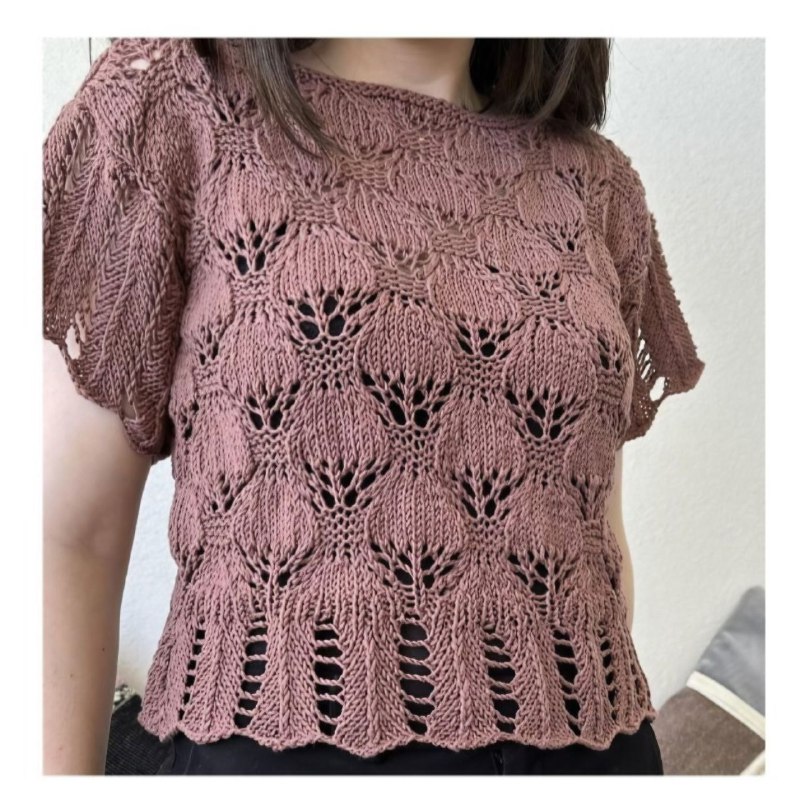
Breezy Elegance: Knit Your Own Laced Linen Summer Top
How to Knit a Laced Linen Summer Top: Step-by-Step Pattern
This elegant, airy summer top features a stunning lace pattern and unique sleeve options. Depending on your preference, you can create flowing “flutter” sleeves for a romantic look or structured kimono sleeves for a more modern silhouette. Crafted from linen, this piece is perfect for warm weather, offering both breathability and a sophisticated drape.
Finished Measurements
Chest Circumference: 40 [48, 56] inches / 100 [120, 140] cm
Length (measured flat): Choose from 18, 21.5, or 25 inches / 45, 54, or 63 cm
Tip: Choose your size based on your desired fit (loose or fitted) and preferred length.
Materials and Tools
- Yarn: 100% Linen (Medium weight).
- Yardage Requirements:
- For 18″ length: 628 [726, 824] yards
- For 21.5″ length: 724 [841, 958] yards
- For 25″ length: 821 [957, 1092] yards
- Note: Add an additional 115 yards per sleeve if choosing the Kimono style.
- Needles: US 9 (5.5 mm) knitting needles or size needed to obtain gauge.
- Notions: 4 removable stitch markers, tapestry needle, blocking cords, and pins.
Gauge
33 stitches = 8″ (20 cm) and 20 rows = 3.5″ (9 cm) in stockinette stitch, blocked.
Gauge Swatch Tip: Cast on 35 stitches and work 20 rows. Wet block the swatch, pinning all four sides straight. Once dry, measure from the second stitch of one edge to the second stitch of the opposite edge to ensure your gauge matches.
Stitch Guide
Edge Pattern (Multiple of 8 stitches + 3)
- Row 1 (RS): K2, *yo, k2, sl1, k1, p2, k2, yo, k1; repeat from * until last stitch, k1.
- Row 2 (WS): Purl all stitches.
Body Lace Pattern (Multiple of 16 stitches + 3)
It is recommended to place markers at the end of each 16-stitch repeat. Adjust markers only on Row 5.
- Rows 1, 3 (RS): K2, *k2, (k2tog) 2x, (yo, k1) 3x, yo, (ssk) 2x, k3; repeat from * until last stitch, k1.
- Row 2 and all even rows (WS): Purl all stitches.
- Row 5: K1, sc (single crochet), *(k2tog) 2x, (yo, k1) 5x, yo, (ssk) 2x, sl2-k1-p2sso; repeat from *, ending the last repeat with k2tog instead of sl2-k1-p2sso, k1.
- Rows 7, 9: K1, p1, *p2, k11, p3; repeat from * until last stitch, k1.
- Rows 11, 13: K2, *yo, k1, yo, (ssk) 2x, k5, (k2tog) 2x, (yo, k1) 2x; repeat from * until last stitch, k1.
- Row 15: K2, *(yo, k1) 2x, yo, (ssk) 2x, sl2-k1-p2sso, (k2tog) 2x, (yo, k1) 3x; repeat from * until last stitch, k1.
- Rows 17, 19: K2, *k5, p5, k6; repeat from * until last stitch, k1.
- Row 20: Purl all stitches.
Step-by-Step Instructions
Front and Back Panels (Make 2)
The front and back are worked separately from the bottom up.
Bottom Edge
- Loosely cast on 83 [99, 115] stitches.
- Work Rows 1-2 of the Edge Pattern eight times.
- Work the following two rows twice:
- Row 1 (RS): K1, *sc, p1; repeat from * until last 2 stitches, sc, k1.
- Row 2 (WS): P1, p2tog, *k1, p2tog; repeat from * until last stitch, p1.
The Body
- Work Rows 1-20 of the Body Lace Pattern:
- For 18″ length: Work the 20-row repeat once.
- For 21.5″ length: Work the 20-row repeat twice.
- For 25″ length: Work the 20-row repeat three times.
- Optional Extra Length: To add approximately 1.75″ (4.5 cm), work rows 1-10 of the Body Lace Pattern. To add another 1.75″, work rows 11-20.
- Place removable markers at the beginning and end of the final row to mark the sleeve edges.
- Bind off all stitches loosely. Cut the yarn, leaving a 6-inch tail.
Assembly: Body
- Wet block the front and back panels using blocking cords and pins to open up the lace.
- Sew the shoulders together, leaving a center opening of approximately 10.5″ (27.5 cm) for the neckline. Adjust the neckline size to your preference.
The Sleeves
Pro Tip: Weigh your remaining yarn. Use no more than 50% of the weight for the first sleeve to ensure you have enough for the second.
- With the wrong side of the body facing you, pick up and knit: 45 stitches from the marker to the shoulder seam, 1 stitch at the shoulder seam, and 45 stitches from the shoulder seam to the marker on the other side (Total: 91 stitches).
- Work the following two rows twice:
- Row 1 (RS): K1, *sc, p1; repeat from * until last 2 stitches, sc, k1.
- Row 2 (WS): P1, p2tog, *k1, p2tog; repeat from * until last stitch, p1.
- Work Rows 1-2 of the Edge Pattern eight times.
Choosing Your Sleeve Style:
- Flutter Sleeves (Short): Bind off all stitches. The length will be approximately 4″ (10 cm).
- Kimono Sleeves (Long): Continue working Rows 1-2 of the Edge Pattern for a total of 20 repetitions (approx. 8.5″ or 21 cm). Bind off all stitches.
Repeat the process for the second sleeve.
Finishing and Assembly
Blocking and Sewing
- Block the sleeves according to the pattern measurements.
- For Flutter Sleeves: Using a mattress stitch, sew the side seams of the body from the bottom up to the removable markers. Continue sewing the inner side of the sleeves for about 8-9 inches from the shoulder. Leave the bottom of the sleeves open.
- For Kimono Sleeves: Sew the side seams of the body from the bottom up to the removable markers using a mattress stitch. Then, sew the bottom edge of the sleeves closed.
- Weave in all loose ends.
Special Abbreviations
- sl2-k1-p2sso: Slip 2 stitches together as if to knit, knit the next stitch, then pass the 2 slipped stitches over the knitted stitch (decreases 2 stitches).
- sc: Single crochet.
- yo: Yarn over.
- k2tog: Knit 2 together.
- ssk: Slip, slip, knit.