Crochet Giraffe Pattern: A Cute Amigurumi Tutorial for Beginners
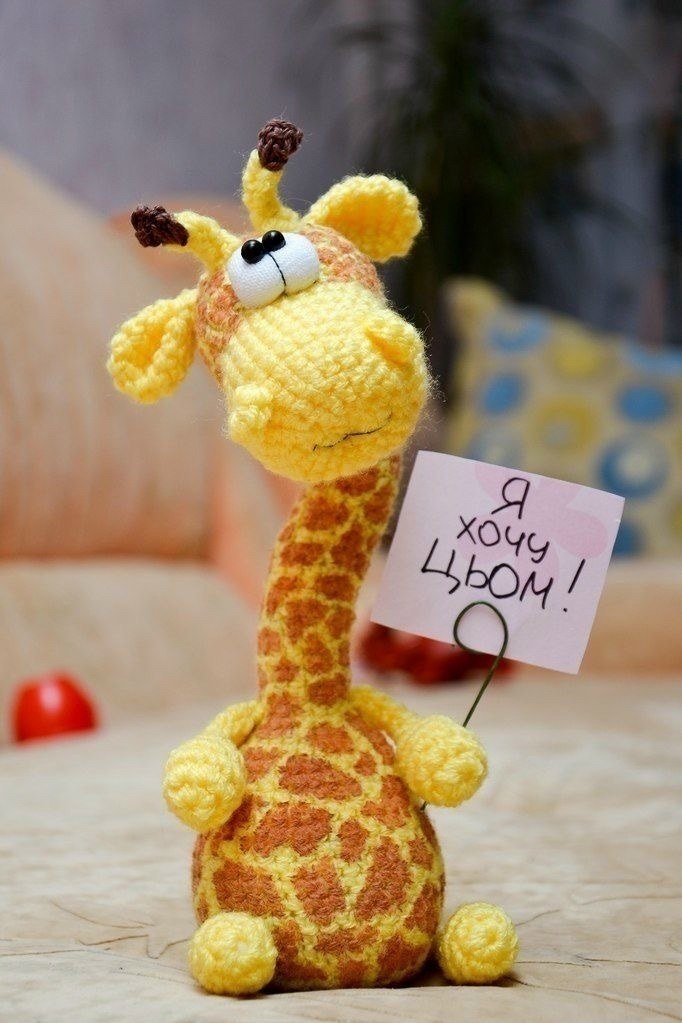
Are you looking for a charming new project to add to your crochet collection? This adorable amigurumi giraffe is the perfect blend of whimsical and sweet. With its long, slender neck and big, expressive eyes, this little guy is bound to become a favorite in any nursery, a delightful gift for a loved one, or a standout piece on your own crochet shelf.
Don’t let the long neck intimidate you! While this pattern creates a unique silhouette, the stitches are straightforward single crochets, making it an excellent project for intermediate beginners or anyone looking to practice their shaping techniques. In this detailed tutorial, we will walk through every single step, from the magic ring to the final stitch, ensuring you can create a professional-looking giraffe that you will be proud to show off.
Materials and Abbreviations
Before we pick up our hooks, let’s make sure you have everything you need. Since we are aiming for a soft, huggable texture, I recommend using a medium-weight (worsted) cotton or acrylic yarn. This will provide good stitch definition, which is crucial for amigurumi.
What You Will Need
- Yarn: Medium weight yarn in bright yellow and orange. (You will need approximately 150–200 yards of yellow and a smaller amount of orange for the decorative spots).
- Crochet Hook: A 3.5mm (E) or 4.0mm (G) hook, depending on your tension. You want your stitches to be tight enough so the stuffing doesn’t show through.
- Safety Eyes: 10mm or 12mm plastic safety eyes.
- Stuffing: High-quality polyester fiberfill.
- Yarn Needle: A blunt-tipped tapestry needle for sewing the pieces together.
- Scissors: For trimming your yarn.
- Stitch Marker: Highly recommended to keep track of your rounds.
Abbreviations (US Terms)
This pattern uses standard US crochet terminology. Please ensure you are following US terms to avoid confusion with UK terminology!
- MR: Magic Ring (also known as an Amigurumi Ring)
- ch: Chain
- sc: Single Crochet
- inc: Increase (2 sc in the same stitch)
- dec: Decrease (Invisible decrease is highly recommended for amigurumi)
- ( ) x n: Repeat the instructions inside the parentheses “n” times.
Step-by-Step Instructions
When working on this project, remember to work in continuous spirals. Do not join the rounds with a slip stitch unless specifically instructed. Use a stitch marker to mark the beginning of each round.
The Body and Long Neck
We will start by creating the base of the body, which will eventually extend upward to form the giraffe’s iconic long neck. To achieve the spotted look seen in the photos, you can change colors periodically or embroider the orange spots onto the yellow base after the body is complete.
Round 1: Create a MR and work 6 sc into the ring. (6)
Round 2: 6 inc. (12)
Round 3: (1 sc, inc) x 6. (18)
Round 4: (2 sc, inc) x 6. (24)
Round 5: (3 sc, inc) x 6. (30)
Rounds 6-7: sc in each stitch around. (30)
Round 8: (4 sc, inc) x 6. (36)
Round 9: sc in each stitch around. (36)
Round 10: (4 sc, dec) x 6. (30)
Round 11: sc in each stitch around. (30)
Round 12: (3 sc, dec) x 6. (24)
Round 13: sc in each stitch around. (24)
Note: It is time to start stuffing! Stuff the base of the body firmly.
Round 14: (2 sc, dec) x 6. (18)
Round 15: sc in each stitch around. (18)
Round 16: (1 sc, dec) x 6. (12)
Rounds 17-36: sc in each stitch around. (12)
As you work through these rows, continue to stuff the neck steadily. Ensure the neck is firm and holds its shape upright.
The Head
The head is worked separately and will be sewn onto the top of the neck. This creates a nice defined shape for the muzzle and forehead.
Round 1: Create a MR and work 6 sc into the ring. (6)
Round 2: 6 inc. (12)
Round 3: (1 sc, inc) x 6. (18)
Round 4: (2 sc, inc) x 6. (24)
Rounds 5-6: sc in each stitch around. (24)
Round 7: (2 sc, dec) x 6. (18)
Round 8: sc in each stitch around. (18)
Round 9: (1 sc, dec) x 6. (12)
Round 10: (1 sc, inc) x 6. (18)
Round 11: (2 sc, inc) x 6. (24)
Rounds 12-14: sc in each stitch around. (24)
Round 15: (2 sc, dec) x 6. (18)
Round 16: (1 sc, dec) x 6. (12)
Round 17: 6 dec. (6)
Fasten off, leaving a long tail for sewing. Stuff the head firmly before closing the hole.
The Arms
Make two arms. These are small and designed to sit at the sides of the body.
Round 1: Create a MR and work 6 sc into the ring. (6)
Round 2: 2 sc, 2 sc in the next stitch, 2 sc, 2 sc in the next stitch. (8)
Round 3: sc in each stitch around. (8)
Round 4: 2 sc, dec, 2 sc, dec. (6)
Continue working 1 sc in each stitch for rounds 5 through 11 to create the length. Fasten off, leaving a tail for sewing.
The Legs
Make two legs. These are slightly shorter than the arms.
Round 1: Create a MR and work 6 sc into the ring. (6)
Round 2: 2 sc, 2 sc in the next stitch, 2 sc, 2 sc in the next stitch. (8)
Round 3: sc in each stitch around. (8)
Round 4: 2 sc, dec, 2 sc, dec. (6)
Continue working 1 sc in each stitch for rounds 5 through 9. Fasten off, leaving a tail for sewing.
The Ears
Make two ears.
Round 1: Create a MR and work 6 sc into the ring. (6)
Round 2: 6 inc. (12)
Rounds 3-6: sc in each stitch around. (12)
Round 7: 6 dec. (6)
Fasten off, leaving a tail for sewing.
Finishing
Now comes the most rewarding part: bringing your giraffe to life! Assembly requires a bit of patience, but it’s where the magic happens.
- Attach the Head: Center the head on top of the neck. Use your yarn needle and a long tail of yellow yarn to sew the head securely to the top of the neck. Ensure it is level so your giraffe doesn’t look tilted.
- Attach the Ears: Sew the ears onto the top of the head, roughly between rounds 4 and 7. Position them symmetrically.
- Add the Eyes: Before you finish sewing the head completely, insert your safety eyes. Place them on the front of the head, roughly halfway between the ears and the muzzle area. For an extra cute look, you can sew small white felt circles behind the eyes to create a “bulging” eye effect.
- Attach the Limbs: Sew the arms to the sides of the body, just below where the neck meets the body. Sew the legs to the bottom of the body to provide a stable base for sitting.
- Decorative Spots: To get that beautiful orange pattern, use your orange yarn and a yarn needle to embroider irregular shapes across the yellow body and neck. This gives the giraffe its unique character!
Tips for Success
To ensure your crochet giraffe turns out perfectly, keep these professional tips in mind:
- Master the Invisible Decrease: For amigurumi, standard decreases can leave small gaps. Use the “invisible decrease” method (inserting the hook into the front loops only of the next two stitches) to create a much smoother, tighter finish.
- Watch Your Tension: Amigurumi requires tighter tension than a scarf or blanket. If you see bits of stuffing peeking through your stitches, try using a smaller crochet hook.
- Don’t Skimp on Stuffing: A giraffe’s neck needs to be quite firm to stand up. When stuffing the neck, push the fiberfill all the way into the narrowest parts to prevent lumps.
- Color Changes: If you want to try changing colors during the rounds rather than embroidering, remember to change color on the final pull-through of the last stitch of the previous round.
Happy crocheting! You now have a beautiful, handmade giraffe to call your own.