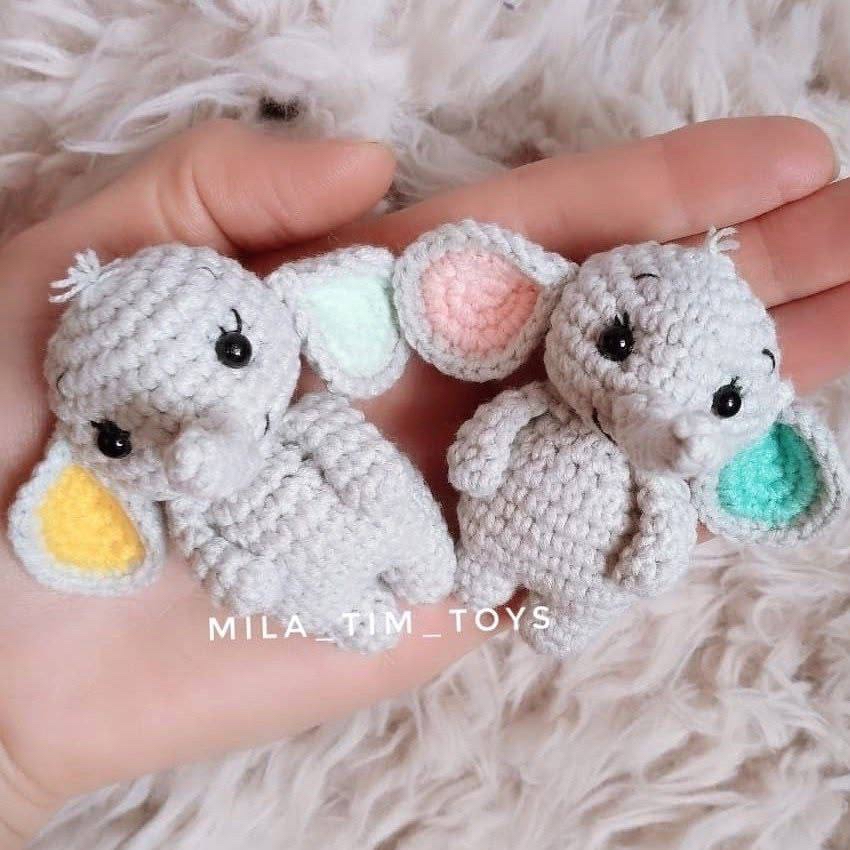
Free Mini Crochet Elephant Pattern: Easy Pocket-Sized Amigurumi
Looking for a quick, adorable project to brighten up your day? This mini crochet elephant is the perfect “pocket buddy.” Whether you are looking to create a cute keychain, a small desk companion, or a sweet gift for a loved one, this little elephant is a joy to make. Designed with beginners in mind, this pattern uses basic stitches to create a charming 3D character that fits right in the palm of your hand.
In this tutorial, we will walk you through every step of creating your own pocket elephant. Because this is an amigurumi project, we will be working in continuous spirals, so remember to use a stitch marker to keep track of your rounds!
Materials & Abbreviations
Supplies You Will Need
- Yarn: Sport weight cotton blend yarn in grey (for the body) and small scraps of various bright colors for the inner ears.
- Crochet Hook: 1.75mm hook (or the size recommended for your specific yarn to ensure a tight fabric that keeps the stuffing inside).
- Eyes: 3mm to 5mm safety eyes, half-beads, or black seed beads.
- Stuffing: Polyester fiberfill or poly-fill.
- Tools: Yarn needle, scissors, and a stitch marker.
US Crochet Terms & Abbreviations
- ch: chain
- sc: single crochet
- inc: increase (2 single crochets in the same stitch)
- dec: decrease (single crochet two stitches together)
- sl st: slip stitch
- MR: magic ring
- st: stitch
Step-by-Step Instructions
The Arms (Make 2)
The arms are simple tubes that do not require stuffing, allowing them to remain flexible and cute.
- Round 1: 6 sc into a MR (6)
- Rounds 2-6: sc in each st around (6)
Fold the piece in half and sc 3 stitches across both layers to close the end. Fasten off, leaving a tail for sewing.
The Trunk
The trunk gives our elephant its personality! We start with a narrow tube that widens slightly at the end.
- Round 1: 4 sc into a MR (4)
- Rounds 2-4: sc in each st around (4)
Fold the piece in half and sc 3 stitches across both layers to close the base. Do not stuff this part.
- Round 5: inc, 3 sc (5)
- Round 6: inc, 4 sc (6)
Fasten off, leaving a long tail for sewing to the face.
The Legs (Make 2)
We will make two legs, but we will start the body directly from the second leg to save time and seams.
- Round 1: 6 sc into a MR (6)
- Round 2: (2 sc, inc) * 2 (8)
- Rounds 3-4: sc in each st around (8)
For the first leg: Fasten off and weave in ends. For the second leg: Do not fasten off; we will continue directly into the body.
The Body
Starting from the second leg, we will join the two legs together to form the base of the body.
- Joining Round: ch 1, join with a sl st to the second leg. Work 8 sc around the first leg, 1 sc in the chain loop, 8 sc around the second leg, and 1 sc in the remaining chain loop (18).
- Round 2: (2 sc, inc) * 6 (24)
- Rounds 3-7: sc in each st around (24) — 5 rounds total.
- Round 8: (2 sc, dec) * 6 (18)
- Round 9: sc in each st around (18)
- Round 10: (1 sc, dec) * 6 (12)
Stuff the body firmly with fiberfill. Fasten off, leaving a long tail for sewing the head to the body.
The Head
The head is a classic sphere shape. Be sure to stuff it firmly to maintain the round look.
- Round 1: 7 sc into a MR (7)
- Round 2: 7 inc (14)
- Round 3: (1 sc, inc) * 7 (21)
- Round 4: (2 sc, inc) * 7 (28)
- Rounds 5-10: sc in each st around (28) — 6 rounds total.
- Round 11: (2 sc, dec) * 7 (21)
- Round 12: 10 dec, 1 sc (11)
Stuff the head firmly. Fasten off and weave in the ends.
The Ears (Make 2)
Each ear consists of two layers: a colorful inner ear and a grey outer ear, joined together at the edge.
Inner Ear (Colorful Yarn)
- Round 1: 6 sc into a MR (6)
- Round 2: 6 inc (12)
- Round 3: (1 sc, inc) * 6 (18)
Fasten off and weave in ends.
Outer Ear (Grey Yarn)
Repeat the instructions for the inner ear (Rounds 1-3), but do not fasten off.
Place the colorful inner ear against the grey outer ear (wrong sides facing each other). We will now crochet through both layers to join them.
- Round 4: (2 sc, inc) * 6 (24)
Fasten off, leaving a long tail for sewing.
Finishing & Assembly
Now comes the magic part where your elephant comes to life! Follow these steps for a professional look:
Step 1: Head and Trunk
Sew the head securely to the top of the body. Next, attach the trunk to the center of the face, positioned between rounds 8 and 10 of the head.
Step 2: Eyes and Face Shaping
Place the eyes between rounds 6 and 7, leaving about 5 to 6 stitches of space between them. For a more professional look, use “needle sculpting”: insert your needle from the neck area, pull it through to the eye point, and stitch back to the neck. This creates a slight indent that makes the eyes pop.
Use a contrasting embroidery thread to sew on tiny eyelashes, eyebrows, and a small, sweet smile.
Step 3: The Ears
Gently fold the ears slightly to create a “cup” or shell shape. Sew them to the sides of the head at the same level as the eyes. Pro Tip: Take the remaining yarn tails from the top of the ears and bring them together at the crown of the head to create a tiny, cute tuft of hair!
Step 4: Final Touches
Sew the arms to the sides of the body. To create the tail, insert your needle into the back of the body, create a small stitch to anchor it, and leave a short length of yarn. Tie a small knot at the end of the tail to prevent fraying.
Tips for Success
- Tension is Key: Since this is a small project, keep your tension consistent. If you see stuffing poking through, try dropping down a hook size.
- Stitch Markers: Always mark the first stitch of every round. It is very easy to lose your place in such a small circle!
- Customization: Feel free to change the ear colors! Neon pink, mint green, or sunny yellow all look wonderful against the grey body.
- Stuffing: Use a chopstick or a pencil to push stuffing into the narrow parts of the head and body to ensure there are no gaps.