Adorable Crochet Sloth Pattern: Create Your Own Cozy Amigurumi Friend
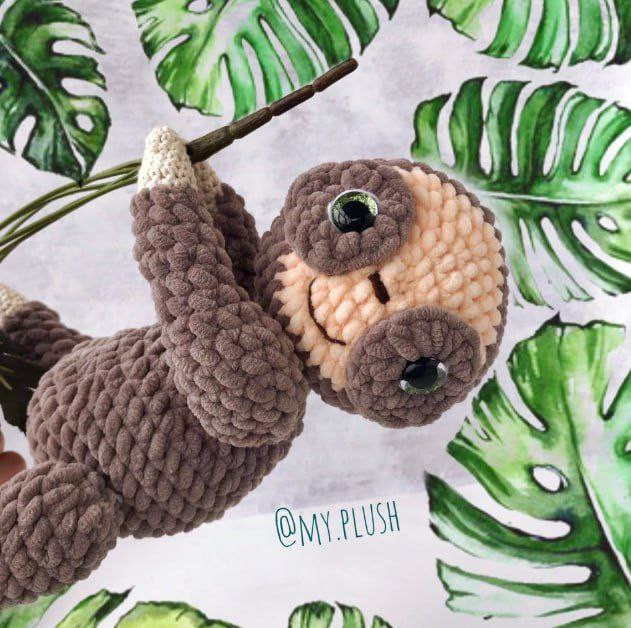
Looking for your next cozy crochet project? There is nothing quite as relaxing as crafting a sloth! This amigurumi sloth pattern is perfect for those who love the “chunkiness” of plush yarn. With its sleepy expression and oversized limbs, this little guy is destined to become a favorite cuddle buddy or a charming gift for a loved one.
This tutorial is designed to be beginner-friendly. We will guide you through every stitch, from the oval shaping of the head to the tiny details of the face. Grab your hook and some velvet yarn, and let’s get started!
Materials & Abbreviations
To achieve that signature soft, velvety look, we recommend using chenille or plush yarn. If you are new to plush yarn, remember to use a stitch marker, as it can be harder to see your stitches compared to traditional acrylic yarn.
Materials Needed
- Main Color (Grey or Brown): 1 skein of plush/chenille yarn.
- Beige Color: A small amount (approx. 10 grams) of plush/chenille yarn for the face.
- Cream/Milk Color: A small amount (approx. 10 grams) of a cotton-blend amigurumi yarn for the claws.
- Crochet Hook: A size that works well with your chosen plush yarn (usually 3.5mm to 4.5mm).
- Safety Eyes: 16mm screw-in safety eyes.
- Stuffing: High-quality polyester fiberfill.
- Embroidery Thread: Small amounts of brown and white thread for the nose, mouth, and eye highlights.
- Tools: Yarn needle, scissors, and stitch markers.
Abbreviations (US Terms)
- MR: Magic Ring
- ch: Chain
- sc: Single crochet
- inc: Increase (two sc in one stitch)
- dec: Decrease (sc two stitches together)
- sl st: Slip stitch
- hdc: Half double crochet
- st(s): Stitch(es)
Step-by-Step Instructions
Eye Patches (Make 2)
These create the distinct “mask” look around the sloth’s eyes. Use your main color yarn.
- Round 1: Ch 4, join with a sl st to form a ring. Ch 2 (counts as first hdc). Work 12 hdc into the center of the ring.
- Round 2: Work 6 sc around, then sl st to join.
Fasten off and weave in the ends.
The Head
The head is worked as an oval. We start with the beige yarn to create the face area, then transition to the main color.
Starting with Beige Yarn:
- Round 1: Ch 6. Starting in the 2nd ch from the hook, work 4 sc, 3 sc in the last stitch. Working along the opposite side of the chain: 3 sc, inc. (12 sts)
- Round 2: inc, 3 sc, 3 inc, 3 sc, 2 inc. (18 sts)
- Round 3: sc, inc, 3 sc, (sc, inc) 3 times, 3 sc, inc, sc, inc. (24 sts)
- Round 4: 2 sc, inc, 4 sc, (2 sc, inc) 3 times, 4 sc, inc, 2 sc, inc. (30 sts)
- Round 5: 3 sc, inc, 5 sc, (3 sc, inc) 3 times, 5 sc, inc, 3 sc, inc. (36 sts)
Transitioning to Main Color:
To make the color change seamless, work the remaining stitches of Round 5 in beige until you reach the side of the head, then switch to the main color for the rest of the round.
- Rounds 6–9: sc in each stitch around. (36 sts)
Shaping the Oval: To keep the head oval, we will place our decreases specifically on the sides. The start of each row should be centered at the front of the face.
- Round 10: 3 sc, (3 sc, dec) 3 times, 3 sc, (3 sc, dec) 3 times. (30 sts)
- Round 11: 3 sc, (2 sc, dec) 3 times, 3 sc, (2 sc, dec) 3 times. (24 sts)
- Round 12: 3 sc, (sc, dec) 3 times, 3 sc, (sc, dec) 3 times. (18 sts)
Pause here to assemble the face details (see the “Finishing” section) before stuffing the head.
- Round 13: 3 sc, 3 dec, 3 sc, 3 dec. (12 sts)
- Round 14: 6 dec. (6 sts)
Fasten off, weave the yarn through the remaining 6 stitches to close the hole tightly, and secure.
The Body
Use the main color yarn for the body.
- Round 1: 6 sc in MR.
- Round 2: 6 inc. (12 sts)
- Round 3: (sc, inc) 6 times. (18 sts)
- Round 4: (2 sc, inc) 6 times. (24 sts)
- Round 5: (3 sc, inc) 6 times. (30 sts)
- Round 6: (4 sc, inc) 6 times. (36 sts)
- Rounds 7–8: sc in each stitch around. (36 sts)
- Round 9: 12 sc, 6 dec, 12 sc. (30 sts)
- Round 10: sc in each stitch around. (30 sts)
- Round 11: (3 sc, dec) 6 times. (24 sts)
- Round 12: sc in each stitch around. (24 sts)
- Round 13: (2 sc, dec) 6 times. (18 sts)
- Round 14: sc in each stitch around. (18 sts)
Stuff the body firmly with fiberfill.
- Round 15: (sc, dec) 6 times. (12 sts)
- Rounds 16–17: sc in each stitch around. (12 sts)
- Round 18: 6 dec. (6 sts)
Fasten off and close the opening.
Upper Arms (Make 2)
Start with the cream cotton-blend yarn for the claws.
- Round 1: 6 sc in MR.
- Round 2: 6 sc.
- Round 3: (sc, inc) 3 times. (9 sts)
- Rounds 4–5: sc in each stitch around. (9 sts)
- Round 6: inc, 8 sc. (10 sts)
- Rounds 7–8: sc in each stitch around. (10 sts)
Switch to Main Color Plush Yarn:
- Round 9: 3 sc, dec, 3 sc, dec. (8 sts)
- Rounds 10–11: sc in each stitch around. (8 sts)
- Round 12: inc, 3 sc, dec, 2 sc. (8 sts)
- Round 13: 4 sc, dec, 2 sc. (7 sts)
- Round 14: 5 sc, dec. (6 sts)
- Round 15: inc, 4 sc, inc. (8 sts)
- Round 16: sc, inc, 5 sc, inc. (10 sts)
- Round 17: 9 sc, inc. (11 sts)
- Rounds 18–20: sc in each stitch around. (11 sts)
- Round 21: 3 sc, dec, 4 sc, dec. (9 sts)
- Round 22: (sc, dec) 3 times. (6 sts)
Fasten off and weave in ends.
Lower Legs (Make 2)
Start with the cream cotton-blend yarn.
- Round 1: 6 sc in MR.
- Round 2: (sc, inc) 3 times. (9 sts)
- Rounds 3–5: sc in each stitch around. (9 sts)
- Round 6: (2 sc, inc) 3 times. (12 sts)
- Rounds 7–9: sc in each stitch around. (12 sts)
Switch to Main Color Plush Yarn:
- Round 10: (2 sc, dec) 3 times. (9 sts)
- Round 11: sc in each stitch around. (9 sts)
- Round 12: dec, 7 sc. (8 sts)
- Round 13: dec, 6 sc. (7 sts)
- Round 14: sc in each stitch around. (7 sts)
- Round 15: inc, 1 sc, inc, 4 sc. (9 sts)
- Round 16: (2 sc, inc) 3 times. (12 sts)
- Rounds 17–20: sc in each stitch around. (12 sts)
- Round 21: (2 sc, dec) 3 times. (9 sts)
- Round 22: (sc, dec) 3 times. (6 sts)
Fasten off and weave in ends.
Finishing
The Face
- Eyes: Insert the 16mm safety eyes into the center of the eye patches. The wider part of the patch (where the 6 sc were worked) should be at the bottom. Place the patches on the head at the level of Round 3 and secure the safety backs.
- Sewing Patches: Use a needle and yarn that matches your main color to sew the eye patches securely to the head.
- Nose: Use brown embroidery thread to stitch a small nose on Round 2.
- Mouth: Use the same brown thread to embroider a small, happy smile between Rounds 4 and 5.
- Highlights: Add tiny white stitches to the eyes to give them a “twinkle” and a more lifelike look.
Assembly
- Head to Body: Sew the head firmly to the top of the body.
- Lower Legs: Attach the lower legs to the body at Round 5.
- Upper Arms: Attach the arms to the body at Round 17.
Tips for a Perfect Sloth
- Stitch Tension: Plush yarn can be stretchy. Try to keep your tension consistent so the stuffing doesn’t peek through the stitches.
- Color Changes: When changing colors, pull the new yarn through the last loop of the previous stitch to create a clean transition.
- Symmetry: Use stitch markers to mark the center of the face and the sides of the head. This ensures your oval shape is symmetrical and the eyes are perfectly aligned.
- Stuffing: Stuff the limbs firmly but leave the “joints” slightly softer so the sloth can be posed in a hanging position!