Giant Plush Goose Crochet Pattern: Free Cuddly Amigurumi Tutorial
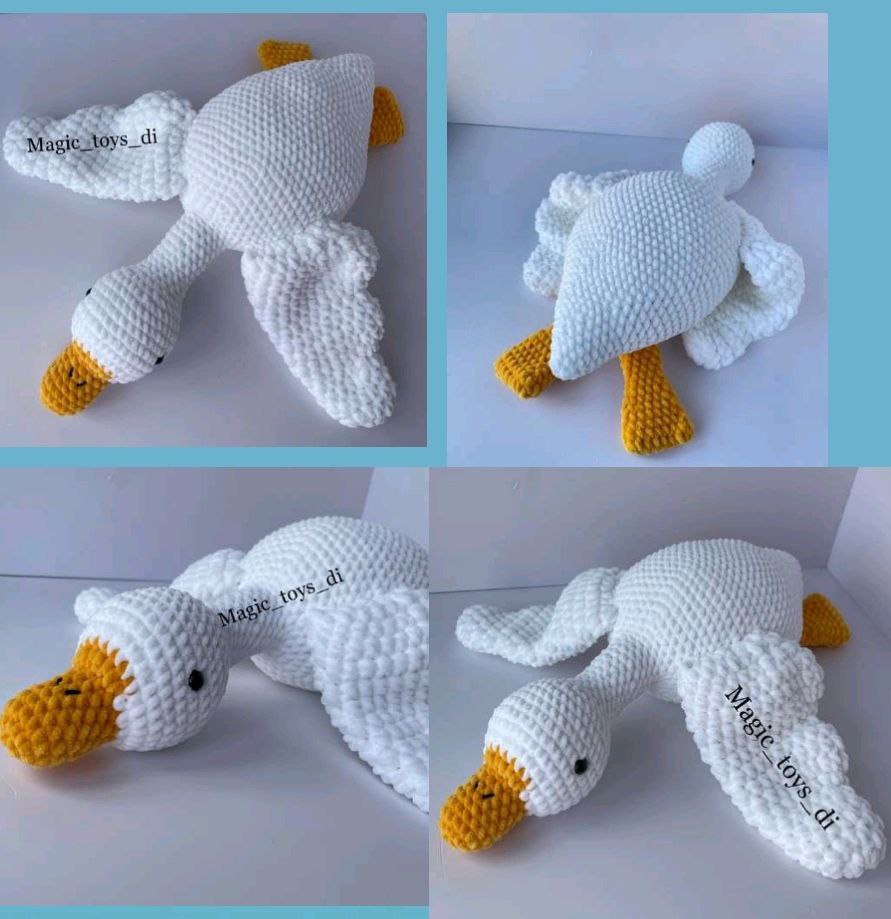
If you are looking for your next cozy crochet project, this oversized plush goose amigurumi pattern is an absolute dream to make. Crafted with super bulky plush yarn, this adorable stuffed goose turns out incredibly soft, squishy, and huggable. Measuring approximately 18 inches long from the tip of its beak to its tail, it makes a wonderful handmade gift, a whimsical nursery accent, or a charming throw pillow for your sofa.
This tutorial uses basic amigurumi techniques, making it approachable for intermediate crocheters or confident beginners who are familiar with single crochet, working in the round, and color changing. Follow along with our detailed step-by-step instructions below to craft your very own lovable goose companion!
Materials & Abbreviations
Required Materials
- Main Color Yarn: Super Bulky Plush/Chenille Yarn (Category 6) in White – approx. 220 yards (2 skeins)
- Contrast Color Yarn: Super Bulky Plush/Chenille Yarn (Category 6) in Orange – approx. 55 yards (½ skein)
- Embroidery Yarn: Small amount of black worsted weight yarn or embroidery floss for the nostrils
- Crochet Hooks:
- US Size 7 (4.5 mm) hook – for the body, head, and feet
- US Size J-10 (6.0 mm) hook – for the wings
- Safety Eyes: One pair of 10 mm or 12 mm black safety eyes
- Stuffing: Premium polyester fiberfill
- Notions: Stitch markers, scissors, tapestry/yarn needle with a large eye, and strong sewing thread matching the main yarn color
Finished Size
Approximately 18 inches (45 cm) long when made with the recommended yarn weight and hook size.
Crochet Abbreviations (US Terms)
- MR: Magic Ring (Magic Circle)
- ch: chain
- sc: single crochet
- hdc: half double crochet
- inc: single crochet increase (2 sc in the same stitch)
- dec: single crochet decrease (sc2tog / single crochet 2 stitches together)
- hdc-inc: half double crochet increase (2 hdc in the same stitch)
- hdc-dec: half double crochet decrease (hdc2tog)
- sl st: slip stitch
- st(s): stitch(es)
- [ ]: stitch count at the end of the round
- *…*: repeat instructions between asterisks as indicated
Step-by-Step Instructions
Head, Neck, and Body (Worked as One Piece)
We begin crocheting at the tip of the orange beak, seamlessly working our way through the head, neck, and main body.
Using Orange Yarn and 4.5 mm hook:
- Round 1: Work 8 sc into a MR. [8]
- Round 2: Work 8 inc. [16]
- Rounds 3–4: Sc in each st around. [16] (2 rounds)
- Round 5: Dec, 6 sc, dec, 6 sc. [14]
- Rounds 6–9: Sc in each st around. [14] (4 rounds)
Switch to White Yarn at the end of Round 9, but do not cut the orange yarn yet.
- Round 10: With White, work 5 inc in sc. Switch to Orange: work 4 hdc-inc. Switch back to White: work 5 inc in sc. [28]
Cut and fasten off the Orange yarn. Continue with White yarn for the rest of the body.
- Round 11: Sc in each st around. [28]
- Round 12: 11 sc, 7 inc, 10 sc. [35]
- Rounds 13–18: Sc in each st around. [35] (6 rounds)
Safety Eye Insertion: Insert the 10 mm or 12 mm safety eyes between Rounds 15 and 16, setting them approximately 16 stitches apart. Stuff the beak very lightly with fiberfill.
- Round 19: *(5 sc, dec)* repeat 5 times. [30]
Begin stuffing the head gently with polyester fiberfill, shaping it as you go.
- Round 20: *(4 sc, dec)* repeat 5 times. [25]
- Round 21: *(3 sc, dec)* repeat 5 times. [20]
- Round 22: *(2 sc, dec)* repeat 5 times. [15]
Forming the Neck:
- Rounds 23–31: Sc in each st around. [15] (9 rounds)
Forming the Body:
Stuff the neck firmly as you work. Continue stuffing the body gradually.
- Round 32: *(2 sc, inc)* repeat 5 times. [20]
- Round 33: *(3 sc, inc)* repeat 5 times. [25]
- Round 34: *(4 sc, inc)* repeat 5 times. [30]
- Round 35: *(5 sc, inc)* repeat 5 times. [35]
- Round 36: *(6 sc, inc)* repeat 5 times. [40]
- Round 37: *(7 sc, inc)* repeat 5 times. [45]
- Round 38: *(8 sc, inc)* repeat 5 times. [50]
- Round 39: *(9 sc, inc)* repeat 5 times. [55]
- Round 40: *(10 sc, inc)* repeat 5 times. [60]
- Rounds 41–54: Sc in each st around. [60] (14 rounds)
- Round 55: *(10 sc, dec)* repeat 5 times. [55]
- Round 56: *(9 sc, dec)* repeat 5 times. [50]
- Round 57: *(8 sc, dec)* repeat 5 times. [45]
- Round 58: *(7 sc, dec)* repeat 5 times. [40]
- Round 59: *(6 sc, dec)* repeat 5 times. [35]
- Round 60: *(5 sc, dec)* repeat 5 times. [30]
- Round 61: *(4 sc, dec)* repeat 5 times. [25]
- Rounds 62–63: Sc in each st around. [25] (2 rounds)
- Round 64: *(3 sc, dec)* repeat 5 times. [20]
- Round 65: 8 sc, dec, 8 sc, dec. [18]
- Round 66: 7 sc, dec, 7 sc, dec. [16]
- Round 67: 6 sc, dec, 6 sc, dec. [14]
- Round 68: 5 sc, dec, 5 sc, dec. [12]
- Round 69: 4 sc, dec, 4 sc, dec. [10]
- Round 70: 3 sc, dec, 3 sc, dec. [8]
- Round 71: Decrease continuously around to close the tail end. Fasten off and weave in the remaining end securely.
Webbed Feet (Make 2)
Using Orange Yarn and 4.5 mm hook:
- Round 1: Ch 7. Starting in the 2nd ch from hook: 5 sc, 5 sc in the last chain stitch. Working along the opposite side of the chain: 4 sc, 3 sc in the final stitch. [17]
- Round 2: Inc, 17 sc. [18]
- Round 3: Dec, 7 sc, dec, 7 sc. [16]
- Round 4: Sc in each st around. [16]
- Round 5: Dec, 6 sc, dec, 6 sc. [14]
- Round 6: Sc in each st around. [14]
- Round 7: Dec, 5 sc, dec, 5 sc. [12]
- Round 8: Dec, 4 sc, dec, 4 sc. [10]
- Rounds 9–14: Sc in each st around. [10] (6 rounds)
Note: Feet do not need to be stuffed. Fold the top opening flat. If needed, crochet extra shift stitches (approx. 3 sc) so the piece aligns horizontally. Work 4 sc across both layers to seal the opening. Fasten off, leaving a yarn tail for sewing.
Feathered Wings (Make 2)
Using White Yarn and the larger 6.0 mm (US J-10) hook:
- Round 1: Work 8 hdc into a MR. [8]
- Round 2: *(1 hdc, hdc-inc)* repeat 4 times. [12]
- Round 3: 5 hdc, hdc-inc, 6 hdc. [13]
- Round 4: 6 hdc, hdc-inc, 6 hdc. [14]
- Round 5: 6 hdc, hdc-dec, 6 hdc. [13]
- Round 6: 5 hdc, 3 hdc-inc, 5 hdc. [16]
- Round 7: 6 hdc, 4 hdc-inc, 6 hdc. [20]
- Rounds 8–9: Hdc in each st around. [20] (2 rounds)
- Round 10: 8 hdc, 2 hdc-dec, 8 hdc. [18]
- Round 11: 7 hdc, 4 hdc-inc, 7 hdc. [22]
- Round 12: 8 hdc, 6 hdc-inc, 8 hdc. [28]
- Rounds 13–14: Hdc in each st around. [28] (2 rounds)
- Round 15: 8 hdc, 6 hdc-dec, 8 hdc. [22]
- Round 16: 7 hdc, 4 hdc-dec, 7 hdc. [18]
Note: Wings are left unstuffed. Press the top edge flat and single crochet 8 sts across both layers to join. Fasten off, leaving a long tail for sewing.
Assembly & Finishing
- Attaching the Feet: Position the orange feet on the underside of the belly at Round 56. Space them approximately 4 to 5 stitches apart. Stitch securely in place using matching yarn or strong sewing thread.
- Attaching the Wings: Locate the expansion increases on either side of the body near the neck junction. Position the wings flat against the body aligned with these increases and sew securely along the top edge of each wing.
- Embroidering Details: Thread a tapestry needle with black yarn or embroidery floss. Embroider two small vertical lines on top of the orange beak to create nostrils.
Tips for Amigurumi Success
- Maintaining Tension with Plush Yarn: Chenille yarns can snag or snap if pulled too forcefully. Keep a gentle, consistent tension while pulling your loops through.
- Use Shift Stitches for Symmetry: Plush stitches tend to slant slightly in spiral rounds. Feel free to add 1–2 extra sc stitches (shift stitches) before flattening edges so the feet and wings lie perfectly symmetrical.
- Stuffing Techniques: Stuff the head firmly so it holds its round shape, and pack the neck densely to prevent “floppy head syndrome.” Keep the beak, feet, and wings lightly stuffed or unstuffed to maintain a soft, pliable texture.
- Stitch Markers are Essential: When working with fuzzy plush yarn, stitch counts can be harder to see. Place a stitch marker in the first stitch of every round to keep accurate track of your progress.
Your giant plush goose is complete! Enjoy your delightfully soft new creation, perfect for snuggling or gifting to a loved one.