How to Crochet an Adorable Amigurumi Teddy Bear: A Step-by-Step Beginner Tutorial
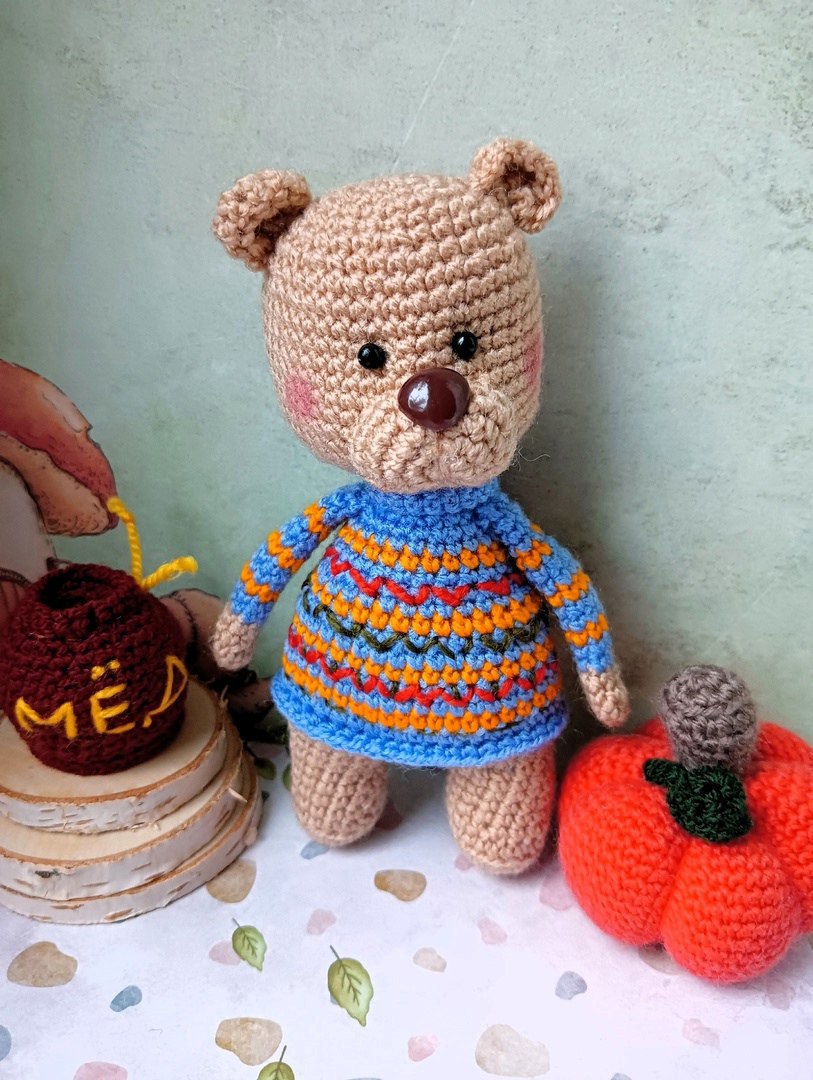
Are you looking for your next crochet project? There is nothing quite as heartwarming as a handmade teddy bear. Whether you are looking to create a special gift for a baby shower, a charming addition to a nursery, or a sweet little companion for a loved one, this amigurumi teddy bear is the perfect project. This tutorial will guide you through the process of creating a cute, striped-sweater-wearing bear from scratch.
Amigurumi—the Japanese art of knitting or crocheting small, stuffed yarn creatures—is a wonderful way to practice your tension and stitch control. This specific pattern is designed to be approachable for beginners while resulting in a professional-looking, high-quality toy. Grab your hook and some cozy yarn, and let’s get started!
Materials & Abbreviations
Before we dive into the stitches, let’s make sure you have everything you need on your crochet table. Because this pattern uses a small hook, it is designed for fine-weight yarn, which creates a tight, dense fabric perfect for stuffing.
What You Will Need
- Yarn: Fine weight (fingering or lace weight) yarn. You will need a primary color (like beige or tan) and a secondary color for the sweater stripes (like blue). A standard 3.5 oz (100g) skein providing approximately 492 yards (450m) is plenty.
- Crochet Hook: 1.5 mm (or the size recommended to achieve a very tight tension).
- Stuffing: Polyester fiberfill.
- Safety Features: Small safety eyes and a small safety nose (or you can embroider these on with black thread).
- Tools: A tapestry needle for sewing, scissors, and stitch markers.
Abbreviations (US Terms)
Please ensure you are using US terminology to follow this pattern accurately:
- MR: Magic Ring (or Magic Circle)
- ch: Chain
- sc: Single Crochet
- dc: Double Crochet
- sl st: Slip Stitch
- inc: Increase (2 sc in the same stitch)
- dec: Decrease (sc two stitches together)
- BLO: Back Loop Only
- FLO: Front Loop Only
- st(s): Stitch(es)
Step-by-Step Instructions
The Head (Beige Color)
The head is the centerpiece of your bear. We will work in a continuous spiral. Use a stitch marker to keep track of the beginning of each round.
- Round 1: Create a magic ring and work 6 sc into the ring. (6)
- Round 2: 6 inc around. (12)
- Round 3: (1 sc, 1 inc) repeat 6 times. (18)
- Round 4: (2 sc, 1 inc) repeat 6 times. (24)
- Round 5: (3 sc, 1 inc) repeat 6 times. (30)
- Round 6: (4 sc, 1 inc) repeat 6 times. (36)
- Round 7: (5 sc, 1 inc) repeat 6 times. (42)
- Round 8: (6 sc, 1 inc) repeat 6 times. (48)
- Rounds 9–17: Sc in each stitch around (9 rounds total). (48)
- Round 18: (6 sc, 1 dec) repeat 6 times. (42)
- Round 19: (5 sc, 1 dec) repeat 6 times. (36)
- Round 20: (4 sc, 1 dec) repeat 6 times. (30)
- Round 21: (3 sc, 1 dec) repeat 6 times. (24)
- Round 22: (2 sc, 1 dec) repeat 6 times. (18)
- Rounds 23–24: Sc in each stitch around. (18)
Stop here and stuff the head firmly with fiberfill before moving to the next part.
The Muzzle (Beige Color)
The muzzle gives your bear its personality. It is worked separately and then sewn onto the head.
- Round 1: Create a magic ring and work 6 sc into the ring. (6)
- Round 2: 6 inc around. (12)
- Round 3: (1 sc, 1 inc) repeat 6 times. (18)
- Round 4: (2 sc, 1 inc) repeat 6 times. (24)
- Round 5: Sc in each stitch around. (24)
Lightly stuff the muzzle and set it aside.
The Ears (Beige Color)
You will need to make two ears.
- Round 1: Create a magic ring and work 8 sc into the ring. (8)
- Round 2: ch 2, work 7 dc into the ring, then finish with a sl st to the first stitch.
The Arms (Beige & Blue)
The arms feature a cute color-change to mimic a shirt sleeve.
- Round 1: Create a magic ring and work 8 sc into the ring. (8)
- Rounds 2–4: Sc in each stitch around (using beige). (8)
- Note: Cut the beige yarn and join your blue yarn to continue.
- Rounds 5–16: Sc in each stitch around (using blue). (8)
- Round 17: Join the two sides of the arm and work 4 sc through both layers to close the end.
The Legs (Beige Color)
Make two legs. For the second leg, do not cut the yarn; instead, use a chain to connect it to the body.
- Round 1: Create a magic ring and work 6 sc into the ring. (6)
- Round 2: 6 inc around. (12)
- Round 3: (1 sc, 1 inc) repeat 6 times. (18)
- Round 4: Work in the BLO (Back Loop Only) to create a flat base. (18)
- Round 5: (4 sc, 1 dec) repeat 3 times. (15)
- Rounds 6–9: Sc in each stitch around. (15)
For the second leg: Repeat the same steps, but after Round 9, do not cut the yarn. Instead, ch 3 to prepare for joining to the body.
The Body (Beige & Striped)
This part brings the whole bear together and features the striped sweater effect.
- Round 10: This round joins the legs. Work 15 sc over the first leg, 3 sc in the ch-3 space, 15 sc over the second leg, and 3 sc in the remaining ch-3 space. (36)
Stuff the body firmly as you proceed.
- Rounds 11–12: Sc in each stitch around. (36)
- Round 13: (5 sc, 1 inc) repeat 6 times. (42)
- Note: Cut the beige yarn and join your blue yarn (or your chosen stripe color) to continue.
- Round 14: Sc in each stitch around. (42)
- Round 15: Work in the BLO (Back Loop Only). (42)
- Rounds 16–17: Sc in each stitch around. (42)
- Round 18: (5 sc, 1 dec) repeat 6 times. (36)
- Rounds 19–20: Sc in each stitch around. (36)
- Round 21: (4 sc, 1 dec) repeat 6 times. (30)
- Rounds 22–23: Sc in each stitch around. (30)
- Round 24: (3 sc, 1 dec) repeat 6 times. (24)
- Rounds 25–28: Sc in each stitch around. (24)
- Round 29: (2 sc, 1 dec) repeat 6 times. (18)
- Round 30: Sc in each stitch around. (18)
- Round 31: Work in the BLO (Back Loop Only). (18)
The Collar Detail
To add a lovely textured collar, we will work into the front loops of the body.
- Round 1: Work into the FLO (Front Loop Only) of the body. (5 sc, 1 inc) repeat 3 times. (21)
- Rounds 2–3: Sc in each stitch around. (21)
- Final Step for Body: Return to the Round 15 stitches (the loops you left unworked) and work 42 sc through the front loops to finish the sweater texture.
Finishing
Now comes the magic! Assembly is where your bear truly comes to life. Use your tapestry needle and the yarn tails to sew the pieces together securely.
Assembly Guide
- The Face: Position the muzzle in the center of the head. Sew it on, making sure it is centered. Add the safety eyes just above the muzzle and the safety nose in the center of the muzzle.
- The Ears: Sew the ears to the top of the head, ensuring they are symmetrical.
- The Limbs: Sew the arms to the sides of the body and the legs to the bottom.
- The Tail: To make the tail, ch 4, then in the 3rd ch from the hook, work 8 sc. Sew this to the back of the body.
Tips for Success
Crocheting amigurumi can be tricky at first, but these tips will help you achieve a perfect result:
- Tension is Key: Since you will be stuffing this bear, your stitches must be tight. If you see stuffing peeking through the holes, try using a smaller hook or pulling your stitches tighter.
- Use Stitch Markers: Amigurumi is worked in a continuous spiral, which makes it very easy to lose your place. Always use a marker at the start of every round.
- Don’t Overstuff: While a firm bear is great, overstuffing can cause the stitches to stretch or pop. Stuff the head and body evenly to avoid lumps.
- Color Changes: When changing colors for the stripes or arms, pull the new color through the final two loops of the last stitch of the previous color to ensure a seamless transition.