Cute Crochet Bunny Pattern: A Beginner-Friendly Amigurumi Tutorial
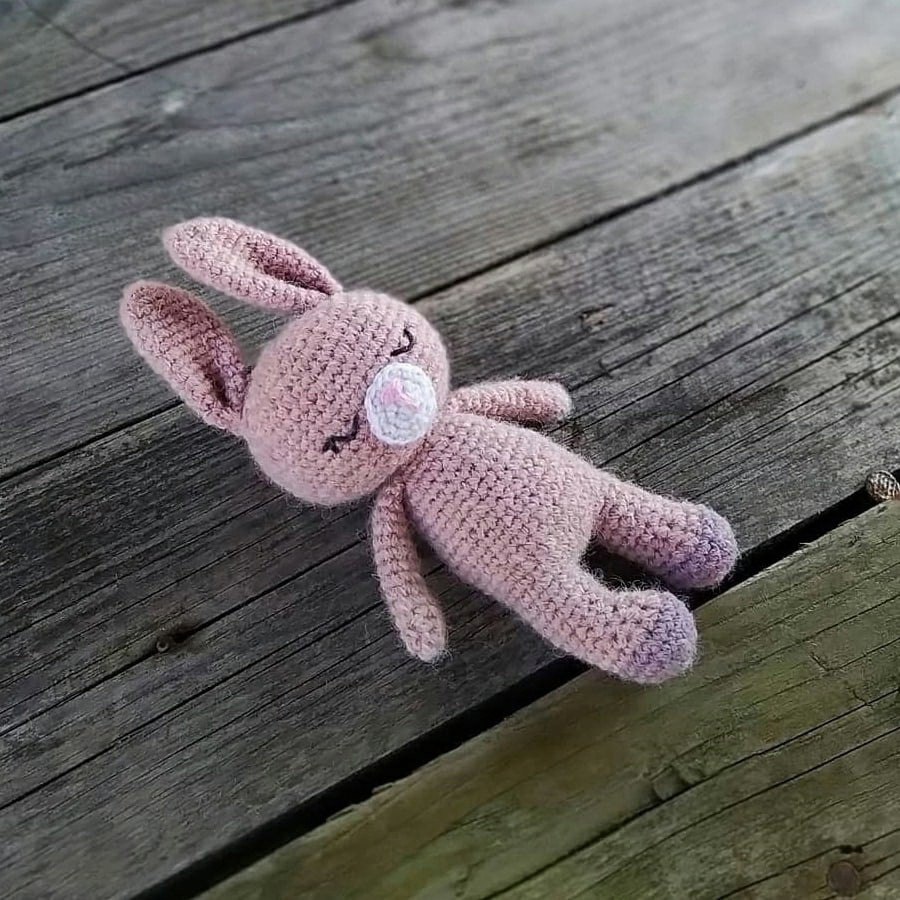
Are you looking for a sweet, cuddly project that is perfect for nursery decor, a baby shower gift, or just a little companion for your desk? This adorable amigurumi bunny is the perfect solution! This project is designed with a focus on simplicity, making it an excellent choice for beginner crocheters who want to practice working in the round and shaping small stuffed animals.
This little bunny features long, floppy ears, a sweet snout, and a tiny, huggable body. While the finished product looks intricate and professional, the pattern follows a straightforward logic that helps you build confidence in your crochet skills. Grab your favorite soft yarn, find a cozy spot, and let’s get started on making your very own crochet bunny!
Materials & Abbreviations
Before we dive into the stitches, let’s make sure you have everything you need on your crochet hook. For amigurumi, I highly recommend using a slightly smaller hook than what is suggested on your yarn label; this ensures your stitches are tight so that the stuffing doesn’t peek through.
What You’ll Need
- Yarn: Medium weight (worsted weight) yarn in your choice of colors. You will need a main color (for the body/head), a secondary color for the snout (usually white or cream), and a tiny bit of black or dark thread for embroidery. Depending on your yarn choice, you will need approximately 50-100 yards.
- Crochet Hook: A 3.5mm (E) or 4.0mm (G) hook is ideal for this project.
- Stuffing: Polyester fiberfill stuffing.
- Eyes: You can use small plastic safety eyes (6mm-8mm) or simply embroider the eyes with black yarn.
- Tapestry Needle: A blunt-tipped needle for sewing the pieces together and embroidering details.
- Stitch Marker: Essential for keeping track of your rounds in amigurumi.
- Scissors: For cutting your yarn.
Abbreviations (US Terms)
Please note that this pattern uses standard US crochet terminology. If you are used to UK terms, be sure to convert them before starting!
- MR: Magic Ring (or Magic Circle)
- sc: Single crochet
- inc: Increase (2 single crochets in the same stitch)
- dec: Decrease (sc 2 together)
- st(s): Stitch(es)
- ch: Chain
- sl st: Slip stitch
- fp/bp sc: Front post / Back post single crochet (if needed)
Step-by-Step Instructions
When working on this project, remember to work in a continuous spiral. Do not join each round with a slip stitch unless specifically instructed. Use your stitch marker at the beginning of every round to ensure you don’t lose your place.
The Head
Start with your main color using a Magic Ring.
- Round 1: 6 sc in MR (6)
- Round 2: 6 inc (12)
- Round 3: (1 sc, inc) repeat 6 times (18)
- Round 4: (2 sc, inc) repeat 6 times (24)
- Round 5: (3 sc, inc) repeat 6 times (30)
- Round 6: (4 sc, inc) repeat 6 times (36)
- Round 7: 36 sc (36)
- Round 8: (5 sc, inc) repeat 6 times (42)
- Rounds 9-15: 42 sc (42)
- Round 16: (5 sc, dec) repeat 6 times (36)
- Round 17: (4 sc, dec) repeat 6 times (30)
- Round 18: (3 sc, dec) repeat 6 times (24)
- Round 19: (2 sc, dec) repeat 6 times (18)
Fasten off the yarn, leaving a tail for sewing.
The Arms (Make 2)
Use your main color.
- Round 1: 6 sc in MR (6)
- Round 2: (1 sc, inc) repeat 3 times (9)
- Rounds 3-13: 9 sc (9)
Note: Do not stuff the arms. To close them, fold the opening in half and crochet 4 sc through both layers to seal the end. Fasten off and leave a long tail for sewing.
The Ears (Make 2)
Use your main color.
- Round 1: 6 sc in MR (6)
- Round 2: (1 sc, inc) repeat 3 times (9)
- Round 3: (2 sc, inc) repeat 3 times (12)
- Round 4: (3 sc, inc) repeat 3 times (15)
- Rounds 5-13: 15 sc (15)
- Round 14: 8 sc, crocheting through both layers (8)
- Round 15: Fold the piece in half and crochet 4 sc through both layers to close.
Fasten off and leave a long tail for sewing.
The Muzzle
Use your secondary color (the snout color).
- Round 1: 6 sc in MR (6)
- Round 2: 6 inc (12)
- Round 3: (1 sc, inc) repeat 6 times (18)
Fasten off, leaving a long tail for sewing. You will use this piece to create the bunny’s cute face later.
The Legs & Body
This section is worked as one continuous piece to create the legs and then the body. We will start with the first leg, then work the second leg and join them together.
Part 1: The First Leg
- Round 1: 6 sc in MR (6)
- Round 2: 6 inc (12)
- Round 3: (1 sc, inc) repeat 6 times (18)
- Rounds 4-5: 18 sc (18)
- Round 6: 6 sc, 3 dec, 6 sc (15)
- Round 7: 5 sc, 2 dec, 6 sc (13)
- Round 8: 5 sc, 1 dec, 6 sc (12)
- Rounds 9-12: 12 sc (12)
Fasten off the yarn for the first leg.
Part 2: The Second Leg & Body Connection
Do not fasten off after the second leg; we will continue crocheting directly into it to form the body.
- Round 1 (Leg 2): 12 sc (12)
- Round 2 (The Bridge): 5 sc (on the second leg), ch 5, join to the first leg. Work 7 sc (completing the first leg), 5 sc into the chain stitches, 12 sc (around the second leg), and 5 sc into the remaining chain stitches. Place your stitch marker here. (Total: 34 stitches)
- Rounds 14-23: 34 sc (34)
- Round 24: 4 sc, 1 dec, 16 sc, 1 dec, 10 sc (32)
- Round 25: 12 sc, 1 dec, 15 sc, 1 dec, 1 sc (30)
- Round 26: 30 sc (30)
- Round 27: (3 sc, dec) repeat 6 times (24)
- Round 28: 24 sc (24)
- Round 29: (2 sc, dec) repeat 6 times (18)
- Rounds 30-31: 18 sc (18)
Stuff the legs and the body firmly with fiberfill. Fasten off, leaving a long tail for sewing.
Finishing
Now comes the most rewarding part—bringing your bunny to life! Assembly is key to getting that perfect “cute” look.
- Attach the Arms: Sew the arms onto the body between rounds 29 and 30. Position them so they look like they are resting at the sides.
- The Face: Sew the muzzle onto the head. Once attached, use black thread or yarn to embroider a cute nose on the muzzle. Then, embroider the eyes and eyebrows just above the muzzle. If you used safety eyes, insert them before sewing the muzzle on.
- The Ears: Sew the ears to the top of the head. You can tilt them slightly to give the bunny more personality!
- The Head: Finally, sew the head onto the body. Make sure it is centered so your bunny stands (or sits) nicely.
Tips
To make your crochet bunny look as professional as possible, keep these tips in mind:
- Tension is Everything: In amigurumi, you want your stitches to be very tight. If you find that your stuffing is showing through the holes, try using a smaller hook or pulling your yarn a bit tighter.
- Use a Stitch Marker: It is incredibly easy to lose count when working in a spiral. A stitch marker is your best friend to avoid having to “frog” (rip out) your work.
- Stuffing Technique: When stuffing the body and head, push the fiberfill into the corners and edges using your crochet hook. This prevents lumps and ensures a smooth, round shape.
- Embroidering Details: For the eyes and eyebrows, don’t be afraid to experiment! A slightly different placement can completely change the “expression” of your bunny.
- Yarn Choice: For a softer, more “plush” feel, you can use chenille or velvet yarn. Just keep in mind that these yarns can make it harder to see your stitches, so work slowly!