How to Crochet a Cute Plush Chick Amigurumi: A Beginner-Friendly Pattern
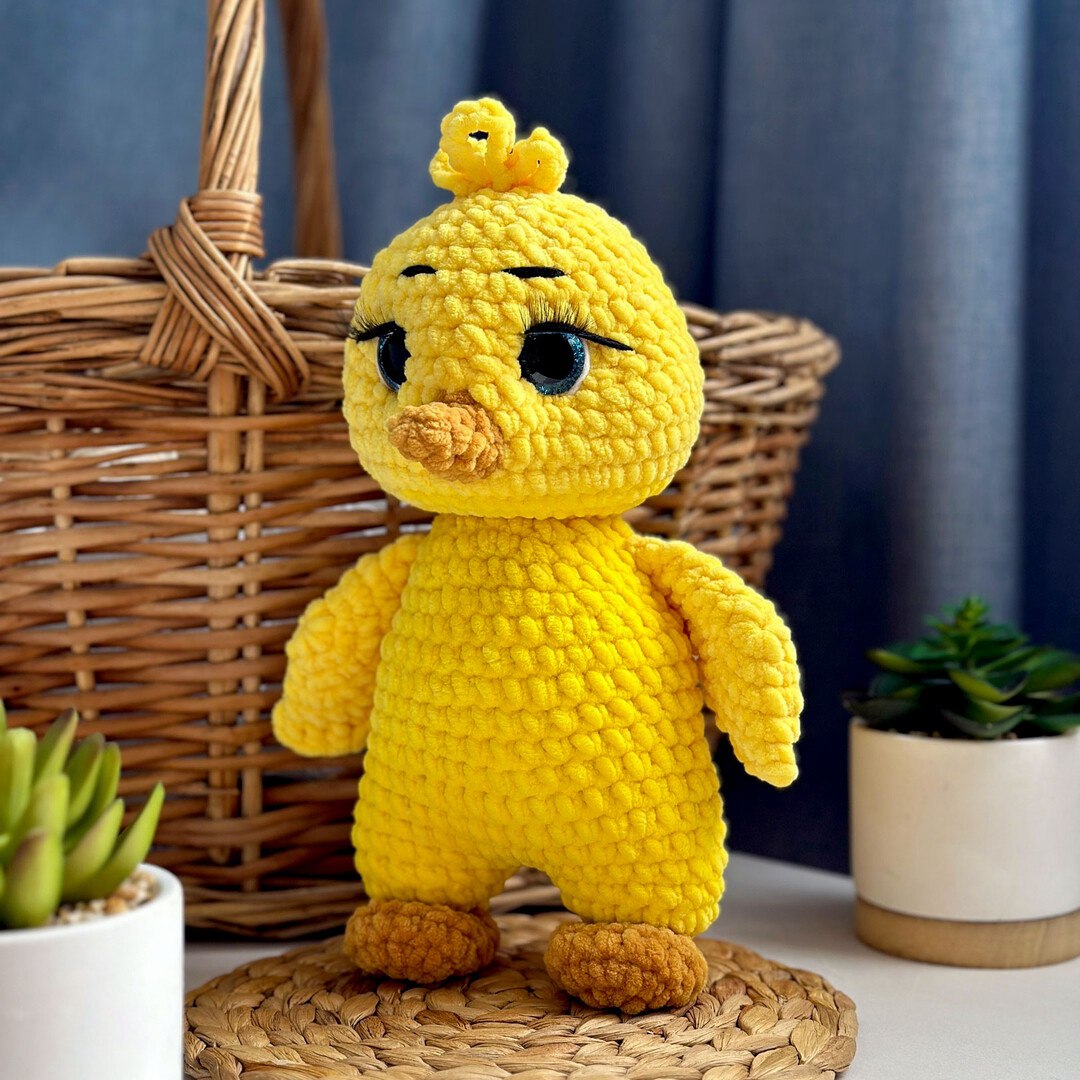
Are you looking for your next adorable crochet project? There is nothing quite as heartwarming as a tiny, chunky plush animal. Today, I am sharing a complete, step-by-step tutorial to create this incredibly cute, expressive little yellow chick! This amigurumi project is perfect for nursery decor, a sweet gift for a baby shower, or simply a delightful addition to your handmade toy collection.
Because we are using soft, plush yarn, the finished chick is super squishy and huggable. This pattern is designed to be beginner-accessible, though you should be familiar with basic crochet stitches. By the time you are finished, you’ll have a little friend that is roughly 10 inches tall and full of personality!
Materials & Abbreviations
To ensure your chick turns out just like the pictures, I recommend using a velvet or chenille-style plush yarn. This gives the toy that professional, store-bought look.
Materials Needed
- Plush Yarn (Velvet/Chenille style):
- Yellow (Main color)
- Mustard/Dark Yellow (For the feet)
- Cotton Yarn (for facial details):
- Black and White
- Safety Eyes: 20mm (approximately 3/4 inch)
- Fiberfill Stuffing: High-quality polyester stuffing
- Crochet Hook: 4.0 mm (G/6)
- Essential Tools: Scissors, a long embroidery needle, a stitch marker, and a strong, thick thread for shaping/pulling.
- Optional: Eyelashes (you can use thin black yarn or eyelashes from a craft store).
US Crochet Abbreviations
- MR: Magic Ring
- sc: single crochet
- inc: increase
- dec: decrease
- triple dec: triple decrease (work 3 single crochets into the same unfinished stitch)
- ch: chain
- sl st: slip stitch
- hdc: half double crochet
- dc: double crochet
Step-by-Step Instructions
The Legs (Make 2)
We will start the legs using the mustard color.
- 1 MR, 8 sc [8]
- 8 inc [16]
- 3-4. 16 sc (2 rounds) [16]
- 3 triple decs (work 3 single crochets into the same unfinished stitch), 1 dec, 3 sc, 1 dec [8]
- Switch to yellow yarn: 8 sc [8]
- 8 inc [16]
- 16 sc [16]
Note on Stuffing: Stuff the mustard section very lightly (or not at all), but stuff the yellow section firmly. Fasten off the first leg. For the second leg, do not fasten off; you will use the remaining yarn to join the body.
The Body
In this round, we will join the two legs together.
- From the second leg, ch 2, then work 16 sc around the first leg. 2 inc in the ch, 16 sc around the second leg, and 2 inc in the ch. [40] (Move your stitch marker here immediately).
- 2-3. 40 sc (2 rounds) [40]
- Note: For rounds 4, 5, 6, and 11, your decreases should be placed on the sides to shape the body properly.
- 4. 7 sc, 1 dec, 18 sc, 1 dec, 11 sc [38]
- 5. 8 sc, 1 dec, 16 sc, 1 dec, 10 sc [36]
- 6. 7 sc, 1 dec, 16 sc, 1 dec, 9 sc [34]
- 7-10. 34 sc (4 rounds) [34]
- 11. 6 sc, 1 dec, 1 sc, 1 dec, 12 sc, 1 dec, 1 sc, 1 dec, 6 sc [30]
- 12-13. 30 sc (2 rounds) [30]
- 14. (3 sc, 1 dec) x 6 [24]
- 15. (2 sc, 1 dec) x 6 [18]
- 16. (1 sc, 1 dec) x 6 [12]
Stuff the body firmly. Do not fasten off; continue working directly into the top of the body to start the head.
The Head
- 12 inc [24]
- (1 sc, 1 inc) x 12 [36]
- (2 sc, 1 inc) x 12 [48]
- 4-8. 48 sc (5 rounds) [48]
- 9. (6 sc, 1 dec) x 6 [42]
- 10. (5 sc, 1 dec) x 6 [36]
- Important: Insert your safety eyes into the head during Round 8.
- 11. 36 sc [36]
- 12. (4 sc, 1 dec) [30]
- 13. (3 sc, 1 dec) [24]
- 14. (2 sc, 1 dec) [18]
- 15. (1 sc, 1 dec) [12]
- 16. 6 dec [6]
Fasten off and weave in the end.
Wings, Beak, and Tail
Wings (Make 2)
- 1 MR, 6 sc [6]
- 6 inc [12]
- (1 sc, 1 inc) x 6 [18]
- (2 sc, 1 inc) x 6 [24]
- (3 sc, 1 inc) x 6 [30]
Do not fasten off. Fold the piece in half and work around both sides of the edge using this sequence: 1 sc, 1 hdc, 1 dc, 1 hdc, 1 sl st, 1 hdc, 1 dc, 1 hdc, 1 sl st, 1 hdc, 1 dc, 1 hdc, 1 sl st, 1 hdc, 1 sc. Fasten off, leaving a long tail for sewing.
Beak
- 1 MR, 4 sc [4]
- (1 inc, 1 sc) x 2 [6]
- (2 dc, 1 inc) x 2 [8]
- 3 sl st, 5 sc [8]
Fasten off, leaving a tail for sewing.
Tail
- 1 MR, 6 sc [6]
- 6 inc [12]
- (1 sc, 1 inc) x 6 [18]
Fasten off, leaving a tail for sewing.
Finishing
The “Pulling” Technique (Giving the Face Character)
To give your chick that adorable, slightly “squished” expression, you need to use the pulling technique. Use a long piece of thick thread and a needle.
- Insert the needle at Point 1 (Round 16 of the body).
- Pull the thread through to Point 2 (Round 8 of the head).
- Re-insert at Point 3 (Round 8 of the head) and pull through to Point 4 (Round 8 of the head).
- Re-insert at Point 5 (Round 8 of the head) and pull through to Point 6 (Round 16 of the body).
Pull the thread tight to create the facial indentation, tie several strong knots, and hide the thread inside the head.
Assembly Guide
- Tail: Sew onto the body between rounds 5 and 7.
- Wings: Sew onto the body between rounds 13 and 14.
- Beak: Sew onto the head between rounds 4 and 7.
- Crest (Tuft): Join yarn to the very last round of the head. Ch 6-10, then sl st into the next stitch. Repeat this two more times to create three little “loops” or tufts on top. Fasten off and hide the tail.
Final Details
Using your black and white cotton yarn, embroider the whites of the eyes, the eyelids, and the eyebrows. If you want to go the extra mile, you can glue on small eyelashes to make the chick look even more expressive!
Tips
Tension Matters: When working with plush yarn, try to keep your tension even. If you crochet too loosely, the stuffing might show through the stitches. If you crochet too tightly, it can be difficult to insert your hook.
Counting Stitches: Amigurumi relies on precise stitch counts. Always use a stitch marker, especially when working in continuous rounds, to ensure you don’t lose your place.
Make it Your Own: Don’t be afraid to experiment! You can change the colors to make a rainbow chick or a pink flamingo. The possibilities are endless!