How to Crochet a Cute Poseable Monkey: A Step-by-Step Amigurumi Tutorial
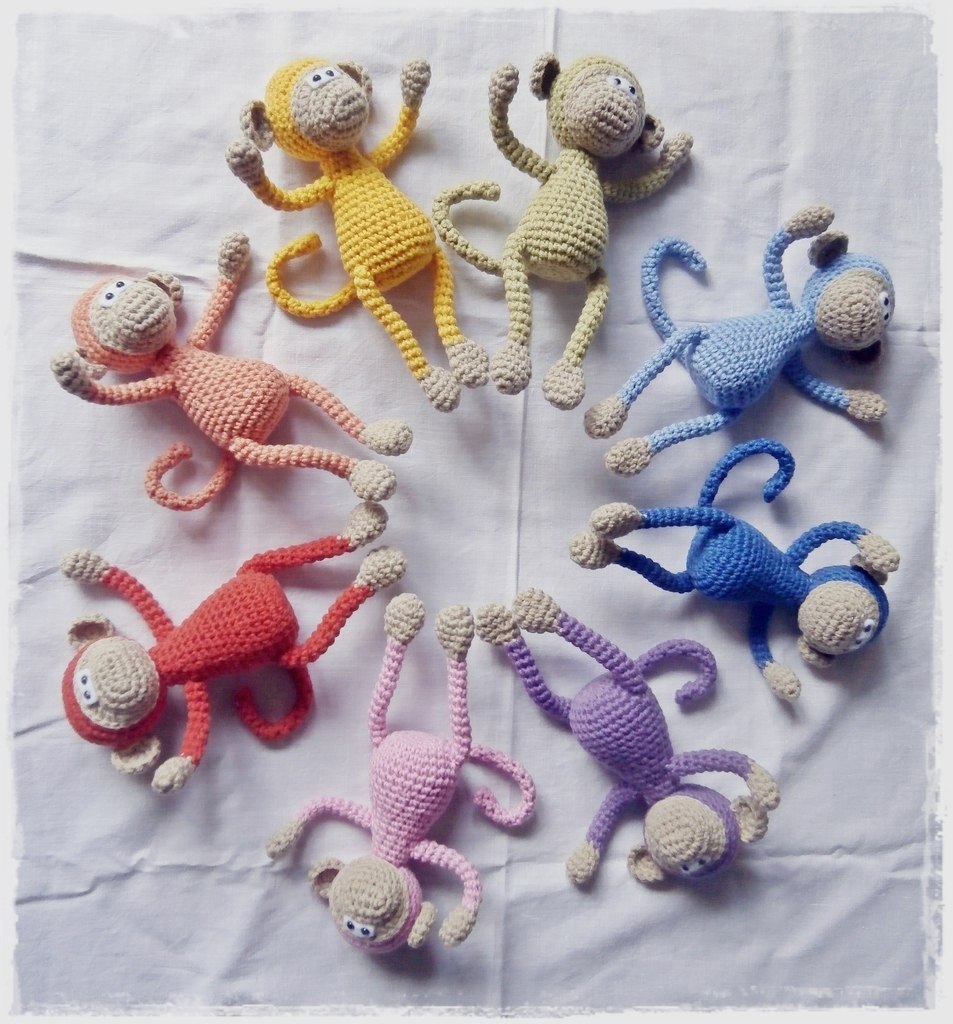
Are you looking for a fun, colorful, and slightly cheeky project to add to your crochet collection? This poseable amigurumi monkey is the perfect solution! Whether you want to make a whimsical nursery decoration or a unique gift for a friend, this monkey is designed to be as expressive as it is adorable. Because of the integrated wire armature, your new little friend can sit, hang, or strike a pose, making it much more interactive than a standard plushie.
This tutorial is written for beginners and intermediate crocheters alike. We will walk through creating a sturdy, weighted body, a charmingly shaped head, and limbs that actually move. Grab your favorite bright colors, and let’s get started on this rainbow-inspired adventure!
Materials & Abbreviations
Before we dive into the stitches, let’s make sure you have everything you need on your craft table. Since this is an amigurumi project, I highly recommend using a smaller hook than what is suggested on your yarn label to ensure your stitches are tight enough to keep the stuffing inside.
Materials Needed
- Yarn: Medium-weight cotton or cotton-blend yarn in two colors. You will need a “main color” (for the body and limbs) and a “contrast color” (for the muzzle and paw tips).
- Crochet Hook: 2.25mm (US size B-1) or the smallest hook that gives you tight tension.
- Eyes: 3mm (approx. 1/8 inch) safety eyes or small beads.
- Felt: A small scrap of white felt (approximately 0.2 x 0.6 inches).
- Stuffing: Poly-fill or similar polyester fiberfill.
- Weight: A small coin (like a penny or nickel) to help the monkey sit upright.
- Wire: 1mm craft wire for the arms, legs, and tail to allow for posing.
- Extras: Scissors, tapestry needle, and a small piece of tape or electrical tape to secure the wire.
Abbreviations (US Terms)
- ch: chain
- sc: single crochet
- hdc: half double crochet
- inc: increase (2 sc in the same stitch)
- dec: decrease (sc 2 stitches together)
- st(s): stitch(es)
- […]: total number of stitches in the round
Step-by-Step Instructions
The Head
We begin the head using your contrast (lighter) color to create a beautiful facial area.
Round 1: Start with a foundation chain of 6 ch. In the 2nd ch from your hook, work 1 sc. Work 3 sc in the next ch. In the very last ch, work 3 sc. Now, rotate your work to crochet along the opposite side of the foundation chain. In the 3rd ch from the hook, work 3 sc. In the 2nd ch from the hook, work 2 sc. [12 st]
Round 2: 1 inc, 3 sc, 3 inc, 3 sc, 2 inc. [18 st]
Rounds 3-4: sc in each st around. [18 st]
Round 5: 8 hdc inc, 10 sc. [26 st]
Note: At this point, switch to your main color. Do not cut the light-colored yarn; instead, carry it along the inside of your work to use later for the muzzle detail.
Round 6: 5 sc, 2 inc, 3 sc, 2 inc, 14 sc. [30 st]
Round 7: (4 sc, 1 inc) repeat 6 times. [36 st]
Creating the Muzzle & Face
To give the monkey its signature look, we will create a decorative border around the face. Insert your hook into the base of the first sc from Round 6. Reach through to the inside of the work to grab your leftover light-colored yarn, pulling it through to the front. Work this in a single crochet pattern all the way around the perimeter of the muzzle area. Once finished, fasten off the light yarn on the inside.
Before closing the head, insert your 3mm safety eyes or beads between the 4th and 5th increases of Round 5. If using felt, cut your small white felt piece and place it behind the eyes to give them a clean, bright look.
Round 8-10: sc in each st around. [36 st]
Round 11: (4 sc, 1 dec) repeat 6 times. [30 st]
Round 12: (3 sc, 1 dec) repeat 6 times. [24 st]
Round 13: (2 sc, 1 dec) repeat 6 times. [18 st]
Round 14: (1 sc, 1 dec) repeat 6 times. [12 st]
Stuff the muzzle lightly with fiberfill, then continue stuffing the head firmly to achieve a nice round shape.
Round 15: 6 dec. [6 st]
Fasten off and weave in your ends securely.
The Body
The body is designed with a teardrop shape to provide a stable base for sitting.
Round 1: 6 sc. [6 st]
Round 2: 6 inc. [12 st]
Round 3: (1 sc, 1 inc) repeat 6 times. [18 st]
Round 4: (2 sc, 1 inc) repeat 6 times. [24 st]
Round 5: (3 sc, 1 inc) repeat 6 times. [30 st]
Rounds 6-8: sc in each st around. [30 st]
Round 9: (3 sc, 1 dec) repeat 6 times. [24 st]
Rounds 10-12: sc in each st around. [24 st]
Round 13: (2 sc, 1 dec) repeat 6 times. [18 st]
Rounds 14-16: sc in each st around. [18 st]
Round 17: (1 sc, 1 dec) repeat 6 times. [12 st]
Rounds 18-20: sc in each st around. [12 st]
Pro Tip: During the stuffing process, place your coin at the very bottom of the body. This acts as a weight to ensure the monkey sits upright! Stuff the rest of the body firmly with fiberfill.
Fasten off, leaving a long tail for sewing the head to the body.
The Ears (Make 2)
Use the contrast (lighter) color.
Round 1: 6 sc. [6 st]
Round 2: 6 inc. [12 st]
Round 3: 12 sc. [12 st]
Fasten off, leaving a tail for sewing.
The Arms (Make 2)
Start with the contrast color.
Round 1: 6 sc. [6 st]
Round 2: (1 sc, 1 inc) repeat 3 times. [9 st]
Rounds 3-4: 9 sc. [9 st]
Round 5: (1 sc, 1 dec) repeat 3 times. [6 st]
Switch to the main color.
Rounds 6-15: 6 sc. [6 st]
Fasten off, leaving a long tail for sewing.
The Legs (Make 2)
Start with the contrast color.
Round 1: 6 sc. [6 st]
Round 2: 6 inc. [12 st]
Rounds 3-4: 12 sc. [12 st]
Round 5: (2 sc, 1 dec) repeat 3 times. [9 st]
Round 6: (1 sc, 1 dec) repeat 3 times. [6 st]
Switch to the main color.
Rounds 7-18: 6 sc. [6 st]
Fasten off, leaving a long tail for sewing.
The Tail
The tail is worked in a continuous spiral using single crochet. Leave a small tail at the beginning to secure the wire later.
Work in a spiral of single crochet, using only 4 stitches as your base. Continue until the tail reaches a length of approximately 4 to 5 inches. Adjust the length based on your monkey’s size and your personal preference.
Finishing
Wire Preparation
To make your monkey poseable, you need to prepare the wire for the limbs and tail. Cut lengths of 1mm craft wire. For the hands and feet, make sure to add extra length: approximately 1.2 inches for the palms and 1.5 inches for the soles. For the tail, add about 0.4 inches for the tip loop and 0.6 inches for the attachment point.
At one end of each wire piece, create a small loop and secure it tightly using tape or electrical tape. This prevents the wire from poking through the crochet stitches.
Assembly
- Attach Limbs: Slide your prepared wire pieces into the arms and legs. Sew the limbs to the body at your desired position.
- Attach Head: Sew the head onto the top of the body.
- Attach Ears: Sew the ears onto the head at the level of the eyes.
- Attach Tail: Feed the wire through the tail and into the base of the body. Secure the tail by making a few stitches over the wire loop at the end to lock it in place.
Tips
- Tension is Key: When working amigurumi, keep your tension tight. If you see gaps between your stitches, try using a smaller hook.
- Wire Safety: Always ensure the ends of your wire are tucked deep inside the stuffing and securely taped so they don’t pierce the fabric.
- Symmetry: When sewing the ears and eyes, use a ruler or mark the spots with pins first to ensure the monkey’s face is perfectly symmetrical.
- Color Play: Don’t be afraid to experiment! While this pattern uses two colors, you can use any combination of bright, rainbow colors to make each monkey unique.