Crochet Bear Keychain Pattern: A Cute and Easy Amigurumi Tutorial
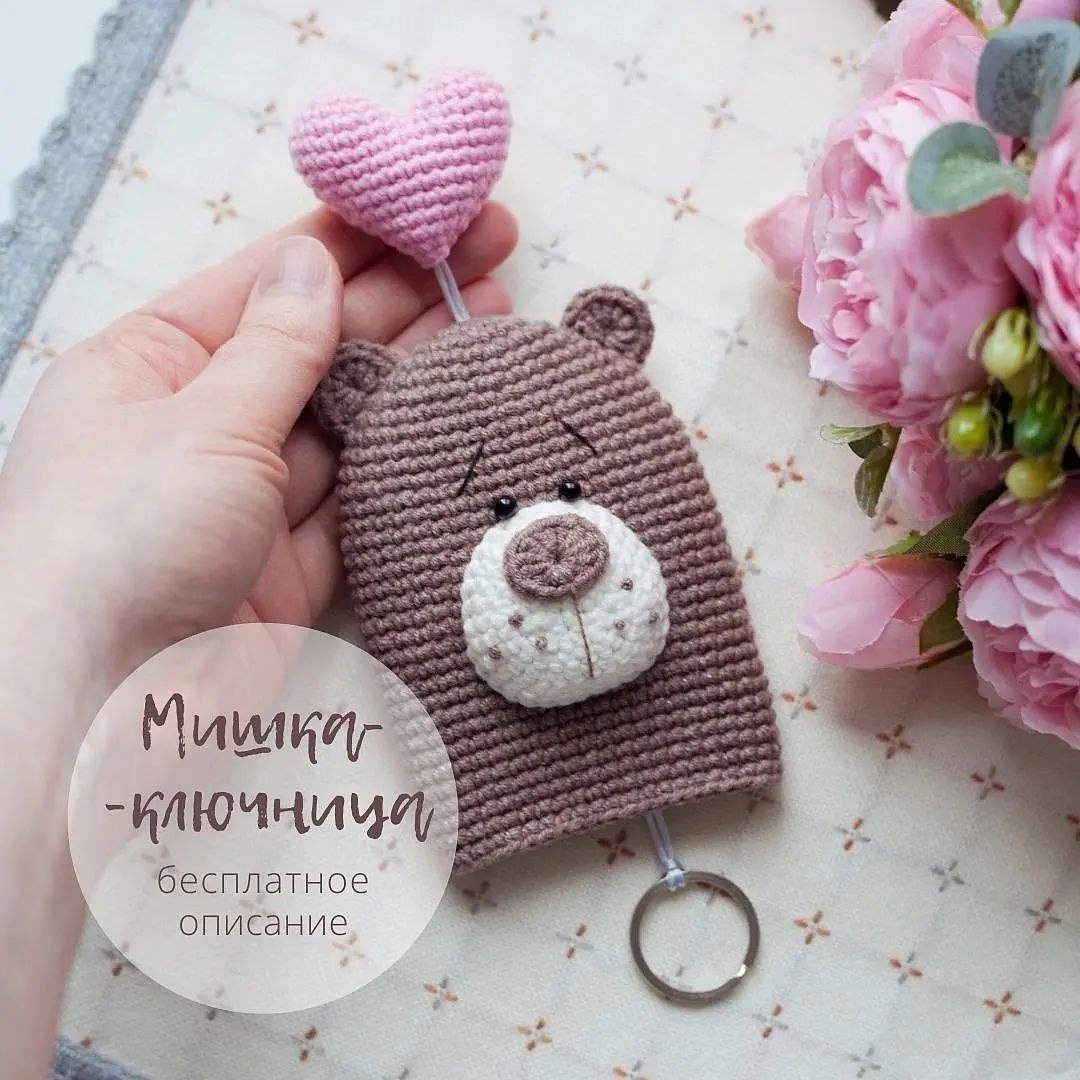
If you are looking for a quick, adorable, and functional crochet project, you have come to the right place! This little bear keychain is the perfect addition to your bag, car keys, or even as a sweet gift for a loved one. Not only is it incredibly cute with its tiny pink heart charm, but it is also a fantastic project for intermediate beginners looking to practice their amigurumi skills.
This tutorial will guide you through creating a textured, chubby bear pouch that is sturdy enough to carry your essentials or simply hang as a charm. We will work through the body, a sweet little muzzle, tiny ears, and even a miniature stuffed heart. Grab your favorite cocoa-colored yarn and let’s get started!
Materials & Abbreviations
To ensure your bear turns out perfectly, gather all your supplies before you begin. While you can use any yarn you have on hand, I recommend a cotton blend for better stitch definition.
What You Will Need
- Yarn: A cotton/acrylic blend (approx. 165 yards per 50g ball). You will need:
- Cocoa brown (for the main body and ears)
- Pink (for the little heart charm)
- Cream or Milk white (for the muzzle and nose)
- Crochet Hook: 2.5 mm (or the size recommended for your yarn to keep stitches tight)
- Eyes: 4 mm black beads
- Stopper Bead: One 10 mm bead with a large hole (to secure the cord)
- Stuffing: Small amount of polyester fiberfill
- Cord: 16 inches of nylon or satin cord (about 1/2 inch diameter)
- Hardware: One metal key ring
- Tools: Sewing needle, scissors, safety pins, and black embroidery thread for the eyebrows
Abbreviations (US Terms)
- MR: Magic Ring
- ch: Chain
- sc: Single crochet
- inc: Increase (2 sc in one stitch)
- dec: Decrease (sc 2 stitches together)
- hdc: Half double crochet
- dc: Double crochet
- sl st: Slip stitch
- st(s): Stitch(es)
Step-by-Step Instructions
The Main Bear Body
Using your cocoa brown yarn, start by creating the base of the bear. We will be working in continuous rounds to avoid a visible seam.
- Round 1: 6 sc in a MR (6)
- Round 2: 6 inc (12)
- Round 3: (inc, 1 sc) repeat 6 times (18)
- Round 4: 3 sc, 2 inc, 3 sc, 1 inc, 3 sc, 2 inc, 3 sc, 1 inc (24)
- Round 5: 4 sc, 2 inc, 10 sc, 2 inc, 6 sc (28)
- Round 6: 5 sc, 2 inc, 5 sc, 1 inc, 6 sc, 2 inc, 5 sc, 1 inc, 1 sc (34)
- Round 7: 6 sc, 2 inc, 15 sc, 2 inc, 9 sc (38)
- Round 8: 8 sc, 1 inc, 18 sc, 1 inc, 10 sc (40)
- Round 9: 40 sc (40)
- Round 10: 9 sc, 1 inc, 19 sc, 1 inc, 10 sc (42)
- Rounds 11-33: 42 sc (42)
Fasten off the yarn, leaving a long tail for assembly. For a more professional look, you can lightly steam the piece with a hot iron through a damp cloth to help it hold its shape.
The Muzzle
Switch to your cream/milk white yarn to create the cute snout of the bear.
- Start with a foundation chain of 2 ch + 1 ch to turn.
- Round 1: inc in the 2nd ch from the hook, then 3 sc in the next st, 1 sc (6)
- Round 2: 6 inc (12)
- Round 3: (2 inc, 1 sc) repeat 2 times, 3 inc, 2 sc, 1 inc (20)
- Round 4: 1 sc, 2 inc, (2 sc, 1 inc) repeat 2 times, 2 sc, 2 inc, 1 sc, 1 inc, 4 sc, 1 inc (28)
- Round 5: 7 sc, 1 inc, 4 sc, 1 inc, 7 sc, 1 inc, 6 sc, 1 inc (32)
- Round 6: 32 sc (32)
Crochet 3 additional sc to smooth out the shape, then fasten off and hide the yarn tail inside the muzzle.
The Nose
Using your cream/milk white yarn, work into a Magic Ring:
- 1 sc, 1 hdc, 3 dc, 3 hdc, 3 dc, 1 hdc, 1 sc (13)
Pull the magic ring tight, fasten off, and weave in your ends.
The Ears
Make two ears using the cocoa brown yarn.
- In a MR: 3 ch (this counts as your height), 8 dc.
Pull the ring tight, fasten off, and weave in the ends.
The Little Heart Charm
This heart is made by joining two small “cups” together. Start with pink yarn.
Part 1: The First Cup
- Round 1: 6 sc in a MR (6)
- Round 2: (inc, 1 sc) repeat 3 times (9)
- Round 3: (inc, 2 sc) repeat 3 times (12)
- Round 4: (inc, 3 sc) repeat 3 times (15)
Fasten off, leaving a tail of about 4-6 inches.
Part 2: The Second Cup
Repeat the exact same steps for the second cup, but do not fasten off the yarn.
Part 3: Joining the Heart
Join the two cups together to form the heart shape:
- Round 5: 15 sc through the first cup (starting from the stitch right after where you cut the yarn), then 15 sc through the second cup (30)
- Round 6: 30 sc (30)
- Round 7: 7 sc, 1 dec, 13 sc, 1 dec, 6 sc (28)
- Round 8: 7 sc, 1 dec, 12 sc, 1 dec, 5 sc (26)
- Round 9: 7 sc, 1 dec, 11 sc, 1 dec, 4 sc (24)
- Round 10: 5 sc, 2 dec, 8 sc, 2 dec, 3 sc (20)
- Round 11: 4 sc, 2 dec, 6 sc, 2 dec, 2 sc (16)
- Round 12: 3 sc, 2 dec, 4 sc, 2 dec, 1 sc (12)
Stuff the heart firmly with fiberfill. At the very end, insert your 10 mm stopper bead into the opening, then continue to Round 13: 2 sc, 2 dec, 2 sc, 2 dec (8) and Round 14: 4 dec (4). Fasten off and hide the tail.
Finishing
Assembly
Now it is time to bring your bear to life! Use a sewing needle and your cocoa brown yarn (split in two for strength) to attach the pieces.
- The Nose: Sew the nose onto the center of the muzzle. You can use black embroidery thread to add small dots on the muzzle for extra detail.
- The Muzzle: Sew the muzzle onto the main body. I recommend sewing it on “inside-out” (with the wrong side facing you) to ensure a cleaner look. Position it between rows 13 and 26 of the body.
- Eyes and Ears: Sew the 4 mm beads for eyes and attach the ears to the top of the head. Use black thread to embroider two little eyebrows for an extra dose of cuteness.
- The Keychain: Attach the metal ring to your 16-inch cord. Thread the cord through the magic ring opening at the top of the bear’s body. Thread the ends of the cord through your 10 mm stopper bead, pull to your desired length, and tie a secure knot above the bead. Trim any excess cord.
Tips
To make your bear look as professional as possible, keep these tips in mind:
- Tension is key: When making amigurumi, try to keep your stitches tight. This prevents the stuffing from peeking through the holes.
- Invisible Decreases: For a smoother look, try using the “invisible decrease” method (working into the front loops only) when working the heart and body.
- Use Stitch Markers: Since amigurumi is worked in continuous rounds, always use a stitch marker to keep track of your starting point.
- Steam Blocking: As mentioned earlier, using a bit of steam can really help “set” the shape of the body and muzzle, making it look less wrinkled and more polished.