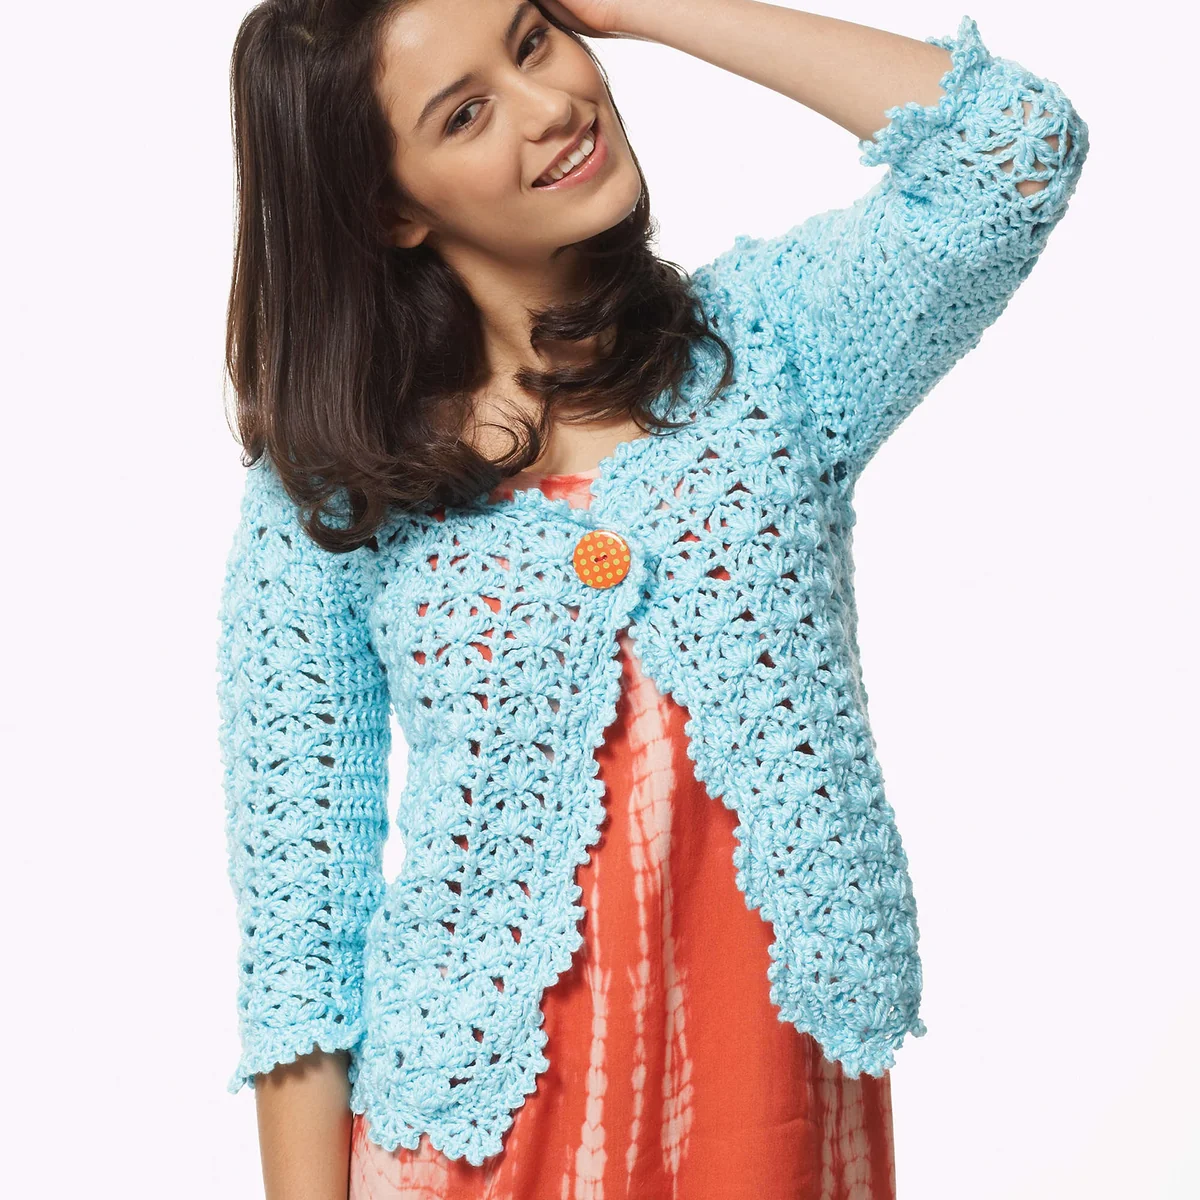
Elegant Lace Crochet Cardigan Tutorial: A Step-by-Step Pattern
Are you looking for the perfect lightweight layer to add to your wardrobe? This elegant lace crochet cardigan is the ultimate project for those who love airy, breathable textures and sophisticated designs. Whether you are heading to a summer brunch or looking for a delicate evening wrap, this cardigan offers a stunning drape and a classic silhouette that never goes out of style.
This project is an intermediate-level crochet pattern. While the shell stitch pattern is rhythmic and meditative once you get the hang of it, the shaping for the armholes and neckline requires a bit of attention to detail. Don’t worry, though—we have broken everything down into simple, easy-to-follow steps so you can crochet your way to a beautiful new garment.
Materials & Abbreviations
To ensure your cardigan has the perfect drape, we recommend using a soft, medium-weight yarn. This pattern is designed for a yarn with a weight of 4 (Medium) and a lovely, smooth texture.
Yarn Requirements
You will need medium-weight yarn (approximately 200 yards or 182 meters per 3.5 oz ball). The amount needed depends on your desired size:
- XS/S: 4 balls
- M: 5 balls
- L: 6 balls
- XL: 7 balls
- 2/3XL: 8 balls
- 4/5XL: 8 balls
Tools & Notions
- Crochet Hook: 5 mm (U.S. size 8), or the size required to obtain your gauge.
- Fasteners: One decorative button and a snap fastener.
- Other: Tapestry needle for weaving in ends and scissors.
Abbreviations (U.S. Terms)
- Beg: Beginning
- Ch: Chain
- Cont: Continue
- Dc: Double crochet
- Pat: Pattern
- Rem: Remaining
- Rep: Repeat
- Rnd(s): Round(s)
- RS: Right Side
- Sc: Single crochet
- Sl st: Slip stitch
- Sp(s): Space(s)
- WS: Wrong side
- Yoh: Yarn over hook
Size Guide & Gauge
This pattern is worked in multiple sizes to ensure a beautiful fit. Please note that the base instructions are written for the smallest size. If you are making a larger size, follow the numbers provided within the parentheses ( ).
Sizing Chart
Choose your size based on your bust measurement:
- XS/S: Fits 28-32″ bust (Finished bust: 34″)
- M: Fits 36-38″ bust (Finished bust: 38″)
- L: Fits 40-42″ bust (Finished bust: 42″)
- XL: Fits 44-46″ bust (Finished bust: 46″)
- 2/3XL: Fits 48-54″ bust (Finished bust: 54″)
- 4/5XL: Fits 56-62″ bust (Finished bust: 62″)
Gauge
It is very important to check your gauge before starting to ensure the cardigan fits correctly. Your gauge should be:
13 dc and 7 rows = 4 inches
Step-by-Step Instructions
The body of the cardigan is worked in one continuous piece from the bottom up to the armholes. This creates a seamless look that is both modern and professional.
The Body
Foundation Row (RS): Chain the number of stitches required for your size (107 for XS/S, up to 191 for 4/5XL). 1 dc in the 4th ch from the hook. *Miss the next 2 ch. [Yoh and draw up a loop. Yoh and draw through 2 loops] twice in the next ch (this counts as 2 dc). Yoh and draw through all 3 loops to complete a cluster. Ch 3. Repeat this entire sequence from * across the row until you reach the last ch. 1 dc in the last ch. Turn. You should have 17 (19-21-23-27-31) shells.
1st Row: Ch 3 (counts as dc). *1 dc in the next dc. Ch 3. 1 sc in the top of the next shell. Ch 3. Repeat from * to the last 2 dc. 1 dc in each of the last 2 dc. Turn.
2nd Row: Ch 3 (counts as dc). *1 dc in the next dc. Shell (as described in the foundation row) in the next sc. Repeat from * to the last 2 dc. 1 dc in each of the last 2 dc. Turn.
Continuing the Pattern: Continue following the shell pattern for the next 2 rows. Work the pattern evenly until the piece measures 10″ from the beginning, ending with a WS row.
Armholes and Neck Shaping
Once the body reaches 10″, we need to divide the work for the armholes and shape the neckline for a flattering fit.
Divide for Armholes: In the next row, work the pattern across the first 4 (5-5-5-6-7) shells, ending with 1 dc in the next dc. Turn and leave the remaining stitches unworked.
Right Front: (WS) Ch 6 (counts as dc and ch 3). *1 sc in the top of the next shell. Ch 3. 1 dc in the next dc. Ch 3. Repeat from * to the last 2 dc. 1 dc in each of the last 2 dc. Turn. Next row: Work the pattern across, ending with 1 dc in the 3rd ch of the ch-6. Turn. Repeat the last 2 rows until the armhole measures 3 (3-5-5-6-6)”.
Neck Shaping: To create the neckline, in the next row (WS), miss the first 2 (2-2-2-3-3) shells. Rejoin yarn with a sl st in the next dc. Ch 6 (counts as 1 dc and ch 3). Work the pattern to the end of the row. Turn. Continue working the pattern until the armhole measures 8 (8-9-9-10-11)”. Fasten off.
Back Piece: With the RS facing you, skip the next shell. Join yarn with a sl st to the next dc. Ch 3 (counts as dc). Work the pattern across the next 7 (7-9-11-13-15) shells, ending with 1 dc in the next dc. Turn and leave the remaining stitches unworked. Repeat the armhole and neck shaping steps as described for the front piece until the armhole measures 8 (8-9-9-10-11)”. Fasten off.
Left Front: Rejoin yarn with a sl st to the next dc. Ch 3 (counts as dc). Work the pattern across the next 7 (7-9-11-13-15) shells, ending with 1 dc in the next dc. Turn. Repeat the armhole and neck shaping steps until the armhole measures 8 (8-9-9-10-11)”. Fasten off.
The Sleeves
The sleeves are worked separately and attached later. You will need to chain the required number for your size (35 for XS/S, up to 47 for 4/5XL).
Foundation Row (RS): 1 dc in the 4th ch from the hook. *Miss the next 2 ch. [Yoh and draw up a loop. Yoh and draw through 2 loops] twice in the next ch (counts as 2 dc). Yoh and draw through all 3 loops. Shell in the next ch. Miss the next 2 ch. 1 dc in the next ch. Repeat from * to the last ch. 1 dc in the last ch. Turn. You should have 5 (5-5-6-6-7) shells.
1st Row: Ch 3 (counts as dc). *1 dc in the next dc. Ch 3. 1 sc in the top of the next shell. Ch 3. Repeat from * to the last 2 dc. 1 dc in each of the last 2 dc. Turn.
2nd Row: Ch 3 (counts as dc). *1 dc in the next dc. Shell in the next sc. Repeat from * to the last 2 dc. 1 dc in each of the last 2 dc. Turn.
3rd Row: Repeat as the 1st row.
4th Row (Increase Row): Ch 3. 1 dc in the first dc. Work the pattern to the last dc. 2 dc in the last dc. Turn.
Repeat the last 2 rows 3 (5-6-5-7-7) more times. Continue working the pattern until the sleeve measures 10 (10-11-11-11-11)”. Place markers 1½” down along the side edges of the sleeve to guide your sewing later.
Shape Top: In the next row, Ch 3. (Yoh and draw up a loop in the next dc. Yoh and draw through 2 loops) twice. Yoh and draw through all 3 loops to make a dc2tog. Work the pattern to the last 3 sts. Dc2tog over the next 2 dc. 1 dc in the last dc. Turn. Repeat this last row 4 (4-5-6-7-8) more times. Fasten off.
Finishing
Now for the most rewarding part—bringing your cardigan to life!
Seaming
Using a tapestry needle, sew the shoulder seams by placing the rows above the markers along the back and front armhole shaping. Next, sew in the sleeves by placing the rows above the markers along the armhole shaping. Finally, sew the side seams and the sleeve seams to complete the structure.
Outer Edging
With the RS facing you, join your yarn with a sl st to the bottom of the Right Front. Ch 1. Work 1 sc in the same sp as the last sl st. Work 36 (36-41-41-44-44) sc up the right front edge, 2 sc in the corner, 11 (16-11-11-16-16) sc across the front neck edge, 14 (14-12-12-12-14) sc up the front neck edge, 17 (17-17-27-38-38) sc across the back neck edge, 14 (14-12-12-12-14) sc down the front neck edge, 11 (16-11-11-16-16) sc across the front neck edge, 2 sc in the corner, 36 (36-41-41-44-44) sc down the left front, 2 sc in the corner, 85 (99-111-117-138-158) sc across the bottom, and 1 sc in the corner. Join with a sl st to the first sc. Total sc around: 232 (256-264-280-328-352).
Next Round: Ch 1. 1 sc in the same sp as the sl st. *Miss the next 3 sc. (1 dc, ch 2, sl st in the top of the dc to make a picot, ch 1) 5 times in the next sc. Miss the next 3 sc. 1 sc in the next sc. Repeat from * around, omitting the sc at the end of the last rep. Join with a sl st in the first sc. Fasten off.
Sleeve Edging
Join yarn with a sl st at the side seam of the sleeve. Working along the foundation ch, proceed as follows:
- 1st Round: Ch 1. 1 sc in the same sp as the sl st. *2 sc in the next ch-2 sp. 1 sc in the next st. Repeat from * around, ending with 2 sc in the ch-2 sp. Join with a sl st to the first st. (36 (36-36-42-42-48) sc).
- 2nd Round: Ch 1. 1 sc in the same sp as the sl st. *Miss the next 2 sc. (1 dc, picot, ch 1) 4 times in the next sc. Miss the next 2 sc. 1 sc in the next sc. Repeat from * around, omitting the sc at the end of the last rep. Join with a sl st in the first sc. Fasten off.
Final Details
To finish, sew each side of your snap fastener in position at the top corner of the neck edge. Finally, sew your decorative button in position. Your beautiful lace cardigan is ready to wear!
Tips for Success
To make your crochet experience as smooth as possible, keep these tips in mind:
- Consistent Tension: Since this pattern relies on a shell/cluster stitch, try to keep your tension even. If your stitches are too tight, the cardigan may feel stiff; if too loose, it may lose its shape.
- Blocking is Key: Lace crochet looks 100% better after blocking! Once you have finished all your seaming, pin your cardigan to the correct measurements on a blocking mat and lightly steam it. This will open up those lovely shell stitches and give the garment a professional, high-end look.
- Count Your Shells: In the beginning, it is very easy to lose count of your shells. I highly recommend using stitch markers to keep track of your progress as you work the foundation and the body.