Free Crochet Teddy Bear Pattern: How to Crochet an Easy Plush Amigurumi Bear
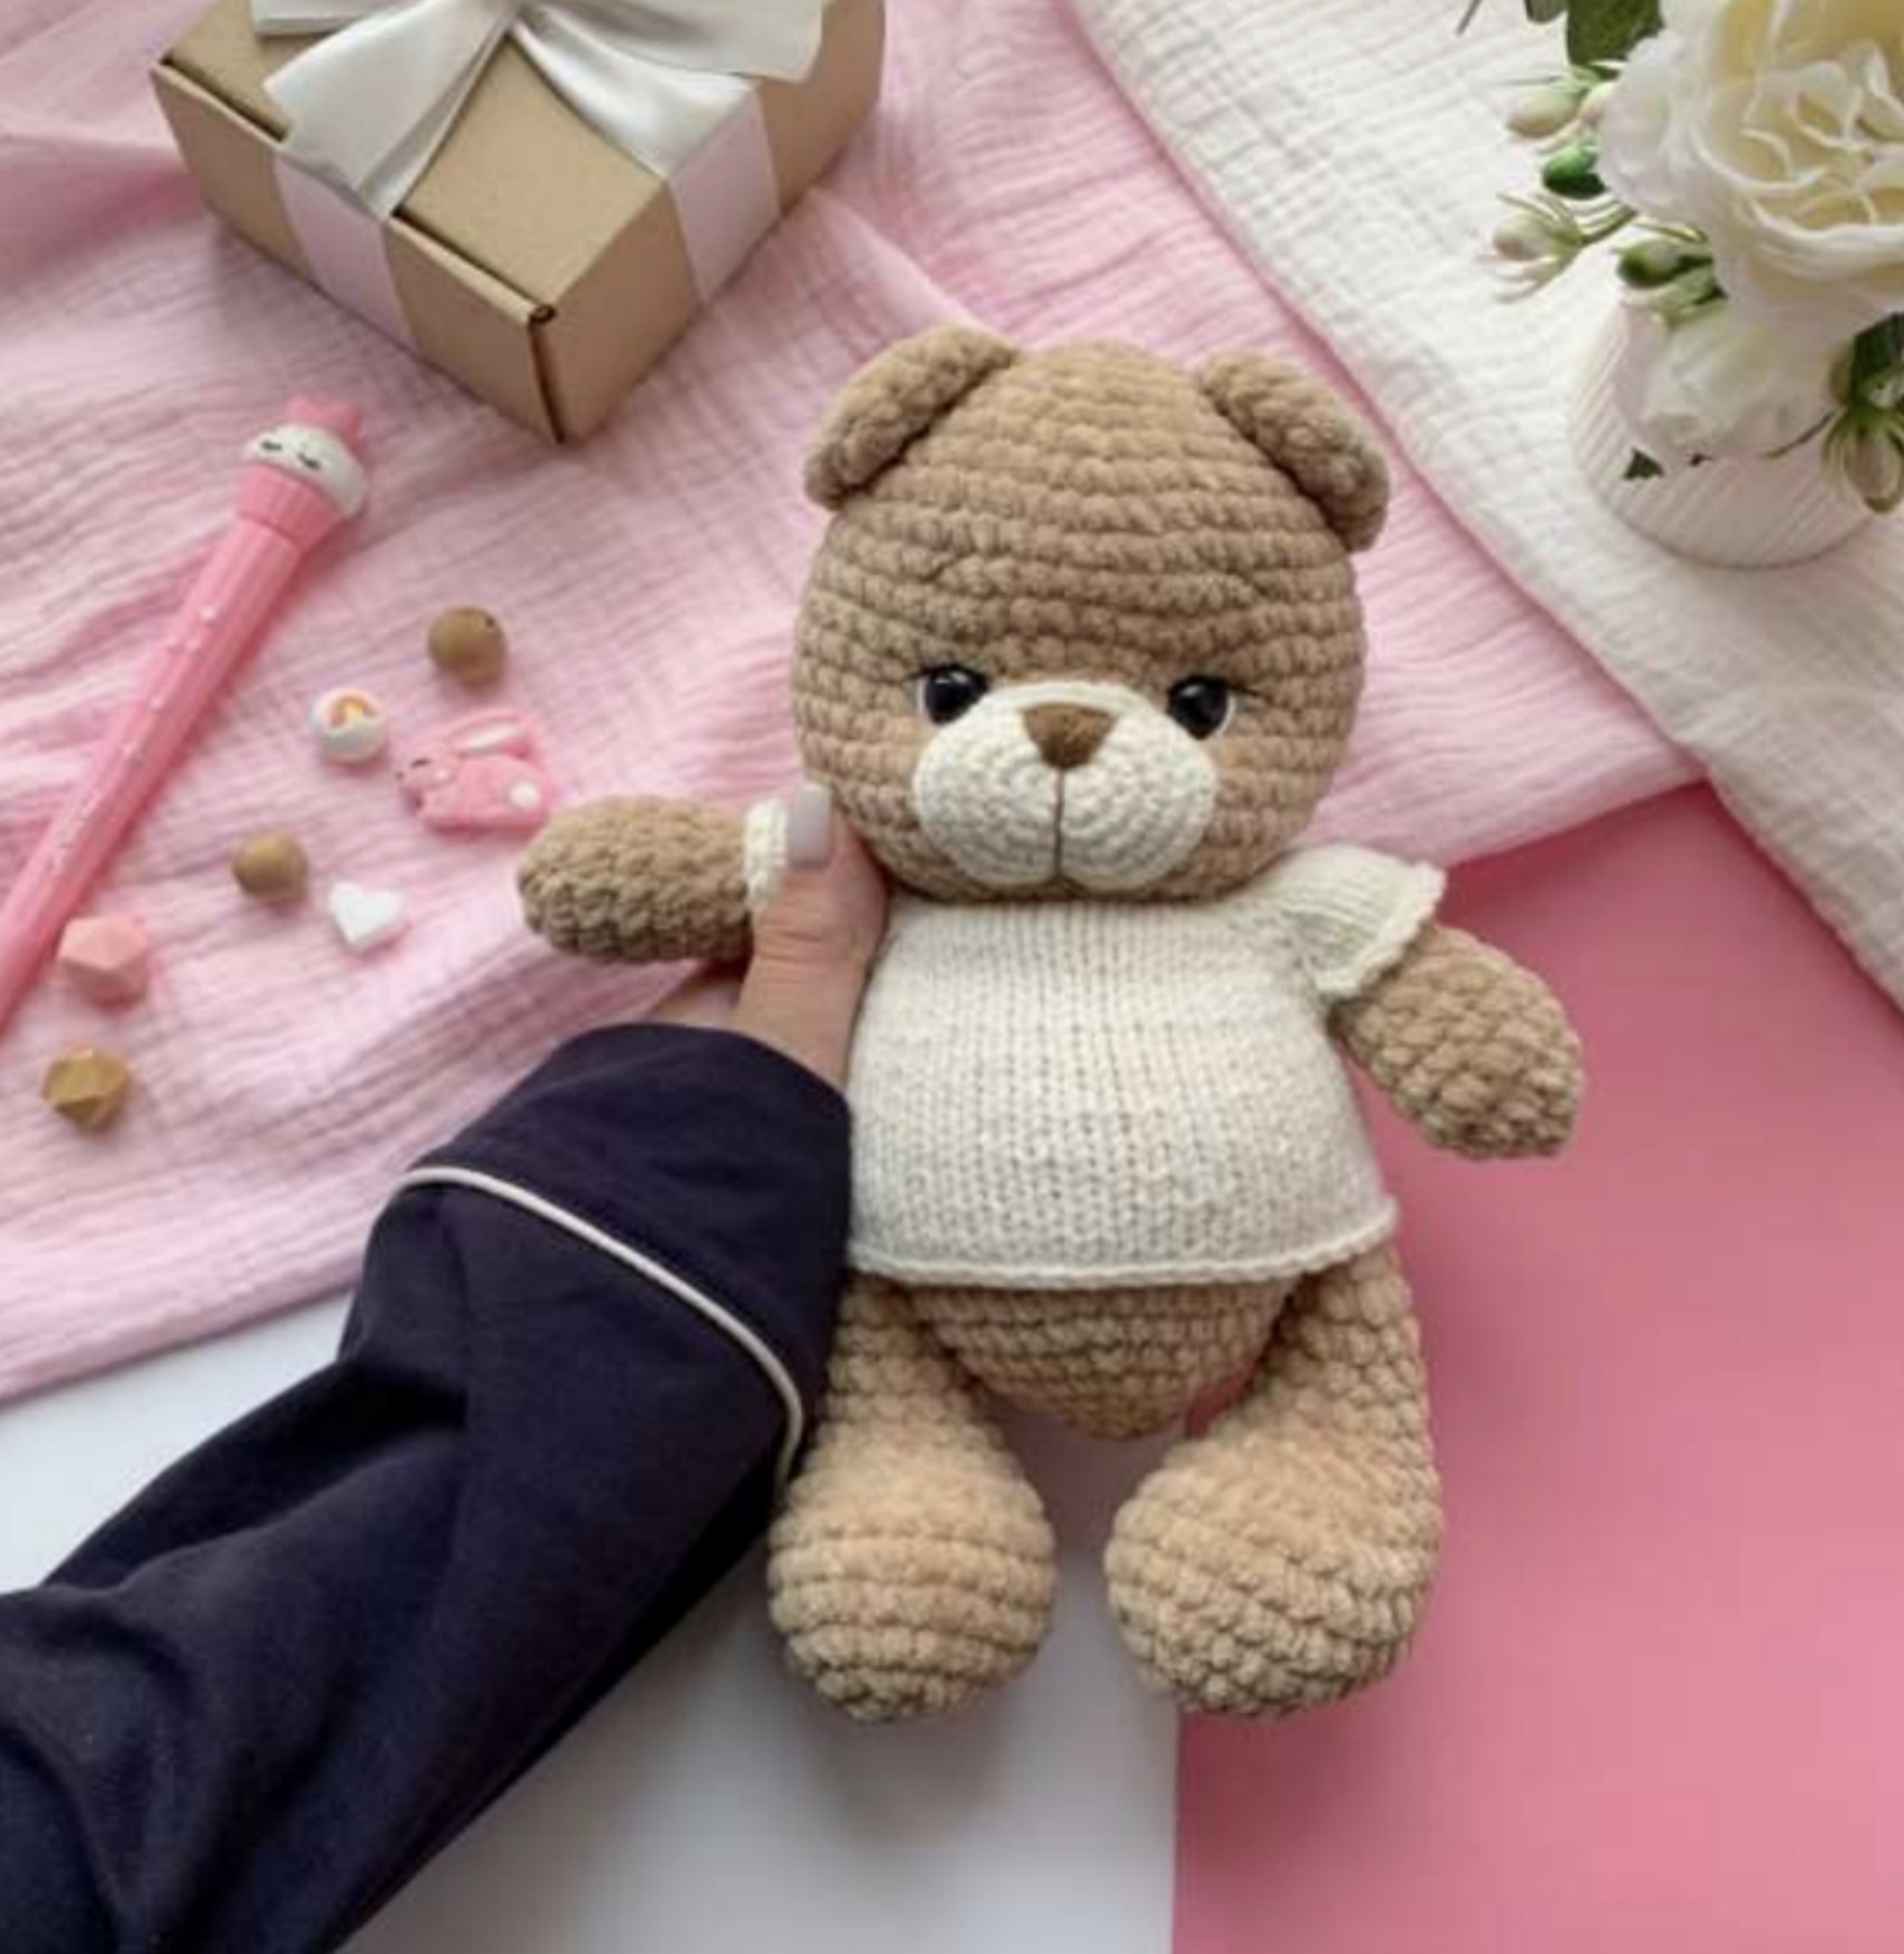
There is nothing quite like the soft, huggable texture of a plush crochet teddy bear. Whether you are looking to make a heartfelt handmade gift for a baby shower, a cute addition to a nursery, or simply want a cozy weekend project, this easy amigurumi bear pattern is exactly what you need. Crocheted with super-soft velvet chenille yarn, this finished teddy bear stands about 10 inches tall and is incredibly cuddly.
In this comprehensive tutorial, we will walk you through every step of creating your own plush teddy bear. From crocheting the adorable chubby legs to mastering the simple face sculpting technique that gives this bear its sweet, soulful expression, this pattern is designed with beginner-friendly instructions in mind.
Materials & Abbreviations
Before you grab your hook, let’s gather the supplies needed to make this plush toy. Using the correct yarn weights ensures your bear turns out perfectly proportioned and super huggable.
Yarn Requirements
- Body & Limbs: Approx. 140 to 150 yards of Super Bulky (Category 6) plush chenille or velvet yarn (such as YarnArt Dolce, Bernat Velvet, or Premier Parfait Chunky) in a warm honey or light brown shade.
- Muzzle: Approx. 10 yards of Sport Weight (Category 2) cotton or semi-cotton yarn (such as YarnArt Jeans) in cream or off-white.
- Details: Small amounts of Sport Weight yarn in black/dark brown (for eyelashes, nose, and eyebrows) and white (for the eye whites).
Tools & Notions
- Main Crochet Hook: 3.0 mm (US Size C-2 or D-3) to keep stitches tight so fiberfill doesn’t peek through.
- Muzzle Crochet Hook: 2.0 mm (US Size B-1) for a clean, tight stitch on the cotton muzzle.
- Safety Eyes: One pair of 12 mm plastic safety eyes.
- Stuffing: Premium polyester fiberfill.
- Notions: Tapestry needle with a large eye, sharp scissors, and stitch markers to keep track of your rounds.
Crochet Abbreviations (US Terms)
- ch – chain
- MR – magic ring
- sc – single crochet
- inc – increase (work 2 single crochets into the same stitch)
- dec – invisible decrease (single crochet 2 stitches together using front loops only)
- sl st – slip stitch
- st(s) – stitch(es)
- rnd(s) – round(s)
Step-by-Step Instructions
This bear is constructed in pieces. First, we will crochet the arms and legs, which will then be seamlessly crocheted directly into the body. This clever design choice means less sewing for you at the end! After the body is completed, we will make the head, muzzle, ears, and tail.
Lower Paws (Legs) – Make 2
The legs start with a foundation chain to create an oval-shaped sole for the foot.
Chain 7. Starting in the second chain from your hook, work around both sides of the chain:
- Rnd 1: 1 inc, 4 sc, 3 sc into the last chain. Turning to work along the opposite side of the chain: 5 sc, 1 sc into the very first starting chain space (15 sts)
- Rnd 2: [inc] 3 times, 3 sc, [inc] 3 times, 3 sc, [inc] 3 times (24 sts)
- Rnd 3: [inc] 2 times, 10 sc, [inc] 2 times, 10 sc (28 sts)
- Rnds 4-6: 28 sc around (3 rounds)
- Rnd 7: 10 sc, [dec] 5 times, 8 sc (23 sts)
- Rnd 8: 9 sc, [dec] 5 times, 4 sc (18 sts)
- Rnd 9: 8 sc, [dec] 4 times, 2 sc (14 sts)
- Rnds 10-15: 14 sc around (6 rounds)
At the end of Round 15, work an additional 4 sc (these are shift stitches to align the fold of the leg). Stuff the foot firmly, but leave the upper half of the leg unstuffed so it sits nicely when attached.
Flatten the top edge of the leg and crochet through both layers together with 7 sc to close the opening. Chain 1, cut the yarn leaving a short tail, and pull it secure. Set both legs aside.
Upper Paws (Arms) – Make 2
We will work the arms in continuous rounds, stuffing only the lower portion.
- Rnd 1: 6 sc in MR (6 sts)
- Rnd 2: 6 inc (12 sts)
- Rnd 3: [1 sc, inc] 4 times, 4 sc (16 sts)
- Rnds 4-6: 16 sc around (3 rounds)
- Rnd 7: [dec] 2 times, 12 sc (14 sts)
- Rnd 8: 1 dec, 10 sc, 1 dec (12 sts)
- Rnd 9: 1 dec, 10 sc (11 sts)
- Rnds 10-12: 11 sc around (3 rounds)
Work an additional 2 sc shift stitches to align the fold. Stuff the lower half of the arm lightly. Flatten the top opening and crochet through both layers with 6 sc to seal the arm. Fasten off.
The Body
The body is worked from the bottom up. We will join the legs in Round 11 and the arms in Round 21. Remember to stuff the body firmly as you progress!
- Rnd 1: 6 sc in MR (6 sts)
- Rnd 2: 6 inc (12 sts)
- Rnd 3: [1 sc, inc] 6 times (18 sts)
- Rnd 4: [2 sc, inc] 6 times (24 sts)
- Rnd 5: [3 sc, inc] 6 times (30 sts)
- Rnd 6: [4 sc, inc] 6 times (36 sts)
- Rnd 7: [5 sc, inc] 6 times (42 sts)
- Rnd 8: [6 sc, inc] 6 times (48 sts)
- Rnds 9-10: 48 sc around (2 rounds)
- Rnd 11 (Leg Join): Join the first leg by crocheting through both the leg stitches and the body stitches together for 7 sc, work 17 sc along the body, join the second leg by crocheting through both the leg and body layers together for 7 sc, work 17 sc along the body (48 sts)
- Rnds 12-13: 48 sc around (2 rounds)
- Rnd 14: [14 sc, dec] 3 times (45 sts)
- Rnd 15: [13 sc, dec] 3 times (42 sts)
- Rnd 16: [12 sc, dec] 3 times (39 sts)
- Rnd 17: [11 sc, dec] 3 times (36 sts)
- Rnd 18: [10 sc, dec] 3 times (33 sts)
- Rnd 19: [9 sc, dec] 3 times (30 sts)
- Rnd 20: [8 sc, dec] 3 times (27 sts)
- Rnd 21 (Arm Join): 2 sc along the body, join the first arm by crocheting through both layers together for 6 sc, 1 dec, 5 sc, 1 dec, join the second arm by crocheting through both layers together for 6 sc, 2 sc, 1 dec (24 sts)
- Rnd 22: [2 sc, dec] 6 times (18 sts)
Slip stitch to the next stitch to finish the round. Fasten off, leaving a long yarn tail. We will use this tail later to sew the head securely to the body.
The Head
The head is crocheted as a separate sphere. Make sure to stuff the head very firmly, focusing on the bottom half, as this supports the face sculpting shape.
- Rnd 1: 6 sc in MR (6 sts)
- Rnd 2: 6 inc (12 sts)
- Rnd 3: [1 sc, inc] 6 times (18 sts)
- Rnd 4: [2 sc, inc] 6 times (24 sts)
- Rnd 5: [3 sc, inc] 6 times (30 sts)
- Rnd 6: [4 sc, inc] 6 times (36 sts)
- Rnd 7: [5 sc, inc] 6 times (42 sts)
- Rnd 8: [6 sc, inc] 6 times (48 sts)
- Rnds 9-17: 48 sc around (9 rounds)
Safety Eye Placement: Insert the 12 mm safety eyes between Rounds 13 and 14. Place them so there are 8 single crochet stitches between their center insertion points (which leaves about 6 visible stitches between the inner edges of the eyes once secured). Attach the safety washers firmly on the inside of the head.
- Rnd 18: [6 sc, dec] 6 times (42 sts)
- Rnd 19: [5 sc, dec] 6 times (36 sts)
- Rnd 20: [4 sc, dec] 6 times (30 sts)
- Rnd 21: [3 sc, dec] 6 times (24 sts)
- Rnd 22: [2 sc, dec] 6 times (18 sts)
Slip stitch to finish. Fasten off and weave in your loose end. Fill the head with fiberfill, smoothing out any lumps.
Ears – Make 2
The ears do not require stuffing.
- Rnd 1: 6 sc in MR (6 sts)
- Rnd 2: 6 inc (12 sts)
- Rnd 3: [1 sc, inc] 6 times (18 sts)
- Rnd 4: 18 sc around (18 sts)
Fold each ear flat and single crochet through both thicknesses across the opening (8 sc) to close. Fasten off, leaving a long tail to sew them onto the head.
Muzzle
Using your 2.0 mm hook and the cream-colored cotton or semi-cotton yarn:
- Rnd 1: 6 sc in MR (6 sts)
- Rnd 2: 6 inc (12 sts)
- Rnd 3: [1 sc, inc] 6 times (18 sts)
- Rnd 4: [2 sc, inc] 6 times (24 sts)
- Rnd 5: [3 sc, inc] 6 times (30 sts)
- Rnd 6: [4 sc, inc] 6 times (36 sts)
Work 1 additional sc, then slip stitch to finish. Fasten off, leaving a long yarn tail for sewing.
Tail
- Rnd 1: 6 sc in MR (6 sts)
- Rnd 2: [2 sc, inc] 2 times (8 sts)
Slip stitch to the first stitch. Fasten off, leaving a long sewing tail.
Finishing & Assembly
Now that all the individual components are ready, it is time to assemble your plush teddy bear and bring its cute personality to life!
Step 1: Attach the Head to the Body
Thread your tapestry needle with the long yarn tail left on the body. Align the head centered over the body opening. Sew the head to the body stitch-by-stitch, keeping your tension tight and even. Add a little extra stuffing to the neck area right before closing the seam to prevent the head from wobbling.
Step 2: Sew on the Muzzle
Position the muzzle on the front of the face, centered horizontally directly below the eyes. The top edge of the muzzle should sit right between the eyes. Pin it in place. Sew around the outer edge of the muzzle. Right before you finish sewing, stuff a small amount of fiberfill behind the muzzle to give it a soft, rounded shape, then finish sewing and weave in your ends.
Step 3: Face Sculpting (Soft Indentation)
To give your bear a professional, sweet look, perform a simple eye indentation. Thread your needle with a strong, matching piece of yarn or thread. Insert the needle from the base of the neck, bring it out at the outer corner of the left eye, insert it one stitch over, and bring it back down to the neck base. Pull gently to sink the eye slightly inward. Repeat the process for the right eye. Tie the two thread ends securely at the neck base and bury the knot inside the head.
Step 4: Embroidery & Details
- Eyes: Thread your white yarn and embroider a thin semi-circle along the outer edge of each safety eye to create a bright highlight. With thin black yarn, embroider sweet, sleepy eyelashes on the outer corners.
- Nose: Using brown yarn, embroider a triangle nose on the top-center of the muzzle, filling it in with horizontal satin stitches. Embroider a vertical line from the bottom point of the nose down to the bottom of the muzzle.
- Eyebrows: Embroider two small, slightly slanted eyebrows a few rounds above the eyes.
Step 5: Attach the Ears and Tail
- Ears: Position the ears on the sides of the head between Rounds 5 and 10. Sew them securely in a slightly curved shape to give them a natural look.
- Tail: Stuff the tiny tail lightly with fiberfill and sew it to the back of the body between Rounds 10 and 11.
Crochet Tips for Plush Yarn
Working with plush velvet chenille yarn can sometimes be a little tricky if you are used to traditional wool or acrylic. Keep these quick tips in mind to make your project a complete success:
- Mark Your Rounds: It can be very difficult to see individual stitches in plush yarn. Always use a stitch marker in the first stitch of every round to avoid losing your place.
- Avoid Shedding: Chenille yarn tends to shed at the cut ends. To prevent this, singe the cut tail lightly with a lighter, or tie a small, tight knot at the very end of the yarn tail.
- Keep Stitches Tight: If your stitches feel loose, drop down a hook size. Amigurumi requires a dense fabric so the stuffing stays hidden inside the toy.
Your beautiful, plush teddy bear is now complete and ready for endless snuggles! Happy crocheting!