Adorable Plush Pig with Floral Cardigan: Free Amigurumi Crochet Pattern
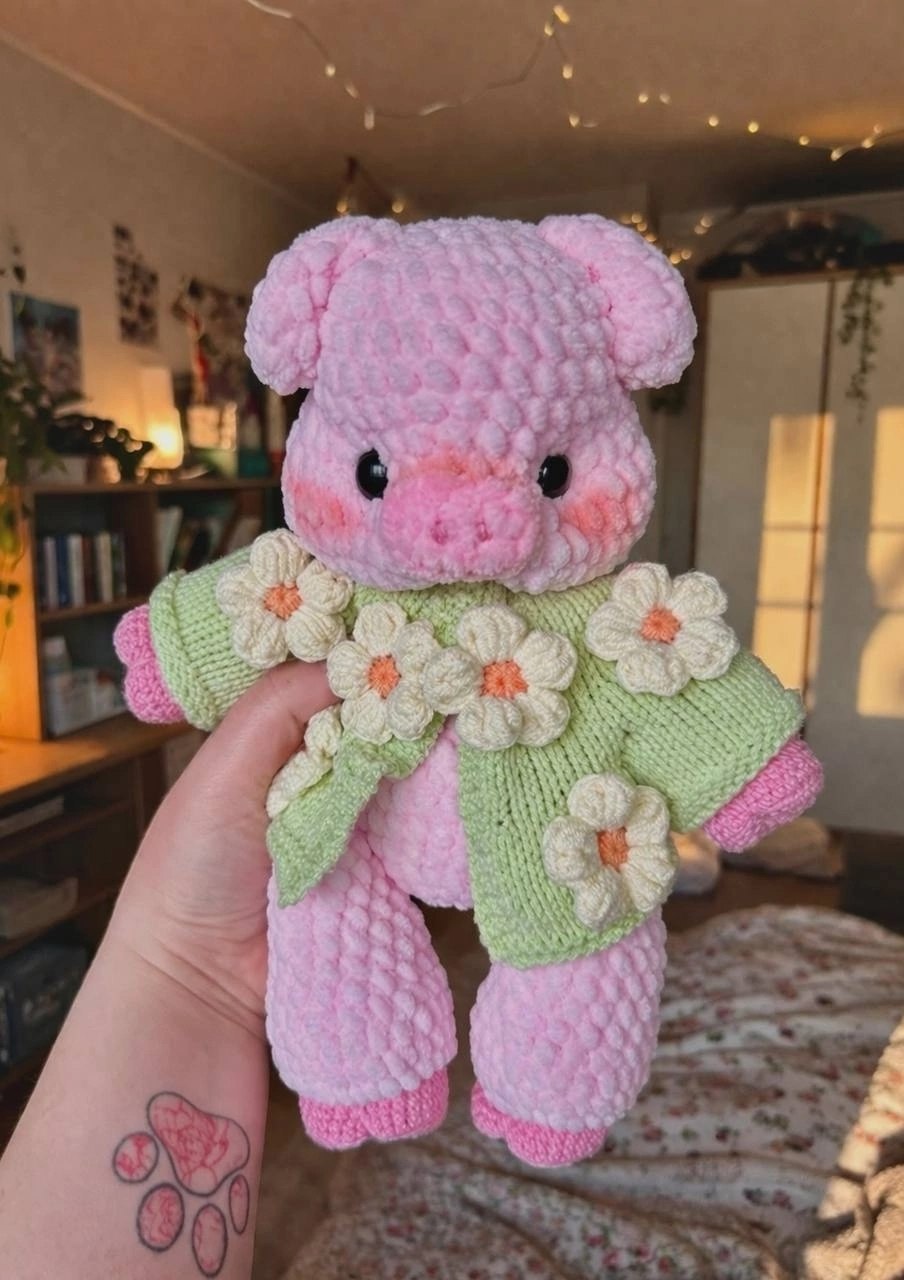
Looking for your next cozy crochet project? This sweet, chunky plush pig is the perfect blend of “cottagecore” aesthetics and cuddly comfort. With its velvety texture and a tiny hand-knit cardigan adorned with daisies, this little piglet is sure to become a favorite in any collection. Whether you are looking to make a gift for a loved one or a treat for yourself, this detailed tutorial will walk you through every stitch.
This project is a mixed-media piece, combining crochet for the pig and a touch of knitting for the adorable outfit. While the plush yarn makes the project move quickly, some of the details require a bit of patience and precision, making it a wonderful challenge for intermediate makers.
Materials & Abbreviations
Supplies You Will Need
- Plush Yarn (Chenille/Velvet): Light pink for the body, and a slightly darker pink for the snout.
- Cotton Blend Yarn (Sport or DK weight): Pink for the hooves, light green for the cardigan, and white and yellow/orange for the daisies.
- Crochet Hooks: 5.5mm (for the plush body) and 2.75mm (for the cotton details). Tip: Use a 4mm and 2mm hook if you prefer a tighter tension.
- Knitting Needles: 3mm circular needles for the cardigan body and 3.5mm needles for the sleeves.
- Safety Eyes: 14mm or 16mm black eyes.
- Other Essentials: Polyester fiberfill stuffing, yarn needle, scissors, stitch markers, and a hot glue gun for the flowers.
US Crochet Terms
- MR: Magic Ring
- ch: Chain
- sc: Single Crochet
- hdc: Half Double Crochet
- inc: Increase (2 sc in one stitch)
- dec: Decrease (sc 2 together)
- BLO: Back Loop Only
- sl st: Slip Stitch
Knitting Terms
- k: Knit
- p: Purl
- yo: Yarn Over
- m1a: Make one increase (picked up stitch)
Step-by-Step Instructions
The Head
Use the 5.5mm hook and light pink plush yarn.
- Round 1: 8 sc in MR (8)
- Round 2: 8 inc (16)
- Round 3: (1 sc, inc) x 8 (24)
- Round 4: (3 sc, inc) x 6 (30)
- Rounds 5-9: sc in each stitch around (30)
- Round 10: 7 sc, 3 inc hdc, 10 sc, 3 inc hdc, 7 sc (36)
- Round 11: 7 sc, (1 sc, inc) x 3, 10 sc, (1 sc, inc) x 3, 7 sc (42)
- Rounds 12-13: sc in each stitch around (42)
- Round 14: (5 sc, dec) x 6 (36)
- Round 15: (4 sc, dec) x 6 (30)
- Round 16: (3 sc, dec) x 6 (24)
Eye Placement: Insert safety eyes between Rounds 10 and 11, spaced 6 stitches apart.
- Round 17: (2 sc, dec) x 6 (18) — Begin stuffing the head firmly, paying extra attention to the cheeks to make them plump.
- Round 18: (1 sc, dec) x 6 (12)
Fasten off. Secure the yarn with a chain stitch and trim. I recommend using a cotton thread for sewing the head to the body, as plush yarn can sometimes fray.
The Ears (Make 2)
Use the 5.5mm hook and light pink plush yarn.
- Round 1: 6 sc in MR (6)
- Round 2: (1 sc, inc) x 3 (9)
- Round 3: (2 sc, inc) x 3 (12)
- Round 4: (3 sc, inc) x 3 (15)
- Round 5: sc in each stitch around (15)
- Round 6: (4 sc, inc) x 3 (18)
- Round 7: sc in each stitch around (18)
Flatten the ear and sc across the top opening (9 sc) to close. Fasten off, leaving a short tail for sewing.
The Snout
Use a smaller hook (2.75mm) and darker pink plush yarn.
- Row 1: ch 4
- Row 2: In 2nd ch from hook: inc, 1 sc, 4 sc in the next stitch, 1 sc, inc (9)
Fasten off. Use a darker pink cotton thread to embroider two small nostrils in the center of the snout. Sew the snout centered between the eyes.
The Tail
Use the 5.5mm hook and light pink plush yarn.
- Row 1: ch 10
- Row 2: In 2nd ch from hook: 3 hdc in each stitch until the last stitch; 2 hdc in the final stitch.
Fasten off, leaving about 4 inches for sewing. Attach the tail to the back of the body between Rounds 5 and 6.
The Legs (Make 2)
Start with the 2.75mm hook and pink cotton blend yarn.
- Round 1: 8 sc in MR (8)
- Round 2: 8 inc (16)
- Round 3: (1 sc, inc) x 8 (24)
- Round 4: (3 sc, inc) x 6 (30)
- Round 5: (4 sc, inc) x 6 (36)
- Round 6: BLO sc in each stitch around (36)
- Round 7: (4 sc, dec) x 6 (30)
- Rounds 8-10: sc in each stitch around (30)
Transition to Plush: Switch to light pink plush yarn. Work Round 11 with the smaller 2.75mm hook to ensure the plush yarn fits into the cotton stitches. Then, switch to the 5.5mm hook.
- Round 11: sc in each stitch around (30)
- Round 12: (3 sc, dec) x 6 (24)
- Round 13: sc in each stitch around (24)
- Round 14: (2 sc, dec) x 6 (18) — Start stuffing the leg.
- Rounds 15-17: sc in each stitch around (18)
- Round 18: (4 sc, dec) x 3 (15)
- Rounds 19-21: sc in each stitch around (15)
- Round 22: (3 sc, dec) x 3 (12)
- Round 23: sc in each stitch around (12)
Flatten the leg and sc across the opening (6 sc) to close. Fasten off.
The Arms (Make 2)
Start with the 2.75mm hook and pink cotton blend yarn.
- Round 1: 8 sc in MR (8)
- Round 2: 8 inc (16)
- Round 3: (1 sc, inc) x 8 (24)
- Round 4: (3 sc, inc) x 6 (30)
- Round 5: BLO sc in each stitch around (30)
- Round 6: (3 sc, dec) x 6 (24)
- Rounds 7-9: sc in each stitch around (24)
Switch to plush yarn (use small hook for Round 10, then large hook for the rest).
- Round 10: sc in each stitch around (24)
- Round 11: (2 sc, dec) x 6 (18)
- Rounds 12-14: sc in each stitch around (18)
- Round 15: (4 sc, dec) x 3 (15)
- Rounds 16-18: sc in each stitch around (15)
- Round 19: (3 sc, dec) x 3 (12)
Flatten and sc across (6 sc). Fasten off.
The Body
Use the 5.5mm hook and light pink plush yarn.
- Round 1: 8 sc in MR (8)
- Round 2: 8 inc (16)
- Round 3: (1 sc, inc) x 8 (24)
- Round 4: (3 sc, inc) x 6 (30)
- Round 5: (4 sc, inc) x 6 (36)
- Rounds 6-9: sc in each stitch around (36)
- Round 10 (Attaching Legs): 8 sc, 6 sc joined with leg 1, 8 sc, 6 sc joined with leg 2, 8 sc (36)
- Round 11: 10 sc, (dec, 5 sc) x 3, 5 sc (33)
- Round 12: 10 sc, (dec, 4 sc) x 3, 5 sc (30)
- Round 13: 9 sc, (dec, 3 sc) x 3, 6 sc (27)
- Round 14: 6 sc, dec, 11 sc, dec, 6 sc (25) — Begin stuffing the body.
- Round 15: 5 sc, dec, 11 sc, dec, 5 sc (23)
- Round 16: 5 sc, dec, 10 sc, dec, 4 sc (21)
- Round 17: 4 sc, dec, 10 sc, dec, 3 sc (19)
- Round 18: 9 sc, dec, 8 sc (18)
- Round 19: (1 sc, dec) x 6 (12)
Fasten off and weave in ends.
Finishing
Face Sculpting & Assembly
To give the pig a professional look, we will “sculpt” the face using a yarn needle and matching thread. Pull the thread from the bottom of the muzzle up toward the forehead, and from the sides of the muzzle toward the eyes. This creates a cute dip under the snout and a more defined face shape. Be careful not to pull too hard to avoid tearing the plush yarn.
Sew the ears at an angle relative to the eyes. Attach the arms between Rounds 18 and 19 of the body, spaced about 4 stitches apart. Finally, sew the head to the body, ensuring it is centered.
The Cardigan (Knitting)
Cast on 50 stitches using 3mm needles. We will work in rows.
- Rows 1-5: k3, (k2, p2) x 11, k3.
- Row 6: k3, (k2, yo, k2) x 11, k3 (61 sts).
- Row 7: k3, purl to last 3 sts, k3.
- Row 8: knit all.
- Row 9: k3, purl to last 3 sts, k3.
- Row 10: knit all.
- Row 11: k3, purl to last 3 sts, k3.
- Row 12: k3, (k2, yo, k3) x 11, k3 (72 sts).
- Row 13: k3, purl to last 3 sts, k3.
- Row 14: knit all.
- Row 15: k3, purl to last 3 sts, k3.
- Row 16: knit all.
- Row 17: k3, purl to last 3 sts, k3.
- Row 18: k3, (k2, yo, k4) x 11, k3 (83 sts).
- Rows 19-23: Repeat the purl/knit pattern (R19, 21, 23 purl; R20, 22 knit).
- Row 24: k12, place 20 sts on a holder, m1a 10 sts, k20, place 20 sts on a holder, m1a 10 sts, k11.
- Row 25: k3, purl to last 3 sts, k3.
- Row 26: k3, (k1, yo, k2) x 19, k3 (82 sts).
- Row 27: k3, purl to last 3 sts, k3.
- Row 28-35: Repeat purl/knit pattern.
- Rows 36-39: Knit all rows. Bind off.
Sleeves: Pick up the 20 held stitches from each armhole. Add a few stitches at the top and 10 at the underarm (approx 34 sts total). Work 8-10 rows in stockinette stitch. Purl the last 3 rows and bind off.
The Daisy Decorations (Make 6)
Center: With yellow yarn and a small hook, work 10 sc in MR, pull tight, and sl st to close.
Petals: Join white yarn. ch 3, in 1st ch: work 4 dc (keeping the last loop of each dc on the hook, total 5 loops), pull through all loops. ch 1. Repeat this in the next stitch. Repeat 8 more times to create 5 petals. sl st to 2nd ch. Fasten off.
Use hot glue to attach the daisies randomly to the cardigan.
Tips for Success
- Dealing with Plush Yarn: Plush yarn can be tricky to see. Use a stitch marker at the start of every round so you don’t lose your place.
- Perfecting the Hooves: To create the split-hoof look, use a needle and matching cotton thread to sew a line from the center of the foot (between R1 and R2) up to the middle (between R10 and R11). Pull firmly to create a distinct indentation.
- Steam Your Cardigan: Once the cardigan is finished, you can lightly steam it with an iron (without touching the fabric) to make the stitches lie flat and look more polished.
- Adding Blush: Use a small brush and a bit of dry pink pastel or actual makeup blush to add soft color to the pig’s cheeks for extra cuteness.