How to Crochet a Mini Albert Einstein: Free Amigurumi Pattern
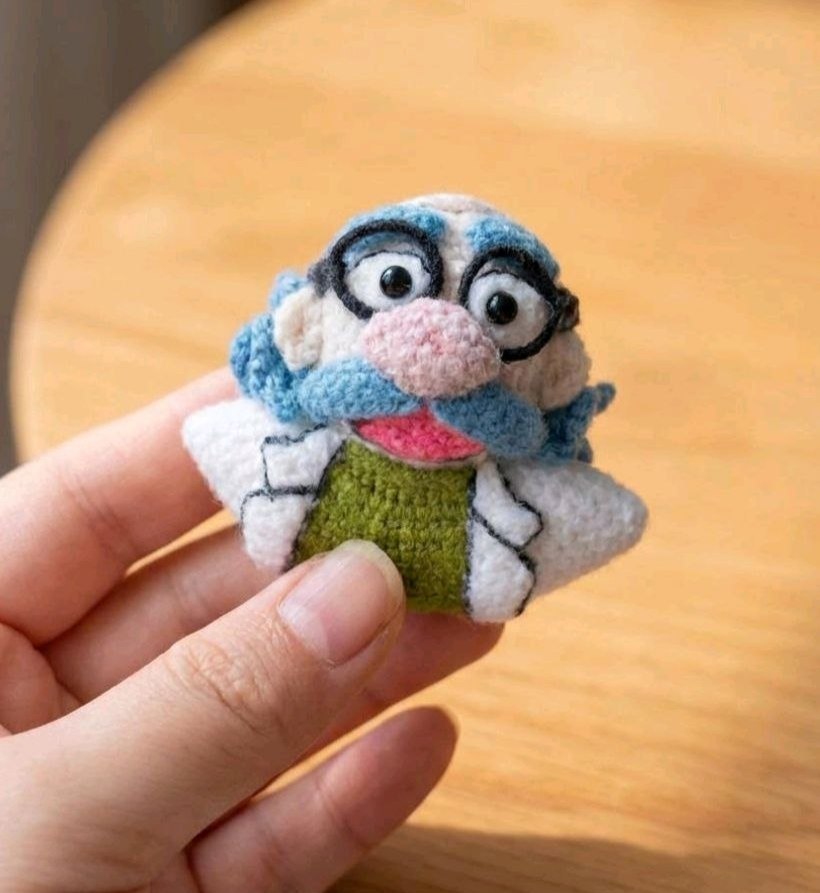
Looking for a fun, quirky, and slightly intellectual addition to your crochet collection? Meet the Mini Albert Einstein! This adorable amigurumi project captures the essence of the world’s most famous physicist—complete with his iconic wild hair and signature mustache—in a tiny, pocket-sized form. Whether you are looking for a unique gift for a science teacher, a student, or just want a genius little buddy to sit on your desk, this pattern is the perfect project.
This project is beginner-friendly and works up quickly, making it an ideal “one-sitting” craft. We will be using basic amigurumi techniques to create a rounded body and adding detailed accents to give our little genius his characteristic look. Let’s grab our hooks and get started!
Materials & Abbreviations
To create your Mini Einstein, you will need the following materials. Since this is a small project, you can use leftover scrap yarn from your stash!
Materials Needed
- Yarn: Medium weight (4) cotton or acrylic yarn in the following colors:
- Skin Tone (for the face and nose)
- White (for the lab coat/body)
- Grey-Blue (for the hair, mustache, and eyebrows)
- Red (for the mouth)
- Black (for the suit details)
- Crochet Hook: 3.0mm or 3.25mm (use a size smaller than recommended on your yarn label to ensure tight stitches so stuffing doesn’t show).
- Safety Eyes: 6mm black safety eyes (or black embroidery thread).
- Stuffing: Polyester fiberfill.
- Tools: Tapestry needle, scissors, and stitch markers.
Abbreviations (US Terms)
- MR: Magic Ring
- sc: Single crochet
- inc: Increase (2 sc in one stitch)
- dec: Decrease (invisible decrease preferred)
- hdc: Half double crochet
- ch: Chain
- sl st: Slip stitch
- BLO: Back loop only
- FLO: Front loop only
- st: Stitch
Step-by-Step Instructions
Body and Head
The body and head are worked as one continuous piece to create a seamless, rounded shape. Start with your primary skin tone color.
- Round 1: Create a MR and work 5 sc into the ring. (5 sts)
- Round 2: Inc in every stitch around. (10 sts)
- Round 3: (1 sc, inc) repeat 5 times. (15 sts)
- Round 4: (2 sc, inc) repeat 5 times. (20 sts)
- Round 5: (3 sc, inc) repeat 5 times. (25 sts)
- Rounds 6-7: sc in each stitch around. (25 sts)
- Round 8: 8 sc, (1 sc, dec) repeat 3 times, 8 sc. (22 sts)
- Round 9: sc in each stitch around. (22 sts)
- Round 10: 8 sc, (1 sc, dec) repeat 2 times, 8 sc. (20 sts)
Color Change: Switch to black yarn for the following rounds to represent the suit.
- Round 11: sc in each stitch around. (20 sts)
- Round 12: 2 sc, (2 sc, dec) repeat 4 times, 2 sc. (16 sts). Note: This is the round where you will crochet the arms into the body.
Fasten off and leave a long tail for sewing. Stuff the head and body firmly with fiberfill.
The Arms (Make 2)
Use the skin tone color for the arms.
- Round 1: Create a MR and work 6 sc into the ring. (6 sts)
- Round 2: Inc in every stitch around. (12 sts)
- Round 3: sc in each stitch around. (12 sts)
- Round 4: 3 sc, 3 dec, 3 sc. (9 sts)
- Round 5: sc in each stitch around. (9 sts)
- Round 6: (1 sc, dec) repeat 3 times. (6 sts)
Fasten off, leaving a tail for sewing. Do not stuff the arms heavily; a light stuffing or leaving them flat works best for this scale.
The Eyes (Make 2)
Use white yarn for the eye bases.
- Round 1: Create a MR, work 2 sc, 2 hdc, 2 sc, 2 hdc. Sl st to join.
Fasten off. You can either place a small safety eye in the center or embroider a black pupil using a needle and thread.
The Nose
Use the skin tone color.
- Round 1: Create a MR and work 6 sc into the ring. (6 sts)
- Round 2: Inc in every stitch around. (12 sts)
- Round 3: 2 sc, ch 4, skip 2 sts, 2 sc, ch 4, skip 2 sts. Sl st to join.
This creates a slightly flattened oval shape. Fasten off and leave a tail for sewing.
The Mustache (Make 2)
Use the grey-blue yarn.
- Row 1: Ch 8. Turn, sc in 2nd ch from hook and in each ch across. (7 sts)
- Row 2: Ch 1, turn, sc in each stitch across. (7 sts)
Fasten off, leaving a tail for sewing.
The Eyebrows (Make 2)
Use the grey-blue yarn.
- Row 1: Ch 6. Turn, 2 sl st, 2 sc, 1 sl st.
Fasten off, leaving a tail.
The Mouth
Use the red yarn.
- Round 1: Create a MR, work 2 sc, 1 hdc, 2 sc, 1 hdc. (6 sts)
- Round 2: 2 inc, (hdc, inc), 2 inc, (hdc, inc). (12 sts)
- Round 3: 4 sc, (2 hdc, inc) repeat 2 times, 4 sc, (2 hdc, inc) repeat 2 times. (16 sts)
Fasten off, leaving a tail.
The Ears (Make 2)
Use the skin tone color.
- Round 1: Ch 4. In the same chain: inc, 1 hdc, inc, 1 hdc.
Fasten off, leaving a tail.
The Iconic Hair
Use the grey-blue yarn. This piece is worked as a flat rectangle and then textured to look “wild.”
- Row 1: Ch 20. Starting from the 2nd ch from hook, work 19 sc.
- Rows 2-4: sc in the BLO of each stitch across. (19 sts)
- Row 5 (The Fringe): Turn, working in the BLO: (Ch 10, sl st in the next st) repeat 19 times.
- Row 6 (Adding Volume): Go back to the FLO of Row 4: (Ch 8, sl st in the next st) repeat 19 times.
Fasten off and leave a tail for sewing.
Finishing
Now comes the assembly! The way you place the features will determine the expression of your Einstein.
- Eyes and Brows: Sew the white eye bases onto the face. If you aren’t using safety eyes, embroider the pupils now. Place the grey-blue eyebrows slightly angled above the eyes to give him a thoughtful look.
- Nose and Mouth: Sew the nose in the center of the face. Attach the red mouth directly underneath the nose.
- Mustache: Attach the two mustache pieces on either side of the mouth, curving them slightly outward.
- Ears: Sew the ears to the sides of the head.
- Arms: Sew the arms to the sides of the body at Round 12.
- Hair: Place the hair piece on top of the head. Sew it securely, allowing the “fringe” to hang down naturally over the forehead and sides.
Tips for Success
Perfecting the Shape: When working on the head, make sure your stuffing is even. Use your finger to push the stuffing into the curves so the head remains round and doesn’t flatten at the bottom.
Tension Matters: Since this is a small amigurumi, loose stitches can lead to “holes” where the stuffing peeks through. Keep your tension consistent and tight. If you see gaps, try dropping down half a hook size.
Customizing Your Genius: Feel free to experiment with the hair! You can make the chains in Row 5 and 6 longer if you want Einstein’s hair to be even more chaotic and wild.
Invisible Decreases: To keep the face smooth, always use the invisible decrease method (working into the front loops only of the next two stitches) instead of a standard decrease.