Adorable Amigurumi Bunny Crochet Pattern: A Step-by-Step DIY Guide
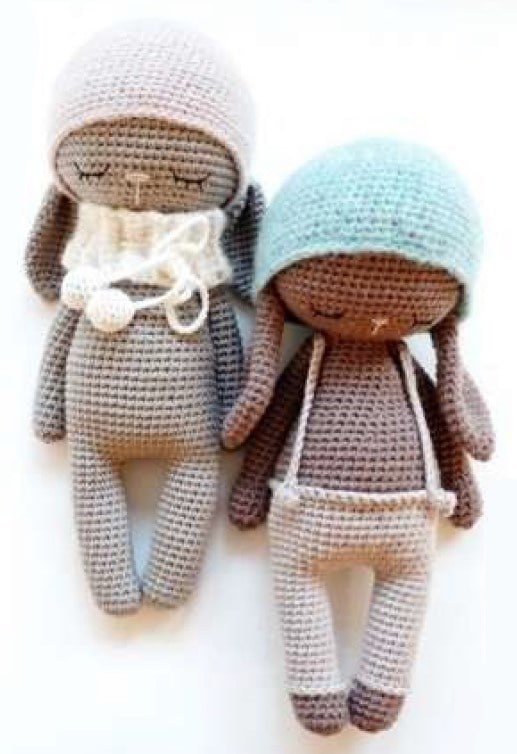
Are you looking for your next cozy crochet project? Look no further! This adorable amigurumi bunny, featuring a sweet sleeping expression and cozy accessories, is the perfect project for anyone wanting to create a heartwarming gift or a charming addition to a nursery shelf. Whether you are making a classic bunny with a scarf or a trendy version in little pants, this pattern is designed to be engaging and fun.
This tutorial is perfect for intermediate beginners who are comfortable with basic amigurumi techniques like working in the round and increasing/decreasing. Grab your favorite soft yarns, and let’s get stitching!
Materials & Abbreviations
To achieve the soft, high-quality look seen in the photos, I recommend using premium cotton and fluffy blends. Below is a comprehensive list of what you will need.
Yarn Requirements
- Body Yarn: 1-2 skeins of a smooth cotton yarn (such as Schachenmayr Catania or any similar DK weight organic cotton).
- Accessory Yarn (Hat & Scarf): 1 skein of a fluffy, brushed yarn (such as Drops Alpaka Silk Brushed, Katia Catena Merino, or a similar mohair/alpaca blend).
- Alternative Pants Version: If you choose to make the pants version, have an additional color of cotton yarn ready.
Tools & Notions
- Crochet Hooks: 2.5 mm (for the body) and 3 mm (for the hat and scarf).
- Stuffing: High-quality polyester fiberfill.
- Embroidery Thread: Black and pink thread for the facial features.
- Eye Details: Optional 12 mm wooden beads if you prefer to wrap them for the scarf pompoms.
- Other: A tapestry needle, stitch markers, and scissors.
Abbreviations (US Terms)
- MR: Magic Ring
- SC: Single Crochet
- INC: Increase (2 sc in one stitch)
- DEC: Decrease (sc 2 together)
- HDC: Half Double Crochet
- CH: Chain
- BLO: Back Loops Only
- ST(s): Stitch(es)
Step-by-Step Instructions
The Head
Working in a continuous spiral, use your 2.5 mm hook and body yarn.
- MR, 6 sc (6)
- 6 INC (12)
- (1 sc, 1 INC) x 6 (18)
- (2 sc, 1 INC) x 6 (24)
- (3 sc, 1 INC) x 6 (30)
- (4 sc, 1 INC) x 6 (36)
- (5 sc, 1 INC) x 6 (42)
- (6 sc, 1 INC) x 6 (48)
- 48 sc (48)
- (7 sc, 1 INC) x 6 (54)
- (8 sc, 1 INC) x 6 (60)
- (9 sc, 1 INC) x 6 (66)
- Rows 13–23: 66 sc (11 rows total)
- (9 sc, 1 DEC) x 6 (60)
- (8 sc, 1 DEC) x 6 (54)
- (7 sc, 1 DEC) x 6 (48)
- (6 sc, 1 DEC) x 6 (42)
- (5 sc, 1 DEC) x 6 (36)
- (4 sc, 1 DEC) x 6 (30)
- (3 sc, 1 DEC) x 6 (24)
- (2 sc, 1 DEC) x 6 (18)
Finish with one HDC, stuff the head firmly with fiberfill, and leave a long tail for sewing to the body later.
The Legs and Body
We will start with the legs to ensure the body connects correctly.
First Leg
Use your 2.5 mm hook and body yarn. Working in a spiral:
- MR, 8 sc (8)
- 8 INC (16)
- 16 sc (16)
- 16 sc (16)
- The Bend: 2 sc, 1 DEC, 6 sc, 1 INC, 5 sc (16). Note: To create the leg’s curve, ensure your decreases are on the inner side of the leg and increases are on the outer side.
- 16 sc (16)
- 2 sc, 1 DEC, 6 sc, 1 INC, 5 sc (16)
- Rows 8–19: 16 sc (12 rows)
Finish with one HDC, fasten off, and weave in your ends.
Second Leg
Repeat the instructions for the first leg up to row 19. Crucial Tip: Do not fasten off! Instead, work 4 sc extra after row 19 to keep both legs in the correct position for joining. Stuff both legs firmly.
Connecting the Body
Hold the first leg in position. Create a chain of 6 sc (ch 6) and join it to the first leg with 1 sc.
- Work 15 sc around the first leg.
- Work 6 sc across the ch-6 join.
- Work 16 sc around the second leg.
- Work 6 sc across the other side of the ch-6 join.
You should have 44 stitches total. Place a stitch marker in the first stitch of the next row. Stuff the body as you go; since this is a long body, stuffing it all at once can lead to lumps!
- Rows 21–33: 44 sc (13 rows)
- 9 sc, 1 DEC, 20 sc, 1 DEC, 11 sc (42)
- 42 sc (42)
- (5 sc, 1 DEC) x 6 (36)
- 36 sc (36)
- 36 sc (36)
- (4 sc, 1 DEC) x 6 (30)
- 30 sc (30)
- 30 sc (30)
- (8 sc, 1 DEC) x 3 (27)
- 27 sc (27)
- 27 sc (27)
- (7 sc, 1 DEC) x 3 (24)
- 24 sc (24)
- (2 sc, 1 DEC) x 6 (18)
- 18 sc (18)
- Work approximately 11 more sc to finish the back of the torso. Finish with 1 HDC, fasten off, and weave in ends.
Variation: The “Pants” Look
If you want to make the bunny in pants, follow the Leg and Body instructions above with these changes:
- After row 5, switch your main yarn color to your “pants” color.
- In row 7, work only in the Back Loops Only (BLO).
- In row 30, switch back to the body color, working in BLO to create a waistband.
- After finishing the body, go back to row 30, turn the body upside down, and work 44 sc through the front loops only to create the waistband. Repeat this on the legs.
Arms (Make 2)
Using the 2.5 mm hook and body yarn:
- MR, 6 sc (6)
- 6 INC (12)
- Rows 3–6: 12 sc (4 rows)
- 2 DEC, 8 sc (10)
- Rows 8–25: 10 sc (18 rows)
Stuff the bottom third of the arm very firmly, the middle more loosely, and leave the last 1-2 cm empty. To close, fold the opening in half and work 4 sc through both layers. Leave a long tail for sewing.
Ears (Choose one option)
Option 1: Small Ears (Sewn to Hat)
- MR, 6 sc (6)
- 6 sc (6)
- 6 INC (12)
- 12 sc (12)
- (1 sc, 1 INC) x 6 (18)
- Rows 6–16: 18 sc (11 rows)
- (1 sc, 1 DEC) x 6 (12)
Finish with 1 HDC, fasten off, leave a tail, and sew the middle of the ear shut with a few stitches.
Option 2: Longer Ears (Under the Hat)
- MR, 6 sc (6)
- (1 sc, 1 INC) x 3 (9)
- (2 sc, 1 INC) x 3 (12)
- (3 sc, 1 INC) x 3 (15)
- (4 sc, 1 INC) x 3 (18)
- (5 sc, 1 INC) x 3 (21)
- Rows 7–9: 21 sc (3 rows)
- (5 sc, 1 DEC) x 3 (18)
- Rows 11–20: 12 sc (10 rows)
Finish with 1 HDC and leave a long tail.
Hat and Accessories
The Hat
Use the 3 mm hook and fluffy accessory yarn.
- MR, 6 sc (6)
- 6 INC (12)
- (1 sc, 1 INC) x 6 (18)
- (2 sc, 1 INC) x 6 (24)
- (3 sc, 1 INC) x 6 (30)
- (4 sc, 1 INC) x 6 (36)
- (5 sc, 1 INC) x 6 (42)
- (6 sc, 1 INC) x 6 (48)
- (7 sc, 1 INC) x 6 (54)
- (8 sc, 1 INC) x 6 (60)
- (9 sc, 1 INC) x 6 (66)
- Rows 12–27: 66 sc (16 rows)
- (9 sc, 1 DEC) x 6 (60)
Finish with 1 HDC and fasten off. Tip: If the hat feels too wide, add one more row of (8 sc, 1 DEC) x 6.
The Scarf & Cord
Scarf: Work in rows (not a spiral). Chain 7 + 1. For 34 rows, work 7 sc in BLO. Join the two ends together with 7 HDC to create a loop. Fasten off.
Cord: Chain approximately 60. Attach to the scarf. Attach two small pompoms to the ends. You can make these by wrapping yarn around a 12mm bead or by stuffing a small crocheted sphere.
Finishing
Assembly
First, sew the head onto the body. Pro-Tip: Stuff the neck area extra firmly to ensure the head doesn’t wobble!
Next, sew the arms directly underneath the head. If using Option 1 for ears, put the hat on first, embroider the eyes, and then sew the ears to the hat at approximately the same level as the eyes (around row 21 of the hat).
Face Decoration
This is where your bunny comes to life!
- Eyes: Embroider “sleeping eyes” between rows 22 and 23 of the head. Each eye should be 6 sc long. Leave a gap of 7 sc between the eyes. Add three small eyelashes below each eye.
- Nose: Using pink thread, embroider a tiny nose between the eyes at the same height as the eyes. Make it 2-3 sc wide horizontally, then add a small vertical line 4 rows downward.
- Cheeks: For an extra touch of cuteness, use a bit of light pink blush or eye shadow to tint the cheeks!
Tips for Success
- Tension is Key: For amigurumi, keep your stitches tight so the stuffing doesn’t show through the holes.
- Use Stitch Markers: Since amigurumi is worked in a continuous spiral, it is very easy to lose your place. Always use a marker!
- Embroidering First: I recommend putting the hat on and pinning the ears in place before you embroider the eyes. This helps you get the proportions just right.