Cute Crochet Ghost Pattern with Mini Pumpkins: A Spooky and Sweet Amigurumi Tutorial
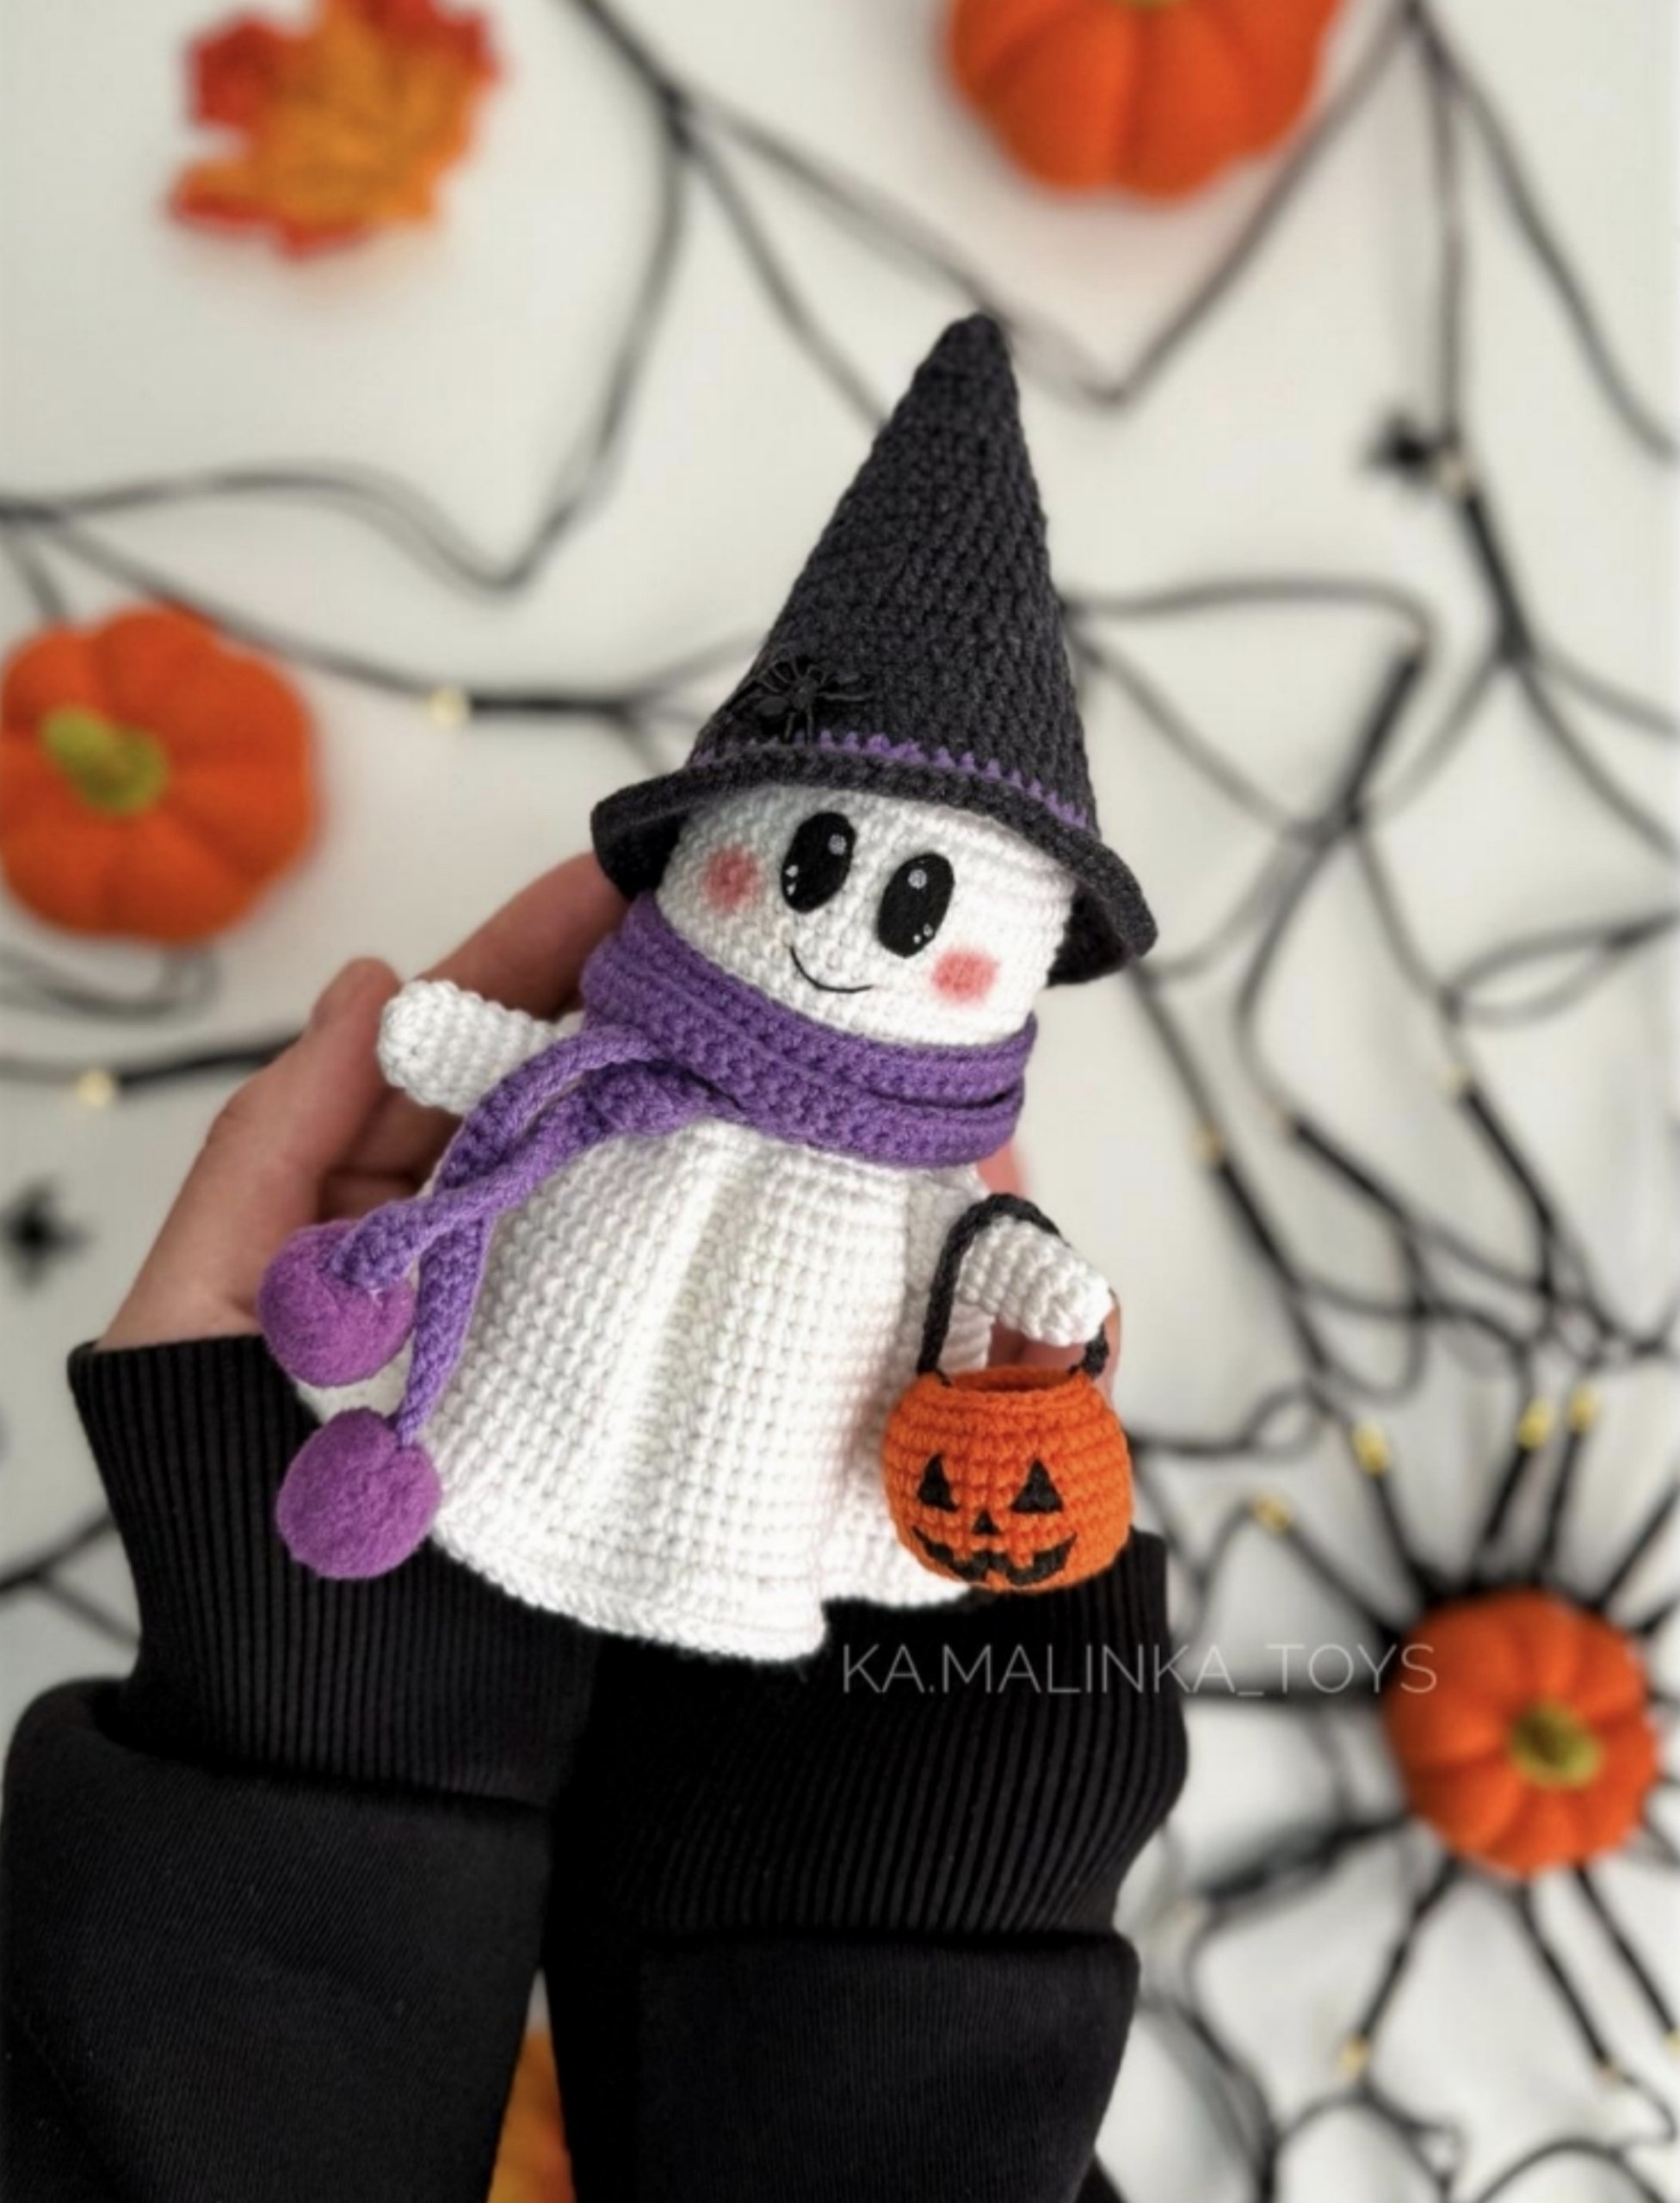
Are you looking for the perfect Halloween crochet project? Whether you want to decorate your mantle, create a spooky gift for a friend, or just enjoy the cozy vibes of the autumn season, this cute crochet ghost pattern is for you! This adorable little spirit comes complete with a tiny witch hat, a cozy purple scarf, and even its own little pumpkin basket. This pattern is designed to create a finished piece approximately 4.7 inches tall, making it the perfect size for shelf decor or a tabletop companion.
This project is a wonderful way to practice intermediate techniques like working in the front and back loops to create ruffles, making it a great step up for those looking to move beyond basic amigurumi. Follow along this step-by-step guide to bring your own little ghost to life!
Materials & Abbreviations
Materials Needed
To ensure your ghost turns out just as cute as the one in the photos, you will need the following supplies. Note that yarn amounts may vary depending on your tension, so it is always a good idea to have a little extra on hand.
- Yarn (Cotton/Acrylic blend recommended):
- White (approx. 1 skein)
- Graphite/Dark Grey (small amount)
- Purple (small amount)
- Orange (for pumpkins)
- Yellow (for hat buckle and pumpkin details)
- Green (for pumpkin stems)
- Crochet Hook: 2.0 mm (or size needed to achieve a tight tension)
- Stuffing: Fiberfill or similar polyfill
- Face Details: Black felt or black fabric paint, white fabric paint or white embroidery thread (for eye highlights), and pink pastel (for rosy cheeks)
- Extras: Two small purple pompoms, a sewing needle, scissors, and a thin black thread for facial embroidery
Abbreviations (US Terms)
Please ensure you are using US crochet terminology for this pattern:
- MR: Magic Ring
- ch: Chain
- sc: Single crochet
- inc: Increase (2 sc in one stitch)
- dec: Decrease (sc 2 together)
- hdc: Half double crochet
- dc: Double crochet
- sl st: Slip stitch
- BLO: Back loop only
- FLO: Front loop only
- (…) : Number of stitches in the round
Step-by-Step Instructions
The Ghost Body
The ghost is worked in two parts: a solid inner core and a decorative outer shell that creates a beautiful ruffled skirt effect.
The Inner Core
Using White yarn:
- MR, 8 sc (8)
- BLO: (inc) * 8 (16)
- (1 sc, inc) * 8 (24)
- (2 sc, inc) * 8 (32)
- (3 sc, inc) * 8 (40)
- Rounds 6-37: 40 sc (32 rounds total)
Fasten off, weave in the end, and stuff the core firmly with fiberfill.
The Bottom Base
Using White yarn:
- MR, 8 sc (8)
- (inc) * 8 (16)
- (1 sc, inc) * 8 (24)
- (2 sc, inc) * 8 (32)
- (3 sc, inc) * 8 (40)
Do not fasten off. Place this bottom piece against the bottom of your core. Join them together by crocheting 40 sc through both layers. Fasten off and hide the yarn tail inside the body.
The Outer Shell (The Ruffles)
Attach White yarn to the front loops (FLO) of the very first round of the core. We will now work the outer layer that gives the ghost its shape.
- (inc) * 8 (16)
- (1 sc, inc) * 8 (24)
- (2 sc, inc) * 8 (32)
- (3 sc, inc) * 8 (40)
- (4 sc, inc) * 8 (48)
- Rounds 6-19: 48 sc (14 rounds)
- (7 sc, inc) * 6 (54)
- R21 (Ruffle Row 1): (BLO: 3 sc, FLO: inc, 4 sc, inc) * 6 (66)
- R22 (Ruffle Row 2): (BLO: 3 sc, FLO: 3 sc, 2 inc, 3 sc) * 6 (78)
- R23 (Ruffle Row 3): (BLO: 3 sc, FLO: inc, 8 sc, inc) * 6 (90)
- Rounds 24-37: (BLO: 3 sc, FLO: 12 sc) * 6 (90) (14 rounds total)
- R38: FLO: (2 sc, inc) * 30 (120)
- R39: 120 sc
- R40: sl st
Fasten off and hide the yarn tail.
The Ghost Arms
Make 2 arms using White yarn:
- MR, 8 sc (8)
- 8 sc
- (inc, 3 sc) * 2 (10)
- Rounds 4-8: 10 sc (5 rounds)
Do not stuff. Fold the piece in half and sc through both sides (5 sc) to close. Leave a long tail for sewing.
The Witch Hat
First, create the cone using Purple yarn:
- Ch 54, join to form a ring with a sl st.
- R1: 54 hdc, sl st.
Switch to Graphite yarn:
- R2: 2 ch, (7 hdc, dec) * 6, sl st (48)
- R3: 2 ch, 48 hdc, sl st
- R4: 2 ch, (6 hdc, dec) * 6, sl st (42)
- R5: 2 ch, 42 hdc, sl st
- R6: 2 ch, (5 hdc, dec) * 6, sl st (36)
- R7: 2 ch, 36 hdc, sl st
- R8: 2 ch, (4 hdc, dec) * 6, sl st (30)
- R9: 2 ch, 30 hdc, sl st
- R10: 2 ch, (3 hdc, dec) * 6, sl st (24)
- R11: 2 ch, 24 hdc, sl st
- R12: 2 ch, (2 hdc, dec) * 6, sl st (18)
- R13: 2 ch, 18 hdc, sl st
- R14: 2 ch, (1 hdc, dec) * 6, sl st (12)
- R15: 2 ch, 12 hdc, sl st
- R16: 2 ch, (dec) * 6, sl st (6)
Fasten off and weave in ends. To make the brim, attach Graphite yarn to the FLO of the initial starting chain:
- 3 ch, (1 dc, inc from dc) * 27, sl st (81)
Fasten off and embroider a small yellow buckle onto the purple part of the hat.
The Scarf & Pompoms
Using Purple yarn:
- Ch 200. Starting from the 2nd chain from the hook:
- R1: 199 sc, ch, turn.
- R2: 199 sc, sl st.
Fasten off. Attach or sew your two small pompoms to the ends of the scarf.
The Pumpkin Basket & Mini Pumpkins
Pumpkin Basket
Using Orange yarn:
- MR, 8 sc (8)
- (inc) * 8 (16)
- (1 sc, inc) * 8 (24)
- (2 sc, inc) * 8 (32)
- Rounds 5-10: 32 sc
- R11: (2 sc, dec) * 8 (24)
- R12: 24 sl st
Fasten off. To make the handle, attach Graphite yarn anywhere on the last round, ch 20, and join to the opposite side so the handle divides the basket into two equal halves. Use black felt or paint to add a face to the basket.
Mini Pumpkins (Accessories)
You can make several sizes! For the Small Pumpkin, use orange yarn:
- MR, 8 sc (8)
- (inc) * 8 (16)
- (1 sc, inc) * 8 (24)
- (2 sc, inc) * 8 (32)
- Rounds 5-10: 32 sc
- R11: (2 sc, dec) * 8 (24)
- R12: 24 sl st
For the Medium and Large pumpkins, follow the same logic but increase the number of rounds and the amount of increases in the beginning to make them wider. Don’t forget to add a tiny green stem using green yarn (crochet a small tube or small sphere) and glue it to the top!
Finishing
Assembly & Decoration
Now comes the fun part—bringing your ghost to life!
- Attach Arms: Sew the arms to the body between rounds 20 and 25 of the outer shell. Space them so there are roughly two “waves” of the ruffle between them.
- Eyes: Using black felt or fabric paint, create eyes between rounds 10 and 13. Keep them about 2 stitches apart. Add a tiny dot of white paint to each eye to create a cute “glint.”
- Smile & Brows: Using thin black thread, embroider a small smile between rounds 14 and 15 (about 4 stitches wide). Embroider small eyebrows on rounds 8 and 9.
- Blush: Use your pink pastel to gently dab some rosy cheeks onto the ghost’s face.
- Final Touches: Tie the purple scarf around the neck, place the witch hat on the head, and hang the pumpkin basket on one of the ghost’s arms!
Tips for Success
- Tension is Key: When making the ruffles (the outer shell), try to keep your tension consistent so the waves look even.
- Stuffing: Make sure to stuff the inner core very firmly before attaching the bottom and the outer shell. This prevents the ghost from looking “lumpy.”
- Safety First: If you are making this for a small child, avoid using plastic safety eyes. Sticking to fabric paint or embroidery is much safer for little ones.
- Yarn Choice: Using a cotton-blend yarn helps the amigurumi hold its shape much better than a very fuzzy acrylic yarn.