How to Crochet a Tiny Mini Teddy Bear: A Cute Amigurumi Pattern
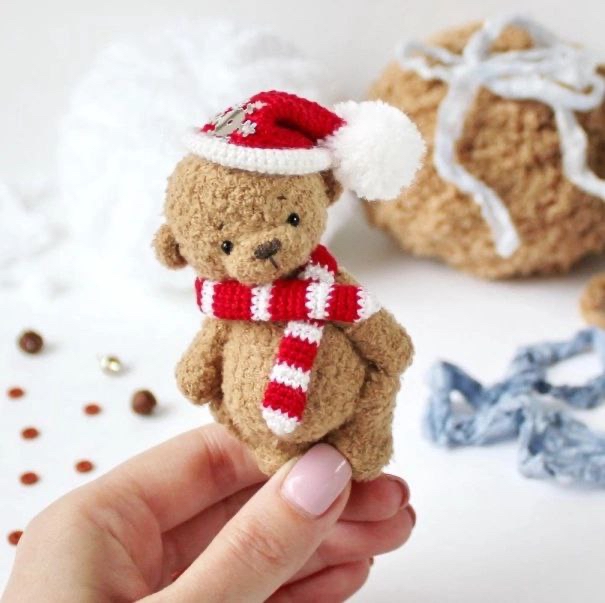
If you are looking for a quick, adorable, and incredibly sweet crochet project, look no further! This Mini Teddy Bear amigurumi is the perfect addition to your crochet collection. Whether you want to make a tiny gift for a friend, a charming ornament for a holiday tree, or a little companion to sit on your desk, this little guy is sure to bring a smile to anyone’s face.
What makes this bear so special is its unique, fuzzy texture. Unlike traditional smooth amigurumi, this pattern utilizes a specific technique to ensure that the “fluff” of the yarn is showcased on the outside, giving the bear a soft, realistic appearance. This pattern is designed to be beginner-friendly, focusing on basic stitches while teaching you how to add professional-grade articulation to your tiny creations.
Introduction
This project creates a miniature teddy bear standing approximately 3 to 3.5 inches tall. Because of its small scale, it is an excellent way to practice precision and fine motor skills. The secret to the bear’s charm lies in the yarn choice and the crochet direction. By working with the wrong side of your stitches facing out, you bring all the lovely texture of the yarn to the surface, creating a “furry” effect that is absolutely irresistible.
Materials and Abbreviations
Materials List
To achieve the look seen in the photos, you will need the following supplies. While you can substitute different brands, the combination of a textured yarn and a fine thread is key to the finished look.
- Textured Yarn: One small ball of fuzzy/textured yarn (approx. 3.3 yards / 3 meters per 1.7 oz / 50g).
- Fine Thread/Yarn: One ball of fine cotton thread or thin yarn (like Iris Gamma) in a color that matches your textured yarn.
- Crochet Hook: 1.5 mm (or a size appropriate for your yarn weight).
- Stuffing: Polyfill or synthetic fiberfill.
- Eyes: 3 mm safety eyes or small beads.
- Embroidery Thread: Black thread for the nose and color-matching thread for sewing parts together.
- Articulation Hardware:
- For the Head: 1 x 12 mm disc, 1 x 9 mm disc, and 1 x 18 mm T-pin/eye pin.
- For the Arms: 4 x 6 mm discs and 2 x 18 mm T-pins/eye pins.
- For the Legs: 4 x 6 mm discs and 2 x 18 mm T-pins/eye pins.
- Tools: Round-nose pliers and manicure scissors for trimming the “fur.”
Crochet Abbreviations (US Terms)
- MR: Magic Ring
- ch: Chain
- sc: Single crochet
- inc: Increase (2 sc in one stitch)
- dec: Decrease (sc 2 together)
- st(s): Stitch(es)
Step-by-Step Instructions
Note on Technique: To get the fuzzy texture, you must work with the wrong side of the crochet stitches facing outward. This means you will be working in continuous rounds, moving in a counter-clockwise direction.
The Head
We begin by creating the head, which will eventually be articulated so it can move!
- Round 1: 6 sc in a Magic Ring (6)
- Round 2: 6 inc (12)
- Round 3: (1 sc, inc) repeat 6 times (18)
- Round 4: (2 sc, inc) repeat 6 times (24)
- Round 5: (3 sc, inc) repeat 6 times (30)
- Rounds 6-11: 30 sc (6 rounds total)
- Round 12: (3 sc, dec) repeat 6 times (24)
- Round 13: (2 sc, dec) repeat 6 times (18)
- Round 14: (1 sc, dec) repeat 6 times (12)
Stuff the head firmly with polyfill. To prepare for assembly, take a 12 mm disc and an 18 mm T-pin. Insert the T-pin through the center of the head and secure it with the disc. Tighten the opening and hide the remaining thread inside the head. Use manicure scissors to carefully trim the long fibers around the head for a neat, rounded look.
The Muzzle and Ears
The Muzzle
- Start with a chain of 6 ch.
- Round 1: From the second ch from the hook, work 4 sc. In the very last ch, work 3 sc (this turns the corner). Working on the other side of the chain, work 3 sc, then work 1 inc in the final stitch (12).
- Round 2: 12 sc.
Fasten off and trim the fuzz so the muzzle is a neat, small shape.
The Ears (Make 2)
Note: For the ears, use only your textured yarn without adding the fine thread.
- Round 1: 6 sc in a Magic Ring. Turn your work to work on the other side of the ring.
- Round 2: 6 sc.
Fasten off, leaving a long tail for sewing. Trim the fuzz to make them small and rounded.
The Body
The body provides the foundation for the limbs and head.
- Round 1: 6 sc in a Magic Ring (6)
- Round 2: 6 inc (12)
- Round 3: 12 sc
- Round 4: (1 sc, inc) repeat 6 times (18)
- Round 5: 18 sc
- Round 6: 18 sc
- Round 7: (2 sc, inc) repeat 6 times (24)
- Round 8: (3 sc, inc) repeat 6 times (30)
- Rounds 9-12: 30 sc (4 rounds total)
- Round 13: (3 sc, dec) repeat 6 times (24)
- Round 14: (2 sc, dec) repeat 6 times (18)
- Round 15: 18 sc
- Round 16: (1 sc, dec) repeat 6 times (12)
- Round 17: 6 dec
Stuff the body firmly. Fasten off and hide the thread.
The Arms and Legs
The Arms (Make 2)
- Round 1: 6 sc in a Magic Ring (6)
- Round 2: (inc, 2 sc) repeat 2 times (8)
- Rounds 3-9: 8 sc (7 rounds total)
- Round 10: 4 dec (4)
Stuff the arms very lightly. Insert a 6 mm disc and an 18 mm T-pin through the arm between rounds 8 and 9. Fasten off, trim the fuzz, and hide the thread.
The Legs (Make 2)
- Start with a chain of 4 ch.
- Round 1: From the second ch, work 2 sc. In the last ch, work 3 sc. Working on the other side of the chain, work 1 sc, then 1 inc (8).
- Round 2: inc, 1 sc, 3 inc, 1 sc, 2 inc (14)
- Round 3: 14 sc
- Round 4: 3 sc, 4 dec, 3 sc (10)
- Round 5: 3 sc, 2 dec, 3 sc (8)
- Rounds 6-9: 8 sc (4 rounds total)
- Round 10: 4 dec (4)
Stuff the legs. Insert a 6 mm disc and an 18 mm T-pin through the leg between rounds 8 and 9. Fasten off, trim the fuzz, and hide the thread.
The Tail
- Round 1: 6 sc in a Magic Ring (6)
Fasten off, leaving a long tail. You will sew this onto the body later.
The Festive Hat and Scarf
To dress your bear, we will crochet a tiny Santa-style hat and a striped scarf.
The Hat
Use red yarn for the main body of the hat.
- Round 1: 6 sc in a Magic Ring (6)
- Round 2: (inc, 1 sc) repeat 3 times (9)
- Round 3: 9 sc
- Round 4: (inc, 2 sc) repeat 3 times (12)
- Round 5: 12 sc
- Round 6: (inc, 3 sc) repeat 3 times (15)
- Round 7: 15 sc
- Round 8: (inc, 4 sc) repeat 3 times (18)
- Round 9: 18 sc
- Round 10: (inc, 5 sc) repeat 3 times (21)
- Round 11: 21 sc
- Round 12: (inc, 6 sc) repeat 3 times (24)
- Round 13: 24 sc
- Round 14: (inc, 3 sc) repeat 6 times (30)
- Round 15: 30 sc
- Round 16: (inc, 4 sc) repeat 6 times (36)
- Round 17: 36 sc
- Round 18: (inc, 5 sc) repeat 6 times (42)
- Round 19: 42 sc
- Round 20: (inc, 6 sc) repeat 6 times (48)
- Round 21: 48 sc
Switch to white yarn.
- Rounds 22-26: 48 sc (5 rounds total)
Fasten off. Create a small white pompom by wrapping white yarn around your fingers, tying it tightly in the middle, and trimming it into a ball. Sew the pompom to the top of the hat.
The Scarf
Use white and red yarn to create a striped effect.
- Start: Ch 15.
- Row 1: Work in white yarn, sc in the second ch from the hook and in each ch across.
- Next Rows: Alternate red and white rows until the scarf reaches approximately 4.3 inches in length.
Finishing
Assembly and Decoration
Now comes the magic part—bringing your bear to life!
- Muzzle: Use a sewing needle and matching thread to sew the muzzle onto the bottom of the head. Once attached, add a little extra stuffing inside the muzzle to make it pop, then embroider a small nose using brown thread.
- Eyes: Place your safety eyes (or beads) on the head. To secure them, insert the needle into the back of the head (point 1), bring it out through the eye (point 2), and thread it through the eye loop or bead. Repeat for the second eye, ensuring they are symmetrical. Secure the thread inside the head.
- Ears: Use the tails left from the ears to sew them onto the top of the head. Pull the thread through the head from the inside to secure them firmly.
- Brows: For extra character, use a little dark thread to embroider two tiny eyebrows.
- Limb Attachment:
- Attach the head to the body by inserting a 9 mm disc and a T-pin through the center. Use your round-nose pliers to bend the ends of the pin to secure the head and body together.
- Attach the arms to the sides of the body between rounds 4 and 5 using the 6 mm discs and T-pins.
- Attach the legs to the bottom of the body between rounds 11 and 12 using the 6 mm discs and T-pins.
- Tail: Sew the small tail onto the back of the body.
- Final Styling: Wrap the scarf around the bear’s neck and tuck the end into the loop to secure it. Place the hat on the head.
Tips
- Use Markers: Because you are working with fuzzy yarn, it can be hard to see your stitches. Always use a stitch marker to identify the beginning of every round.
- Count Constantly: It is very easy to lose a stitch in the fluff! Count your stitches at the end of every single round to ensure your shape remains correct.
- Work by Feel: If you can’t see the stitches, “feel” for them. Insert your hook into the space where you think the previous stitch ended and find the next hole.
- Start Simple: If you are a complete beginner, try practicing these stitches with a smoother, less hairy yarn before moving on to the textured yarn.
- Avoid Dark Colors: If this is your first time working with textured yarn, avoid very dark colors, as it can be significantly harder to see the stitch definition.