How to Crochet a Cute Guardian Angel: A Step-by-Step Amigurumi Tutorial
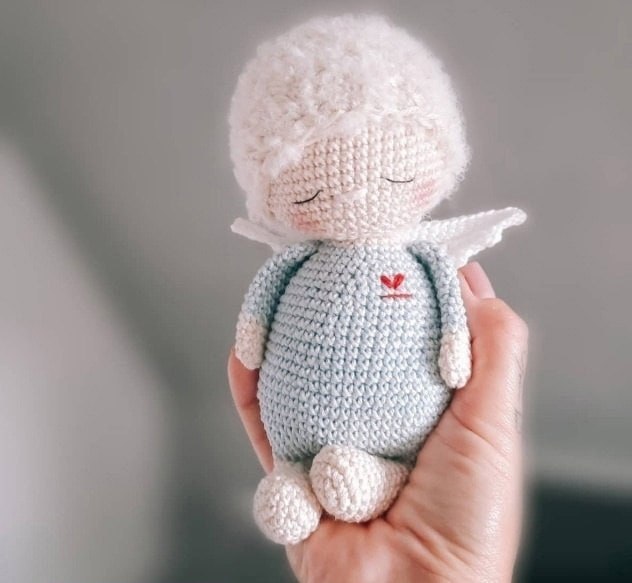
There is something truly magical about creating a little character that symbolizes protection and peace. This adorable crochet Guardian Angel is the perfect project for anyone looking to create a meaningful gift for a baby shower, a new parent, or simply as a sweet piece of nursery decor. This amigurumi angel is small, cuddly, and designed with a whimsical aesthetic that features a cozy moon accessory.
Whether you are a seasoned amigurumi artist or a beginner looking to level up your skills, this tutorial will guide you through every stitch. We will work through creating the head, limbs, body, and those precious tiny wings. Grab your favorite hook and let’s bring this little angel to life!
Materials & Abbreviations
To ensure your angel turns out just like the one in the photos, I recommend using a smooth cotton yarn. Cotton provides excellent stitch definition, which is crucial for amigurumi. For the hair, a textured bouclé yarn adds a lovely, soft touch.
What You Will Need
- Yarn (Weight: Medium/Worsted – Cotton preferred):
- Cream (for the head, hands, feet, and face)
- Limestone or light grey/tan (for the body/suit)
- Mustard yellow (for the little moon)
- Marble or white (for the wings)
- Textured Yarn (for hair): White Alpaca Bouclé or a similar fuzzy white yarn.
- Crochet Hooks: 2.5mm (B-1) for the main body and 6mm (J-10) for the hair.
- Safety Eyes: 4mm or 6mm (optional; you can also embroider eyes with black yarn).
- Other Supplies:
- Fiberfill stuffing
- Stitch markers
- Tapestry needle
- Scissors
- Black yarn scrap (for eyes/nose)
- A little bit of pink rouge (for the rosy cheeks)
Abbreviations (US Terms)
- MR: Magic Ring
- ch: Chain
- sc: Single crochet
- inc: Increase (2 sc in one stitch)
- dec: Decrease (sc2tog)
- sl st: Slip stitch
- st(s): Stitch(es)
- BLO: Back loop only
- Rnd: Round
- Row: Row
- Continuous Rounds: Working in a spiral (do not join at the end of rounds unless specified).
Step-by-Step Instructions
The Head
Use 2.5mm hook and Cream yarn. Work in continuous spiral rounds.
- MR with 5 sc (5)
- [inc] in every st (10)
- [inc, sc] repeat 5 times (15)
- [inc, sc 2] repeat 5 times (20)
- [inc, sc 3] repeat 5 times (25)
- [inc, sc 4] repeat 5 times (30)
- [inc, sc 5] repeat 5 times (35)
- [inc, sc 6] repeat 5 times (40)
- [inc, sc 7] repeat 5 times (45)
- Rnds 10-22: sc in each st (45)
- [dec, sc 7] repeat 5 times (36)
- [dec, sc 6] repeat 4 times (27)
- [dec, sc 5] repeat 4 times (24)
- [dec, sc 4] repeat 4 times (18)
Note on Eyes: If using safety eyes, insert them between rounds 17 and 18, approximately 7 stitches apart. Once finished, stuff the head firmly with fiberfill. Fasten off, leaving a long tail for sewing.
The Legs (Make 2)
Use 2.5mm hook and Cream yarn. Work in continuous spiral rounds.
- MR with 5 sc (5)
- [inc] in every st (10)
- [inc, sc] repeat 5 times (15)
- [inc, sc 2] repeat 5 times (20)
- Rnd 5: sc in each st (20)
- [dec, sc 2] repeat 3 times and [dec, sc 1] repeat 2 times (18)
- [dec, sc 1] repeat 4 times and [dec] repeat 2 times (16)
- [dec] repeat 4 times and [dec, sc 1] repeat 2 times (14)
- [dec, sc 1] repeat 2 times and [dec] repeat 2 times (12)
- Rnd 10: sc in each st (12)
- [dec, sc 1] repeat 2 times (10)
- Rnds 12-13: sc in each st (10)
Pro-Tip: Do not stuff the very bottom of the legs. This keeps them slightly flexible so they can sit nicely when the angel is displayed. Fasten off and leave a long tail.
The Body
Use 2.5mm hook. Start with Limestone yarn.
This piece is worked by joining the legs together. Hold one leg and work your first sc into the inner side of the leg (with the toe pointing toward you). Next, chain 6, then join to the inner side of the second leg with a sc.
Work a total of 10 sc around the connection (this includes the 6 chains and parts of the legs). Continue working around the legs until you reach your first stitch. You should have 32 stitches total.
- Rnd 1: (The joining round described above) (32)
- Rnd 2: [inc, sc 3] repeat 8 times (40)
- Rnd 3: sc in each st (40)
- Rnd 4: [inc, sc 4] repeat 8 times (45)
- Rnd 5: [inc, sc 5] repeat 8 times (50)
- Rnd 6: [inc, sc 6] repeat 8 times (55)
- Rnds 7-10: sc in each st (55)
- Rnd 11: [dec, sc 9] repeat 5 times (50)
- Rnd 12: sc in each st (50)
- Rnd 13: [dec, sc 8] repeat 5 times (45)
- Rnds 14-15: sc in each st (45)
- Rnd 16: [dec, sc 7] repeat 5 times (40)
- Rnds 17-18: sc in each st (40)
- Rnd 19: [dec, sc 6] repeat 5 times (35)
- Rnd 20: sc in each st (35)
- Rnd 21: [dec, sc 5] repeat 5 times (30)
- Rnd 22: sc in each st (30)
- Rnd 23: [dec, sc 3] repeat 6 times (24)
- Rnd 24: sc in each st (24)
Color Change: At the end of Round 24, switch to Cream yarn.
- Rnd 25: [dec, sc 2] repeat 6 times (18)
- Rnd 26: sc in each st (18)
Fasten off and stuff the body firmly, making sure to stuff the neck area well so the head sits securely. Use the long tail to sew the head to the body.
The Arms (Make 2)
Use 2.5mm hook. Start with Cream yarn.
- MR with 4 sc (4)
- [inc] in every st (8)
- Rnds 3-5: sc in each st (8)
Color Change: Switch to Limestone yarn.
- Rnds 6-15: sc in each st (8)
The arms are not stuffed. To finish, press the opening closed and sc the two edges together using 3 sc. Fasten off and sew the arms to the sides of the body, aligned with the legs.
The Hair
Use 6mm hook and hold the White Bouclé and Cream yarn together (double stranded). Work in continuous spiral rounds.
- MR with 5 sc (5)
- [inc] in every st (10)
- [inc, sc] repeat 5 times (15)
- [inc, sc 2] repeat 5 times (20)
- [inc, sc 3] repeat 5 times (25)
- Rnds 6-12: sc in each st (25)
Fasten off, leaving a long tail. Sew the hair onto the top of the head, securing it all the way around.
The Wings
Use 2.5mm hook and Marble yarn. Work in rows (not rounds).
- Row 1: Ch 8. Sc in the 2nd ch from hook and in the next 6 ch. At the end, ch 4 (the last ch acts as a turning chain).
- Row 2: Sc in each st. At the end, ch 4 and turn.
- Rows 3-9: Repeat the previous row, increasing by 3 stitches each time. By the end of Row 9, you should have 31 stitches.
- Row 10: Sc in each st.
To finish, fold the wing in half along the center and sc across the folded edge using 10 sc. This creates the wing shape. Sew the wings vertically to the middle of the angel’s upper back.
The Little Moon
Use 2.5mm hook and Mustard yarn. Work in continuous spiral rounds.
- MR with 5 sc (5)
- [inc] in every st (10)
- [inc] in every st (20)
- [inc, sc] repeat 10 times (30)
- [inc, sc 2] repeat 15 times (45)
- [inc, sc 3] repeat 15 times (60)
- [inc, sc 5] repeat 14 times (70)
Fold the circle in half and sc the two sides together using 35 sc. Remember to stuff the moon with fiberfill as you sew it closed! Fasten off and sew it near the angel’s hands.
Finishing
Now comes the most rewarding part: bringing the face to life! This is where your angel gets its personality.
- The Nose: Using Cream yarn, embroider a tiny nose between rounds 18 and 19, spanning about 3 stitches.
- The Eyes: If you didn’t use safety eyes, use a scrap of black yarn to embroider two small, sleepy eyes on either side of the nose.
- The Cheeks: Using a makeup brush and a tiny bit of pink rouge, gently dab the cheeks to give your angel a sweet, blushing look.
Tips for Success
The “X” Stitch: For a much cleaner, professional-looking amigurumi, I highly recommend using the “cross stitch” method (also known as the X-stitch) rather than the standard “V-stitch.” This involves inserting your hook into the stitch in a way that creates an ‘X’ shape rather than a ‘V’. It makes the stitches look tighter and more uniform.
Tension is Key: When working with amigurumi, your tension should be firm. You want the stuffing to be completely hidden so there are no gaps between the stitches. If you find your stuffing peeking through, try using a smaller hook.
Mark Your Rounds: Since we are working in continuous spirals, it is very easy to lose your place. Always use a stitch marker at the first stitch of every round to keep track of your progress.
Personalize It: Don’t be afraid to play with colors! You could make a nighttime angel with dark blue tones or a spring angel with pastel colors. The sky is the limit!