Crochet Bunny Girl Doll Pattern: A Cute Amigurumi Garden Tutorial
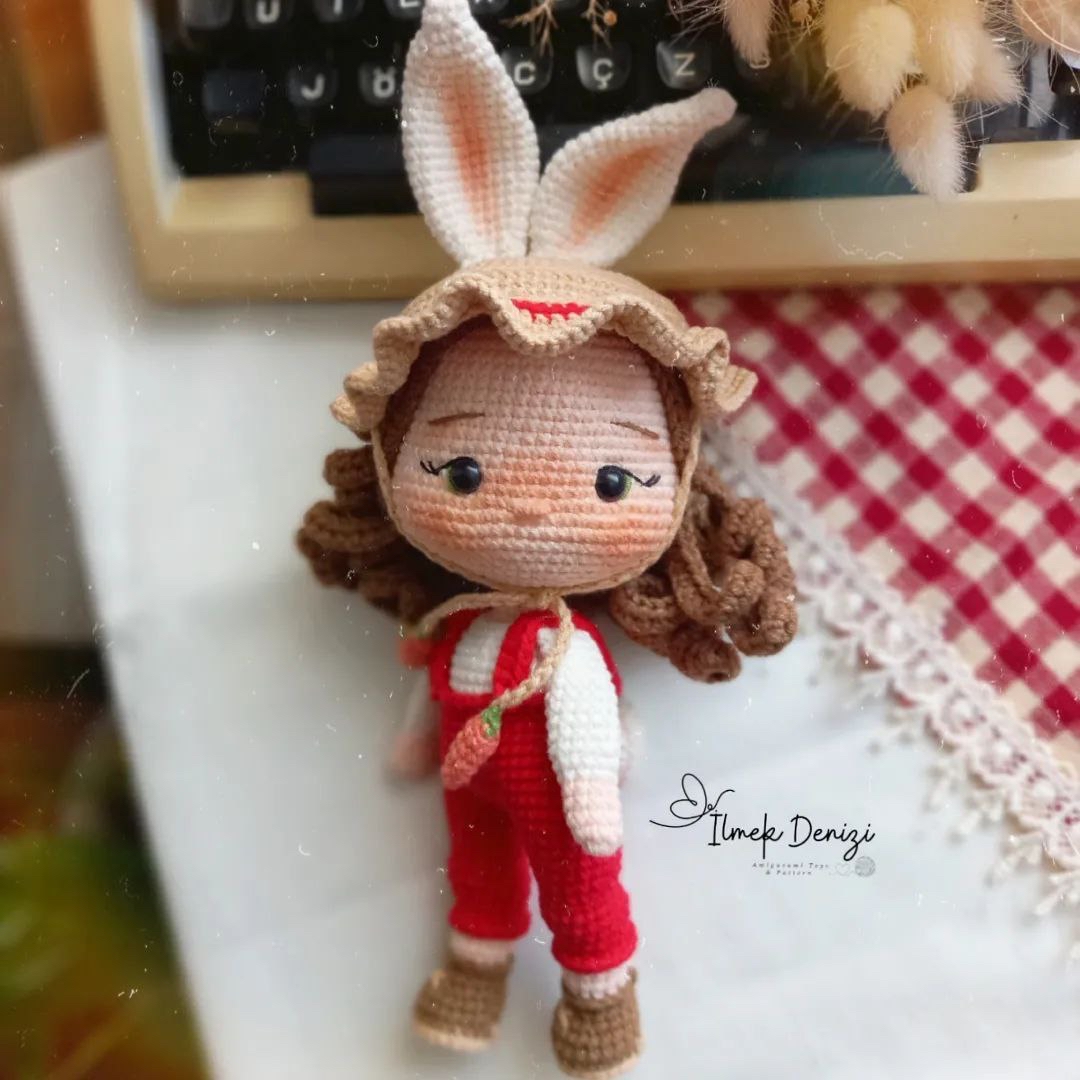
There is nothing quite as charming as a tiny, handcrafted character to brighten up a nursery or a bookshelf. This adorable Bunny Girl Doll is the perfect project for amigurumi lovers looking to create something whimsical and sweet. Dressed in cozy red overalls and sporting a floppy sun hat with bunny ears, this little garden girl is ready for spring adventures!
Whether you are making this as a gift for a little one or as a decorative piece for your own home, this pattern is designed to be clear and engaging. This tutorial will guide you through every stitch, from her expressive little face to her tiny carrot accessories. Let’s grab our hooks and get started!
Materials & Abbreviations
To ensure your doll turns out looking professional and polished, I recommend using a consistent tension and high-quality cotton yarn. Below is a list of everything you will need.
Required Materials
- Yarn (Weight: Sport/Fine, such as YarnArt Jeans):
- Red (for overalls and hat detail)
- Beige/Skin Tone (for head, arms, and face details)
- Cream (for shirt, ears, tail, and hair highlights)
- Sand/Tan (for hat brim, boots, and carrot stems)
- Brown (for hair and boots)
- Orange (for carrots)
- Green (for carrot tops)
- Crochet Hook: 2mm (or the size recommended for your yarn to ensure tight stitches).
- Safety Eyes: 8mm black eyes.
- Stuffing: Polyester fiberfill.
- Wire: Approximately 6 inches of craft wire (to help with poseability).
- Notions: Sewing needle, stitch markers, pins, and scissors.
- Optional: Pink blush (to add sweetness to the cheeks).
US Crochet Abbreviations
- MR: Magic Ring
- ch: Chain
- sl st: Slip stitch
- sc: Single crochet
- inc: Increase (2 sc in one stitch)
- dec: Decrease (sc 2 together)
- hdc: Half double crochet
- dc: Double crochet
- tr: Treble crochet
- BLO: Back loops only
- FLO: Front loops only
Step-by-Step Instructions
The Head
Use Beige yarn.
Start with a Magic Ring and work in continuous rounds:
- R1: 8 sc in MR (8)
- R2: 8 inc (16)
- R3: (1 sc, 1 inc) repeat 8 times (24)
- R4: (2 sc, 1 inc) repeat 8 times (32)
- R5: (3 sc, 1 inc) repeat 8 times (40)
- R6: 2 sc, 1 inc, (4 sc, 1 inc) repeat 7 times, 2 sc (48)
- R7: (5 sc, 1 inc) repeat 8 times (56)
- R8: 3 sc, 1 inc, (6 sc, 1 inc) repeat 7 times, 3 sc (64)
- R9-19: 64 sc (11 rounds total) (64)
- R20: 26 sc, ch, skip 1 stitch, 10 sc, ch, skip 1 stitch, 26 sc (64)
- R21: 20 sc, (1 inc, 1 sc) repeat 4 times, 8 sc, (1 sc, 1 inc) repeat 4 times, 20 sc (72)
- R22-26: 72 sc (5 rounds total) (72)
Note: Insert your 8mm safety eyes into the holes created in Row 20 during Row 26.
- R27: 20 sc, (1 dec, 1 sc) repeat 4 times, 8 sc, (1 sc, 1 dec) repeat 4 times, 20 sc (64)
- R28: (6 sc, 1 dec) repeat 8 times (56)
- R29: 56 sc (56)
- R30: 2 sc, 1 dec, (5 sc, 1 dec) repeat 7 times, 3 sc (48)
- R31: 48 sc (48)
Stuff the head firmly.
- R32: 2 sc, 1 dec, (4 sc, 1 dec) repeat 7 times, 2 sc (40)
- R33: (3 sc, 1 dec) repeat 8 times (32)
- R34: 1 sc, 1 dec, (2 sc, 1 dec) repeat 7 times, 1 sc (24)
- R35: 12 dec (12)
Fasten off and leave a long tail for sewing.
The Arms (Make 2)
Start with Beige yarn.
- R1: 6 sc in MR (6)
- R2: (1 sc, 1 inc) repeat 3 times (9)
- R3-5: 9 sc (3 rounds total) (9)
Switch to Cream yarn.
- R6: 9 sc (9)
- R7: (1 inc, 2 sc) repeat 3 times (12)
- R8-13: 12 sc (6 rounds total) (12)
- R14: (1 dec, 4 sc) repeat 2 times (10)
- R15-17: 10 sc (3 rounds total) (10)
- R18: Fold the arm in half and sc through both layers, 5 sc total (5)
Fasten off and leave a long tail.
The Hair
Use Brown yarn. Tip: Use a slightly larger hook for a looser, more natural texture.
- R1: 8 sc in MR (8)
- R2: 8 inc (16)
- R3: (1 sc, 1 inc) repeat 8 times (24)
- R4: (2 sc, 1 inc) repeat 8 times (32)
Now, we will create the curls (strands):
Ch 47. Starting from the 2nd ch from the hook: (46 dc, skip 1 stitch from R4, sl st) repeat 16 times.
Fasten off, leaving a long tail. Pin the hair to the head with the wrong side facing up, arrange the curls, and sew in place.
The Legs (Make 2)
Start with Sand yarn.
- R1: 8 sc in MR (8)
- R2: 8 inc (16)
- R3: (3 sc, 1 inc) repeat 4 times (20)
Switch to Brown yarn.
- R4: 20 sc in BLO (20)
- R5-6: 20 sc (2 rounds total) (20)
- R7: 4 sc, (1 dec, 1 sc) repeat 4 times, 4 sc (16)
- R8: 5 sc, (1 dec, 1 sc) repeat 2 times, 5 sc (14)
- R9: 14 sc (14)
Switch to Beige yarn.
- R10: 14 sc in BLO (14)
- R11-12: 14 sc (2 rounds total) (14)
Switch to Red yarn.
- R13: 1 inc, 12 sc, 1 inc (16)
- R14: 16 sc in BLO (16)
- R15: 16 sc (16)
- R16: 1 inc, 6 sc, 3 inc (knee), 6 sc (20)
- R17: 20 sc (20)
- R18: 1 sc, 1 dec, 15 sc, 1 dec (18)
- R19: 6 sc, (1 dec, 1 sc) repeat 3 times, 3 sc (15)
- R20: (2 sc, 1 inc) repeat 5 times (20)
- R21-22: 20 sc (2 rounds total) (20)
- R23: 17 sc (17)
Stuff the feet/legs. For the second leg, follow the same steps until R23.
Leg 2 Adjustment:
- R24: 7 sc, do not fasten off (7)
The Body
Join the legs together at the back.
- R25: Ch 3, 20 sc around the first leg, 3 sc in the chain, 20 sc around the second leg, 3 sc in the chain (46)
- R26: (22 sc, 1 inc) repeat 2 times (48)
- R27-30: 48 sc (4 rounds total) (48)
- R31: (10 sc, 1 dec) repeat 4 times (44)
- R32-33: 44 sc (2 rounds total) (44)
- R34: (9 sc, 1 dec) repeat 4 times (40)
- R35-36: 40 sc (2 rounds total) (40)
Switch to Cream yarn.
- R37: 40 sc in BLO (40)
- R38: 4 sc, 1 dec, (8 sc, 1 dec) repeat 3 times, 4 sc (36)
- R39-40: 36 sc (2 rounds total) (36)
- R41: (4 sc, 1 dec) repeat 6 times (30)
Attach the arms in the next round.
- R42: 6 sc across the back, 5 sc over the arm and body, 10 sc in the front, 5 sc over the second arm and body, 4 sc across the back (30)
- R43: (3 sc, 1 dec) repeat 6 times (24)
Switch to Beige yarn.
- R44: (2 sc, 1 dec) repeat 6 times (18)
- R45: (1 sc, 1 dec) repeat 6 times (12)
- R46-48: 12 sc (3 rounds total) (12)
Stuff the body firmly. Take your 6-inch wire, fold it in half, wrap it in tape for safety, and insert it into the body to create a poseable spine. Sew the body to the head.
Final touch: With Red yarn, work 40 sc around the front of Row 37 to create the top edge of the overalls.
Accessories (Carrots, Ears, Tail, & Hat)
Carrots (Make 2)
Use Orange yarn.
- R1: 4 sc in MR (4)
- R2: (1 sc, 1 inc) repeat 2 times (6)
- R3: 6 sc (6)
- R4: (2 sc, 1 inc) repeat 2 times (8)
- R5: 8 sc (8)
Switch to Green yarn.
- R6: 4 dec (4)
Switch to Sand yarn.
- R7: Ch 34, fasten off, leaving a long tail.
Bunny Ears (Make 2)
Use Cream yarn.
- R1: 6 sc in MR (6)
- R2: 6 sc (6)
- R3: (1 sc, 1 inc) repeat 3 times (9)
- R4: (2 sc, 1 inc) repeat 3 times (12)
- R5: (3 sc, 1 inc) repeat 3 times (15)
- R6-7: 15 sc (2 rounds total) (15)
- R8: (4 sc, 1 inc) repeat 3 times (18)
- R9: 18 sc (18)
- R10: (5 sc, 1 inc) repeat 3 times (21)
- R11: 21 sc (21)
- R12: (6 sc, 1 inc) repeat 3 times (24)
- R13-16: 24 sc (4 rounds total) (24)
- R17: (6 sc, 1 inc) repeat 3 times (21)
- R18: 21 sc (21)
- R19: (5 sc, 1 dec) repeat 3 times (18)
- R20: 18 sc (18)
- R21: (4 sc, 1 dec) repeat 3 times (15)
- R22: (3 sc, 1 dec) repeat 3 times (12)
- R23: 12 sc (12)
Fasten off, leaving a long tail. Use pink blush to lightly color the ears.
Tail
Use Cream yarn.
- R1: 8 sc in MR (8)
- R2: 8 inc (16)
- R3: (1 sc, 1 inc) repeat 8 times (24)
- R4-6: 24 sc (3 rounds total) (24)
- R7: 12 dec (12)
Fasten off. Do not stuff. Sew to the back of the body.
Sun Hat
Start with Sand yarn.
- R1: 8 sc in MR (8)
- R2: 8 inc (16)
- R3: (1 sc, 1 inc) repeat 8 times (24)
- R4: (2 sc, 1 inc) repeat 8 times (32)
- R5: (3 sc, 1 inc) repeat 8 times (40)
- R6: (4 sc, 1 inc) repeat 8 times (48)
- R7: (5 sc, 1 inc) repeat 8 times (56)
- R8: 3 sc, 1 inc, (6 sc, 1 inc) repeat 7 times, 3 sc (64)
- R9: 64 sc (64)
- R10: (7 sc, 1 inc) repeat 8 times (72)
- R11: 4 sc, 1 inc, (8 sc, 1 inc) repeat 7 times, 4 sc (80)
- R12: 80 sc in BLO (80)
- R13-15: 80 sc (3 rounds total) (80)
Switch to Red yarn.
- R16: 80 sc in BLO (80)
Switch to Sand yarn.
- R17: 80 sc in BLO (80)
- R18: 80 inc (160)
- R19-20: 160 sc (2 rounds total) (160)
Fasten off and weave in ends. Sew the bunny ears to the hat and the carrot tie-strings to the sides.
Finishing
This is where your doll truly comes to life! The details make all the difference.
- Eyes: Use green yarn to embroider a small rainbow-colored iris around the safety eyes. Use white yarn to add a tiny highlight (the “whites” of the eyes). Use thin black thread to add delicate eyelashes.
- Nose: Using beige yarn, embroider a nose about 4 stitches wide, located 2 rows below the eyes. Start with two horizontal stitches and then wrap the yarn around them to give it dimension.
- Cheeks: Lightly apply pink blush to the cheeks and the tip of the nose for a soft, rosy look.
- Assembly: Sew the hat onto the head, attach the carrot accessories to the hat, and finally, sew the tail to the back of the overalls.
Tips
For a successful crochet project, keep these pro tips in mind:
- Tension is Key: When working with amigurumi, try to keep your stitches tight so that the stuffing doesn’t peek through.
- Stitch Markers: Always use a stitch marker to keep track of the start of your rounds, especially when working with complex increases and decreases.
- Color Changes: To get a clean color change, pull the new color through the final two loops of the last stitch of the previous color.
- Safety First: If you are making this for a very young child, skip the safety eyes and embroider the eyes with black yarn instead to prevent choking hazards.