Adorable Crochet Turtle Amigurumi Pattern with Tiny Accessories
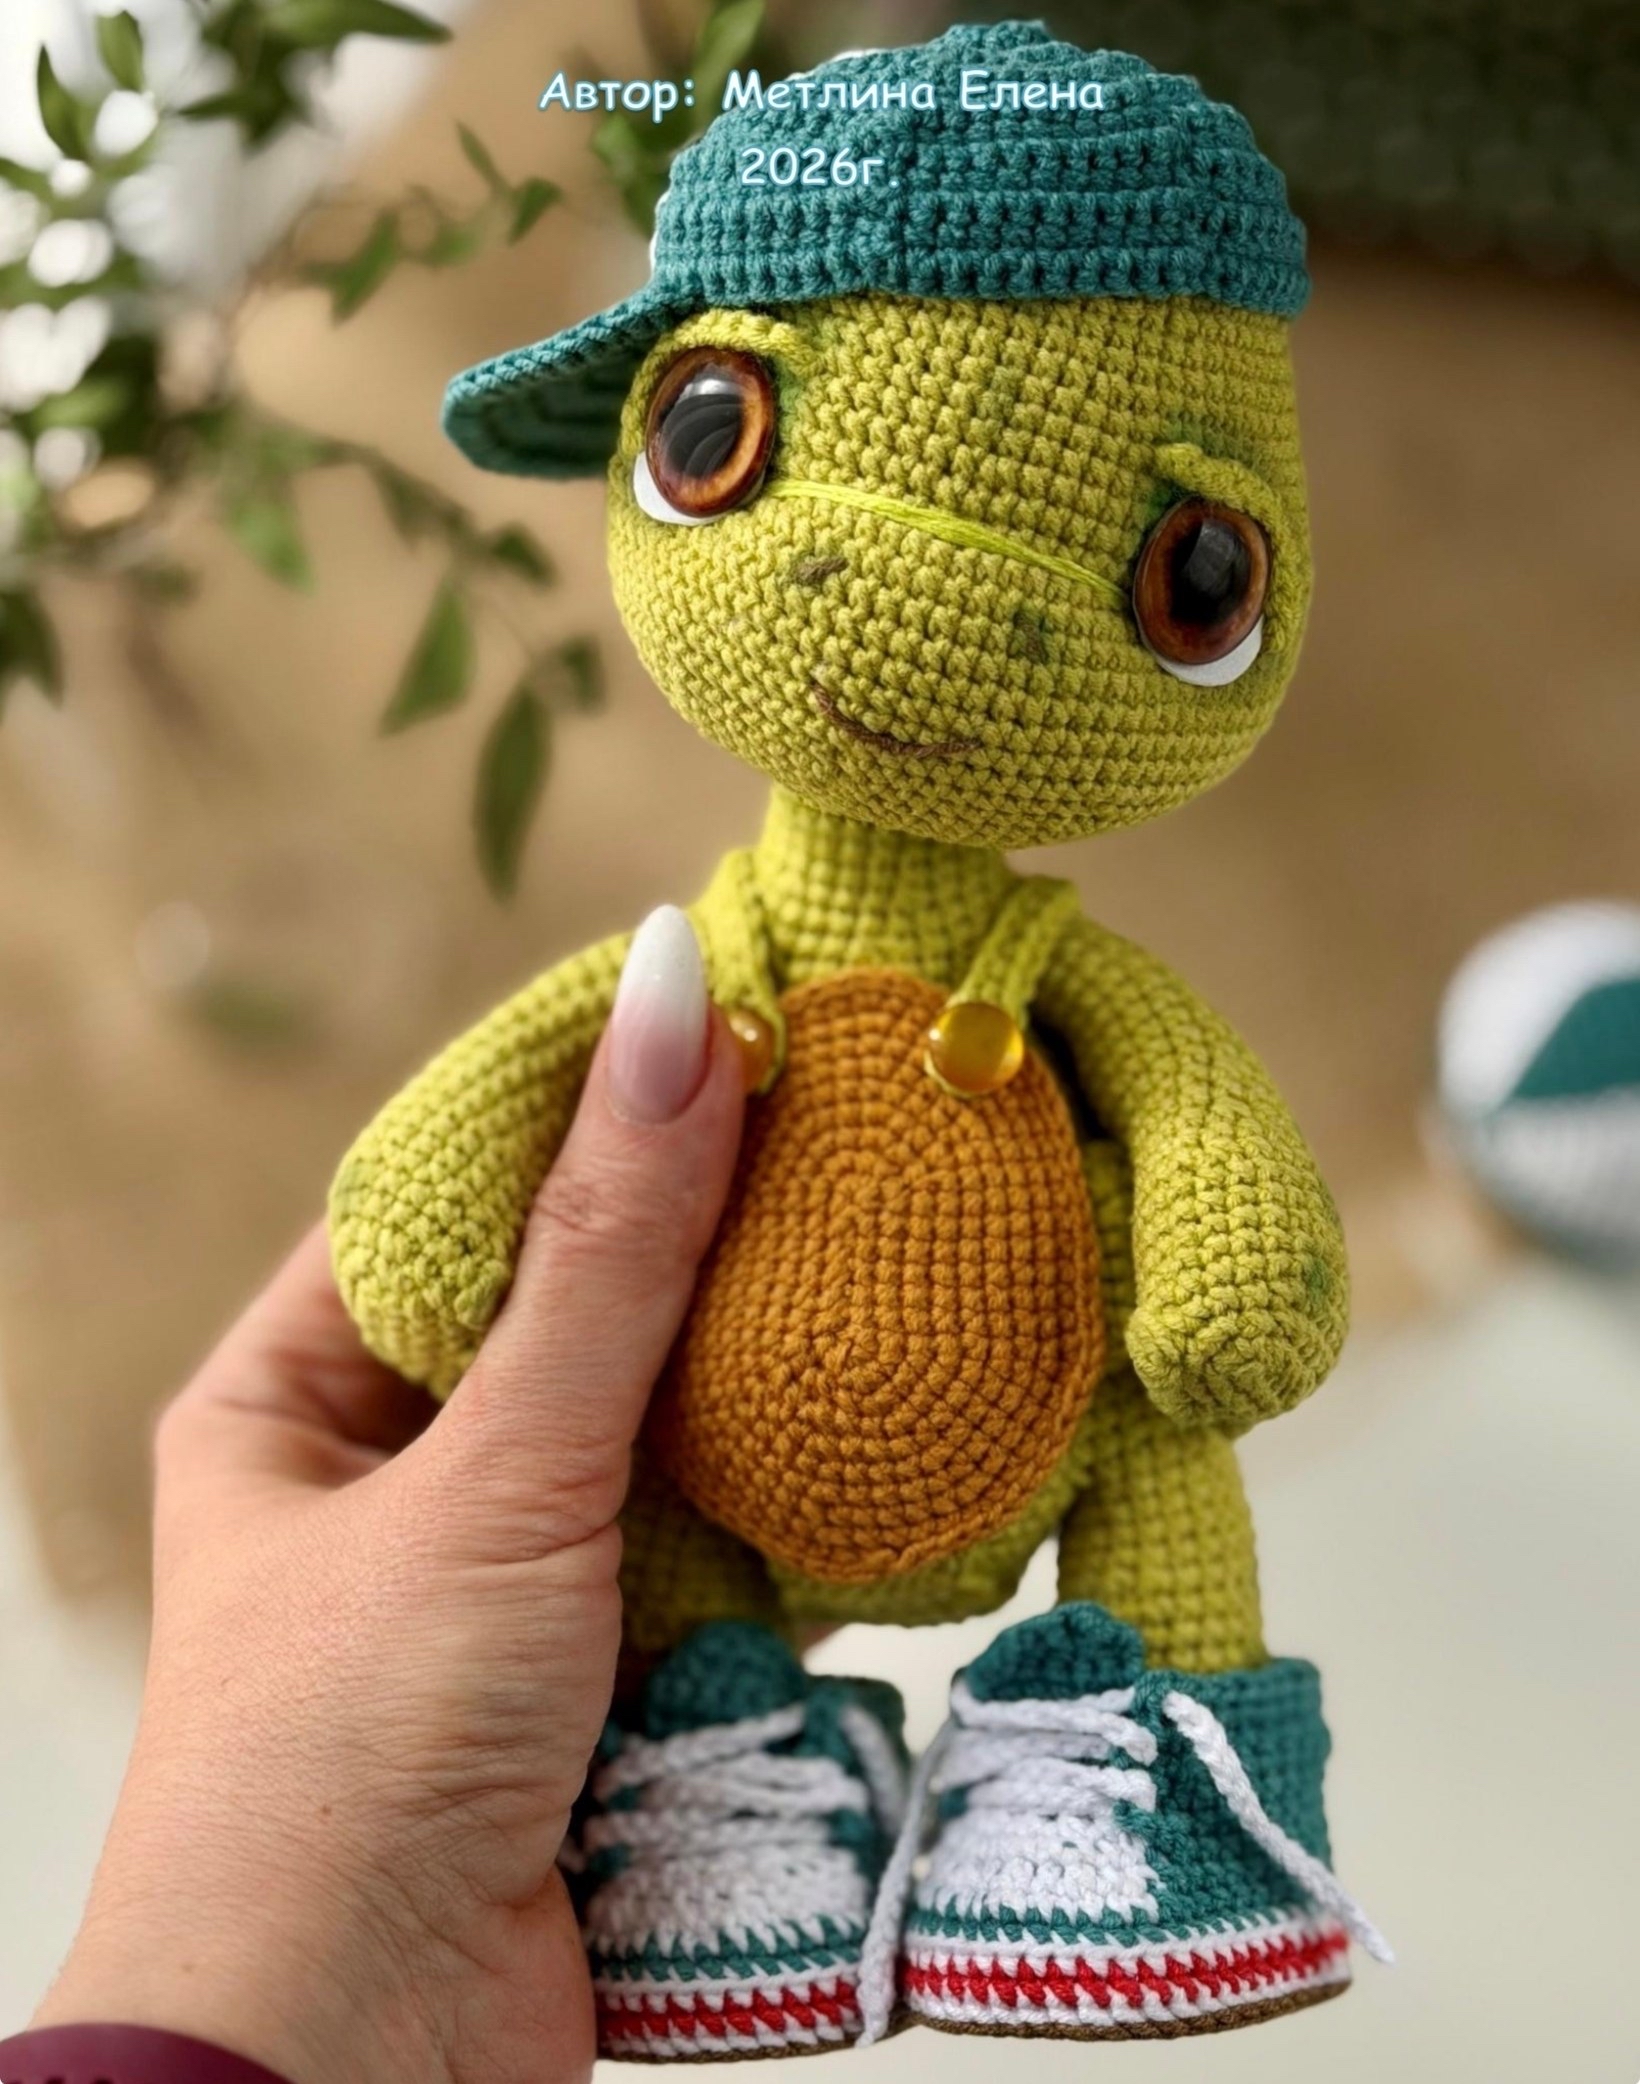
Welcome, fellow crochet enthusiasts! If you are looking for a project that is equal parts cute, challenging, and incredibly rewarding, you have come to the right place. Today, I am sharing a complete, detailed tutorial for creating a tiny, personality-filled crochet turtle. This isn’t just a simple turtle; this little guy comes fully dressed with a stylish cap, tiny sneakers, a little t-shirt, and even a shell backpack!
This project is perfect for intermediate crocheters who want to practice working with armatures (wire frames), assembling complex parts, and creating miniature clothing. The result is a sturdy, poseable turtle that looks like it just stepped out of a storybook. Let’s dive into the details!
Materials & Abbreviations
To ensure your turtle turns out exactly like the photos, I recommend using high-quality cotton yarn. Below is a comprehensive list of everything you will need. Please note that you can use similar yarn in terms of weight and yardage if these specific brands are unavailable.
Yarn Requirements
- Main Colors (for Body, Arms, Legs): Olive Green
- Shell Colors: Terracotta (for the bottom plastron) and Brown (for the top carapace base)
- Shell Accents: Asparagus Green (for shell spots)
- Clothing & Accessories: White, Turquoise (Sea Blue), Light Yellow, and Light Lime Green
- Sneakers: Brown, White, Red, and Turquoise
Tools & Notions
- Crochet Hook: 2.25mm (or a size that creates a very tight tension)
- Eyes: 20mm safety eyes (glass eyes with colored backings work beautifully)
- Felt: 22mm white felt disks (to place behind the eyes)
- Stuffing: Polyfill or hollowfiber
- Armature: 0.9mm metal wire (for the internal skeleton)
- Soling: Thin plastic or cardboard (to be cut into the shape of the shoe soles)
- Details: 5 small clothing buttons (10mm), super glue, embroidery needle, and strong thread
- Finishing: Fabric pastel (optional, for blushing the cheeks or adding texture)
US Crochet Abbreviations
- MR: Magic Ring
- Ch: Chain
- Sc: Single Crochet
- Inc: Increase (2 sc in one stitch)
- Dec: Decrease (sc 2 together)
- Sl st: Slip Stitch
- Hdc: Half Double Crochet
- Dc: Double Crochet
- Tr: Treble Crochet
- FPDC: Front Post Double Crochet
- BPDC: Back Post Double Crochet
- St(s): Stitch(es)
- (…) *: Repeat the instructions inside the parentheses the indicated number of times
Pro Tip: For a denser, more professional texture, you can use a “mixed” crochet technique. Instead of the standard way, pull the yarn through the loop to create a “cross” or “X” shaped stitch. This makes the fabric much tighter and minimizes gaps.
Step-by-Step Instructions
The Head
Start with the main Olive Green color. Stuff the head firmly as you work.
- 6 sc in MR (6)
- 6 inc (12)
- (1 sc, 1 inc) * 6 (18)
- (2 sc, 1 inc) * 6 (24)
- (3 sc, 1 inc) * 6 (30)
- (4 sc, 1 inc) * 6 (36)
- (5 sc, 1 inc) * 6 (42)
- (6 sc, 1 inc) * 6 (48)
- (15 sc, 1 inc) * 3 (51)
- 8 sc, 1 inc, (16 sc, 1 inc) * 2, 8 sc (54)
- (17 sc, 1 inc) * 3 (57)
- 57 sc (57)
- 9 sc, 1 inc, (18 sc, 1 inc) * 2, 9 sc (60)
- 60 sc (60)
- (9 sc, 1 inc) * 6 (66)
- 66 sc (66)
- 5 sc, 1 inc, (10 sc, 1 inc) * 5, 5 sc (72)
- 72 sc (72)
- (17 sc, 1 inc) * 4 (76)
- 76 sc (76)
- 9 sc, 1 inc, (18 sc, 1 inc) * 3, 9 sc (80)
- Rounds 22-27: 80 sc (80)
Eye Placement: If using safety eyes, insert them between rounds 18 and 19, spaced approximately 20 stitches apart. After inserting, prepare the eyelids (see below).
Eyes and Eyelids
Eyelids: Using the main color, make two identical pieces: 11 ch, starting from the 2nd ch from hook: 10 sc. Fasten off, leaving a long tail for sewing.
Assembly: Glue the 20mm eyes onto the 22mm white felt disks. Mark the eye spots on the head between rounds 18 and 19. Sew or glue the eyes in place, then sew the eyelids onto the top edge of the eyes. Use brown thread to embroider the mouth and nostrils for extra detail.
The Arms
Make 2 identical arms in Olive Green. Stuff lightly as you go.
- 6 ch, starting from 2nd ch from hook: 1 inc, 3 sc, 3 sc in the last stitch, then work along the other side of the chain: 4 sc (12)
- 2 inc, 3 sc, 3 inc, 3 sc, 1 inc (18)
- (1 sc, 1 inc) * 2, 3 sc, (1 sc, 1 inc) * 3, 4 sc, 1 inc (24) + 2 sc in back loops
- (2 sc, 1 hdc) * 3, 15 sc (24)
- Rounds 5-8: 24 sc (24)
- (10 sc, 1 dec) * 2 (22)
- 22 sc (22)
- (9 sc, 1 dec) * 2 (20)
- 20 sc (20)
- (8 sc, 1 dec) * 2 (18)
- Rounds 14-23: 18 sc (18)
Stuff the arms so they remain somewhat flat, with very little stuffing in the top section. Mark 8 stitches on the inner side of each arm to help with assembly.
The Legs
Make 2 identical legs in Olive Green. Stuff as you work.
- 9 ch, starting from 2nd ch from hook: 1 inc, 6 sc, 3 sc in the last stitch, then work along the other side of the chain: 7 sc (18)
- 2 inc, 6 sc, 3 inc, 6 sc, 1 inc (24)
- (1 sc, 1 inc) * 2, 6 sc, (1 sc, 1 inc) * 3, 7 sc, 1 inc (30)
- (2 sc, 1 inc) * 2, 6 sc, (2 sc, 1 inc) * 3, 8 sc, 1 inc (36) + 2 sc in back loops (mark start of round)
- 36 sc (36)
- 14 sc, (1 hdc, 2 sc) * 2, 1 hdc, 15 sc (36)
- 36 sc (36)
- 12 sc, (1 dec, 1 sc) * 3, 1 dec, 13 sc (32)
- 32 sc (32)
- 13 sc, 1 dec, 1 sc, 1 dec, 14 sc (30)
- (3 sc, 1 dec) * 6 (24)
- (2 sc, 1 dec) * 6 (18)
- (1 inc, 8 sc) * 2 (20)
- 1 sc, 1 inc, 9 sc, 1 inc, 8 sc (22)
- Rounds 15-17: 22 sc (22)
- 11 sc, 4 inc, 7 sc (26)
- 11 sc, 4 dec, 7 sc (22)
- Rounds 20-21: 22 sc (22)
- 1 dec, 10 sc, 1 dec, 8 sc (20)
- 20 sc (20)
Fold each leg in half and mark the center point. On one leg, mark 8 stitches to the right of center; on the other, 8 stitches to the left. This ensures they are aligned during assembly.
The Body & Armature
This part is essential for making your turtle poseable! Prepare two 20-inch pieces of wire and two 15-inch pieces of wire.
- 6 sc in MR (6)
- 6 inc (12)
- (1 sc, 1 inc) * 6 (18)
- (2 sc, 1 inc) * 6 (24)
- (3 sc, 1 inc) * 6 (30)
- (4 sc, 1 inc) * 6 (36)
- (5 sc, 1 inc) * 6 (42)
- (6 sc, 1 inc) * 6 (48)
Attaching Legs: In Round 9, join the legs to the body. For the first leg, work 8 sc, then 8 sc together with the marked stitches of the leg, then 16 sc, then 8 sc together with the marked stitches of the second leg, then 8 sc (48). In Round 10, work 8 sc, 12 sc along the outer edges of the first leg, 16 sc, 12 sc along the outer edges of the second leg, and 8 sc (56).
- Rounds 11-15: 56 sc (56)
- 14 sc, 1 dec, 26 sc, 1 dec, 12 sc (54)
- 21 sc, (1 dec, 2 sc) * 3, 1 dec, 19 sc (50)
- 22 sc, (1 dec, 1 sc) * 2, 1 dec, 20 sc (47)
- 47 sc (47)
- 1 dec, 10 sc, 1 dec, 20 sc, 1 dec, 11 sc (44)
- 18 sc, 1 dec, 5 sc, 1 dec, 17 sc (42)
- Rounds 22-23: 42 sc (42)
- (12 sc, 1 dec) * 3 (39)
- 39 sc (39)
- (11 sc, 1 dec) * 3 (36)
- 36 sc (36)
- (3 sc, 1 dec) * 6 (24)
- 24 sc (24)
Creating the Skeleton
Take the two 20-inch wires, fold them in half, and twist them together into a spiral. Insert one piece into each leg. Then, twist the two leg-wires together into a single central axis. Connect the arm wires to the body wires by twisting them into a single rod. Carefully bend the ends of the wire and wrap them in medical tape or electrical tape for safety. The wire should extend about 1.5-2 inches beyond the body.
Finally, sew the head onto the wire armature, ensuring the neck area is very tightly stuffed.
The Shell (Plastron & Carapace)
The shell is made in several parts to give it depth and a realistic look.
The Plastron (Bottom Part)
Using Terracotta yarn:
- 8 ch, starting from 2nd ch: 1 inc, 5 sc, 4 sc in the last stitch, then work the other side of the chain: 5 sc, 1 inc (18)
- 2 inc, 5 sc, 4 inc, 5 sc, 2 inc (26)
- (1 sc, 1 inc) * 2, 5 sc, (1 sc, 1 inc) * 4, 5 sc, (1 sc, 1 inc) * 2 (34)
- (2 sc, 1 inc) * 2, 5 sc, (2 sc, 1 inc) * 4, 5 sc, (2 sc, 1 inc) * 2 (42)
- 42 sc (42)
- (3 sc, 1 inc) * 2, 5 sc, (3 sc, 1 inc) * 4, 5 sc, (3 sc, 1 inc) * 2 (50)
- 50 sc (50)
- (4 sc, 1 inc) * 2, 5 sc, (4 sc, 1 inc) * 4, 5 sc, (4 sc, 1 inc) * 2 (58)
- (5 sc, 1 inc) * 2, 5 sc, (5 sc, 1 inc) * 4, 5 sc, (5 sc, 1 inc) * 2 (66)
- 66 sc (66)
The Carapace (Top Part)
This is made in two layers: a Brown base and a Green top layer.
Brown Base: Work two identical pieces. 8 ch, from 2nd ch: 1 inc, 5 sc, 4 sc in last stitch, work other side: 5 sc, 1 inc (18). Continue increasing through rounds 9 to follow the pattern until you reach 66 stitches. Lightly stuff the piece, but leave the center hollow so it sits flat against the turtle’s back.
Green Top Layer: Make two identical pieces. 8 ch, from 2nd ch: 1 inc, 5 sc, 4 sc in last stitch, work other side: 5 sc, 1 inc (18). Increase through rounds until you reach 66 stitches. Do not stuff these.
Assembly: Lay the brown piece down, place the green piece on top, and join them by crocheting around the edges. To add the shell spots, use Asparagus Green yarn. Make 6 small circles: MR, 2 ch, 2 dc, 1 ch, (3 dc, 1 ch) * 4, sl st (20). Sew these onto the green part of the shell.
Accessories
The Cap
Using Turquoise and White yarn, work in rows (turning each row with a 1 ch increase):
- Turquoise: 2 ch, in 1st ch: 2 sc. 2 inc (4). (1 sc, 1 inc) * 2 (6). 6 sc. (2 sc, 1 inc) * 2 (8). 8 sc. (3 sc, 1 inc) * 2 (10). Rounds 8-13: 10 sc (60).
- Make 5 more panels in turquoise and 1 in white. Sew them together to form a cap.
- Visor: Using turquoise, 4 sc in MR, 1 ch, turn. 4 inc (8). (1 sc, 1 inc) * 4 (12). (2 sc, 1 inc) * 4 (16). (3 sc, 1 inc) * 4 (20). (4 sc, 1 inc) * 4 (24). (5 sc, 1 inc) * 4 (28). (6 sc, 1 inc) * 4 (32). (7 sc, 1 inc) * 4 (36). Sew to the cap, ensuring the white section is centered at the front.
The Sneakers
Using Brown, White, Red, and Turquoise yarn. Follow the pattern for the base (9 ch start) and add colored stripes in rounds 7-11. Add a white “tongue” using 6 sc in MR, 6 inc (12), then 6 dec (6). Finally, create laces by making an 80-ch chain from white yarn.
The Ball & Clothes
Ball: Alternate Turquoise and White yarn in a spiral pattern. Start with 6 sc in MR, then increase by alternating colors until you reach 48 stitches. Decrease back down to the center.
Shorts: Use Sea Wave yarn. Work in rows. Join the two leg tubes with a 4-ch bridge to create a waist. Add a white drawstring using a 120-ch chain.
T-Shirt: Use Light Yellow and Light Lime. Work in rows to create the body and armholes. Finish with a button closure using small buttons and a crochet border.
Finishing
The final step is assembling the shell “backpack.” Use the olive green yarn to make two straps: 32 ch, 30 dc. Sew these onto the carapace. Finally, attach the shell to the turtle’s back, ensuring it fits snugly against the body.
Tips for Success
- Tight Tension: Amigurumi requires tight stitches so that stuffing doesn’t show through. If you find gaps, try a smaller hook.
- Safety First: Always ensure wire armatures are securely taped so they cannot poke through the crochet fabric.
- Symmetry: When sewing eyes or limbs, use stitch markers to ensure everything is perfectly centered.
- Details Matter: Don’t skip the tiny things like the mouth embroidery or the shell spots; they are what bring the character to life!
Happy crocheting!